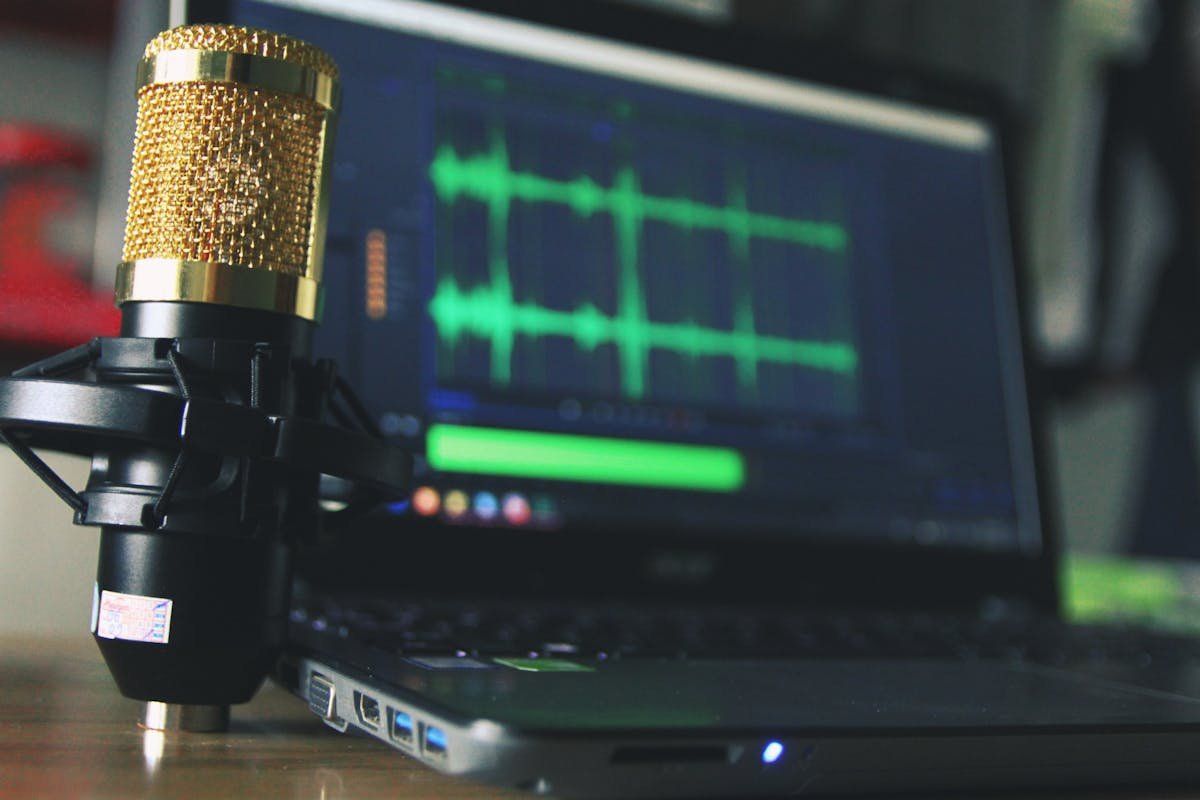
You click Zoom’s record button and every participant sees “This meeting is being recorded” — the room goes quiet, and the conversation you wanted to capture becomes a different conversation. This guide covers how to record Zoom, Teams, Google Meet, and any other video call on your computer without triggering the built-in recording announcement, including software methods (OBS), hardware methods (RECAP S2), and what to consider legally.
Why Built-In Recording Announces to Everyone
It’s not a bug — it’s by design. Zoom, Teams, and Meet are built for corporate environments where legal and HR departments require consent notifications. The recording announcement protects companies from liability.
But not every recording need is a corporate compliance situation:
You’re taking notes for yourself and don’t want to derail the meeting with “is everyone okay being recorded?”
You’re a participant, not the host and the host hasn’t enabled recording
You’re recording for personal reference — a doctor’s appointment over telehealth, a tutoring session, a client call where you need to capture details accurately
You’re a journalist or researcher conducting interviews where the announcement would change how your subject speaks
The built-in recording tools assume you want everyone to know. When that assumption doesn’t fit, you need a hardware solution.
Zoom Call Recording Methods Compared
Method
Works with Zoom / Teams / Meet
Records both sides
Announces to participants
Audio quality
Cost
Zoom/Teams/Meet built-in
Yes
Yes
Yes — everyone notified
Good
Free (with limits)
OBS / screen capture
Captures screen + system audio
Depends on setup
No
Variable
Free
Speakerphone + phone recorder
Yes
Both, poorly
No
Poor — echo, room noise
Free
RECAP S2 (hardware)
Yes — any app
Yes — both sides clearly
No
Excellent
$99 one-time
Why Not Just Use OBS or Screen Recording?
You can. OBS Studio and similar tools can capture system audio on most computers. But there are friction points:
Setup complexity — Routing system audio to OBS requires configuring virtual audio devices on Mac (BlackHole, Loopback) or enabling “Stereo Mix” on Windows (often disabled by default)
Audio quality varies — You’re capturing processed, compressed audio that’s already been through your computer’s audio stack
Your voice is mixed with theirs — Most screen capture setups record a single mixed audio track, making it hard to edit or transcribe
Failure modes are silent — If the audio routing breaks, you don’t know until after the call
On a Mac, OBS cannot capture system audio natively. You need a third-party virtual audio driver like BlackHole or Loopback. BlackHole is free but requires routing audio through macOS Audio MIDI Setup — if you’ve never done it, expect 15-30 minutes of configuration and testing before your first call. Loopback (by Rogue Amoeba, paid) is easier but adds a recurring cost.
On Windows, OBS can capture desktop audio via WASAPI, but many corporate laptops have Stereo Mix disabled by IT policy. You may need to install a virtual audio cable (VB-Audio, Voicemeeter) to route audio properly. Each of these tools adds a layer of complexity and a potential failure point.
RECAP S2 captures clean analog audio directly from your headset connection, before any processing. Your voice and their voice land on separate channels in stereo recording setups. Setup is plug-and-play — no software configuration, no virtual audio drivers, no per-OS quirks.
How RECAP Works with Computer Calls
RECAP S2 was originally designed for phone calls, but it works with any device that has a combo headset port — including laptops and computers.
The Key Insight
Modern laptops have a single 3.5mm combo jack that works with headsets (headphones + microphone in one connector). This is the same type of connection phones use. RECAP sits in the middle of that connection:
Your computer (Zoom, Teams, Meet, any app)
    |
    v
Combo headset jack (or USB-C adapter)
    |
    v
RECAP S2 --- copies audio ---> Recording device
    |
    v
Your wired headset (you hear + speak normally)
By the time audio reaches your headset jack, your computer has already decoded it. Zoom has decompressed it. Teams has decrypted it. The analog audio signal is just sound — and RECAP captures a copy before it reaches your ears.
The meeting participants have no indication anything is different. No software is running on your computer that could trigger a notification. The recording happens at the hardware level.
A wired headset with 3.5mm TRRS connector (most standard earbuds with mic work)
A computer with combo headset jack — most laptops have this; some desktops may need a USB headset adapter
A recording device — a second computer, voice recorder, phone, or tablet
Setup Steps
Plug RECAP S2 into your computer’s headset jack
Plug your wired headset into RECAP S2’s headset port
Connect RECAP S2’s output cable to your recording device’s microphone input
Join your Zoom/Teams/Meet call as normal
Start recording on your recording device
That’s it. You hear the call through your headset. You speak through your headset mic. RECAP silently copies both sides to your recorder.
Recording Device Options
Computer with stereo mic input: Use Audacity (free) set to record in stereo. Your voice appears on one channel, their voices on the other. This makes editing and transcription much easier.
Most modern laptops have mono-only mic inputs. Check yours with our free audio scanner. If it shows MONO, you’ll need a USB stereo audio adapter — see our compatible adapters guide.
Voice recorder: Any digital voice recorder with a stereo external mic input works. Just press record.
iPhone or iPad: Connect a USB audio adapter with stereo mic input to your iPhone’s Lightning or USB-C port, then record using Voice Memos (built-in) or any recording app. Voice Memos saves files locally — no cloud upload required. This is a good option if you want to avoid installing recording software on your work computer entirely.
Android phone or tablet: Same approach — USB audio adapter into USB-C, then record with the built-in recorder app or a third-party app like Easy Voice Recorder.
Which Apps Work
RECAP captures audio from the headset connection. It doesn’t know or care which app is generating the audio. If you can hear it through your wired headset, RECAP can record it:
Zoom (meetings and webinars)
Microsoft Teams (calls and meetings)
Google Meet
Webex
Slack huddles
Discord (voice channels and calls)
FaceTime (Mac)
Any browser-based video call (telehealth portals, online classrooms, etc.)
Regular phone calls through computer apps (Google Voice, Vonage, RingCentral)
The app is irrelevant. The hardware captures whatever audio flows through your headset connection.
FaceTime on Mac deserves a special mention. Unlike Zoom and Teams, FaceTime has no built-in recording at all — not even with an announcement. Your only options are screen recording (which captures compressed audio) or a hardware solution like RECAP that captures clean audio from the headset jack. If you regularly take FaceTime calls on your MacBook and want a reliable recording, this is the setup.
Laptops Without Headset Jacks
Some newer laptops (especially USB-C-only MacBooks and ultrabooks) have removed the 3.5mm jack entirely. You’ll need a USB-C to 3.5mm headset adapter.
Important: Use an adapter with a built-in DAC that supports headset mode (both audio out and mic in). The Apple USB-C to 3.5mm adapter works well. Cheap passive adapters often don’t carry the microphone signal. See our compatible adapters guide for tested options.
Once you have the adapter, the setup is identical: Adapter → RECAP S2 → Headset, with RECAP’s output going to your recorder.
Frequently Asked Questions
Does this work whether I’m the host or a participant?
Yes. RECAP records at the hardware level on your end — it doesn’t matter who’s hosting the meeting. If you’re the host and want to record without triggering the “this meeting is being recorded” banner, RECAP lets you do that. If you’re a participant and the host hasn’t enabled recording at all, RECAP still captures what comes through your headset.
Will the other participants know?
RECAP is a passive hardware device. It doesn’t send any signal, trigger any notification, or change the call in any way. Other participants have no technical way to know you’re recording.
What about video?
RECAP captures audio only. For most purposes — notes, transcription, reference — audio is what you need. If you need video, you’d pair RECAP’s audio recording with a screen capture, but for meeting content, the conversation is usually what matters.
Can I use Bluetooth headphones?
No. RECAP requires a wired connection because it captures analog audio from the headset cable. Bluetooth audio never passes through a wire — it’s transmitted wirelessly from your computer to your headphones. There’s no signal for RECAP to capture.
What if my computer has separate headphone and mic jacks?
Older desktops often have separate pink (mic) and green (headphone) jacks instead of a combo jack. RECAP is designed for combo jacks. Two solutions: use a USB headset adapter that presents a single combo jack to your computer (the cleanest approach), or use a dual-TRS-to-TRRS combiner cable to merge the two jacks into one TRRS port. Either way, RECAP plugs into the combo side.
I thought RECAP was only for phone calls. Does it work with a laptop?
RECAP captures audio from any device with a 3.5mm combo headset jack — phones, laptops, tablets, desktops. The signal chain is the same: device → RECAP → headset, with a copy going to your recorder. If your laptop has a headset jack (most do) or you add a USB-C headset adapter, RECAP works for Zoom, Teams, FaceTime, and every other calling app on your computer.
How is the audio quality?
RECAP captures clean analog audio before any recording compression. Quality is limited by your headset microphone (for your voice) and the call’s audio codec (for their voice). In practice, this means clear, intelligible audio suitable for transcription or archival.
Is this legal?
Recording laws vary by jurisdiction. Some places require all parties to consent (“two-party consent”), others only require one party — you — to consent (“one-party consent”). RECAP is a recording tool; how you use it is your responsibility. If you’re unsure, consult a lawyer or check our guide to call recording laws.
Record Zoom, Teams, Meet, and every other video call — without the announcement.
Get RECAP S2 — $99 | No notifications. No subscriptions. Works with every calling app.
One-time purchase. No batteries, no monthly fees. Ships worldwide.
Already have RECAP and want to record phone calls too? It works the same way — see the full guide.
You need to record a WhatsApp call. Or a Signal call. Or a Zoom meeting you joined from your phone. You open your settings, search for a recording option, and find nothing. You try your phone’s built-in call recording feature and it does not work. You search the App Store or Play Store for a recording app and everything looks sketchy, subscription-heavy, or flat-out broken.
You are not missing something. Your phone is deliberately blocking you from recording these calls. Here is why – and the one method that actually works.
Why You Can’t Record These Calls with Software
Both Apple and Google have locked down call recording at the operating system level. The restrictions are designed around the built-in Phone app, and third-party calling apps get no recording support at all.
iPhone (iOS)
Apple added built-in call recording to the iPhone. But it only works with the Phone app and FaceTime. Open WhatsApp, Signal, Zoom, Microsoft Teams, or any other calling app and the record button simply does not exist. There is no API, no workaround, and no setting to change this. Apple’s recording feature is hard-wired to their own calling apps.
Third-party recording apps on iPhone have never been able to access call audio directly. The few that exist (like TapeACall) use a three-way calling workaround that only works with carrier phone calls – not with WhatsApp, Signal, or any VoIP app.
Screen recording does not help either. If you try using iOS screen recording during a WhatsApp or Signal call, it captures the video on screen but mutes the other party’s audio from the recording. Apple intentionally strips incoming call audio from screen recordings to prevent exactly this kind of workaround.
Android
Google has been tightening restrictions on call recording with each Android release. The built-in recording features on Pixel (Google Phone app) and Samsung (Samsung’s One UI) only work with the native dialer – standard carrier phone calls. They do not activate during WhatsApp, Signal, Zoom, or any third-party calling app.
Third-party recording apps like Cube ACR face the same wall. On modern Android versions, these apps can typically only record your microphone audio, not the other party’s voice. This is an OS-level restriction that no app can bypass without root access.
Screen recording on Android has the same limitation as iPhone for most devices: the remote party’s call audio is either muted or severely degraded in the recording.
The Bottom Line
There is no software solution – not an app, not a built-in feature, not screen recording – that reliably records both sides of a WhatsApp, Signal, Zoom, or Teams call on a modern iPhone or Android phone. The operating systems do not allow it.
Recording Methods Compared
Method
Works with WhatsApp / Signal / Zoom
Records both sides
No announcement
Audio quality
Cost
Screen recording
Captures screen only
No – strips remote audio
Yes
N/A (no call audio)
Free
Speakerphone + external mic
Yes
Both sides, poorly
Yes
Poor – room echo, noise
Free
iPhone / Android built-in recording
No – Phone app only
Yes (Phone app)
No (mandatory announcement)
Good
Free
Third-party recording apps
No – blocked by OS
Your voice only
Varies
Poor to none
Free—Subscription
RECAP S2 (hardware adapter)
Yes – every app
Yes – both sides clearly
Yes
Excellent
$99 one-time
How RECAP S2 Records Any Calling App
RECAP S2 is a hardware audio adapter that works at the analog level, completely outside the reach of iOS and Android software restrictions.
The Signal Path
Here is how audio flows when you use RECAP S2:
Your phone (any calling app)
    |
    v
Headset jack (or adapter)
    |
    v
RECAP S2 --- copies audio ---> Recording device (computer, voice recorder, tablet)
    |
    v
Your wired headset (you hear + speak normally)
The key insight: by the time audio reaches the headset jack, your phone has already decoded it. WhatsApp has decrypted it. Signal has decrypted it. Zoom has decoded it. The analog audio signal coming out of the headset connection is just sound – it contains both sides of the conversation, and it does not matter which app generated it.
RECAP S2 sits in the middle of that signal path, makes a copy, and sends it to your recording device. You continue hearing the call through your headset as normal. The other party has no indication that anything is different.
Every App That Works
Because RECAP captures audio from the headset connection, it works with any app that routes sound through wired headphones. That includes:
WhatsApp (voice calls and video calls)
Signal (voice calls and video calls)
Telegram (voice calls and video calls)
Zoom (mobile app meetings and calls)
Microsoft Teams (calls and meetings)
Google Meet (mobile app)
FaceTime (audio and video)
Discord (voice channels and calls)
Facebook Messenger (voice and video calls)
Viber
LINE
WeChat
Skype (legacy – Skype was shut down in May 2025 and now redirects to Microsoft Teams; if you still have the app installed, RECAP works with it)
Regular phone calls (carrier calls through the Phone app)
If you can hear the other person through your wired headset, RECAP can record it. The app is irrelevant.
Setup Guide
Setting up RECAP S2 takes a few minutes. The process is the same regardless of which calling app you use.
What You Need
RECAP S2 audio adapter ($99 – one-time purchase, no subscriptions)
A wired headset with a 3.5mm TRRS plug (most standard earbuds with a built-in microphone work). Bluetooth headsets will not work – the audio must travel through the wire.
An adapter if your phone lacks a 3.5mm headphone jack (most modern phones). See our compatible adapters guide for tested options.
A recording device – a computer, digital voice recorder, tablet, or second phone with any voice recording app.
iPhone Setup
Connect the appropriate Apple adapter to your iPhone — Lightning to 3.5mm for iPhones with a Lightning port, or USB-C to 3.5mm for iPhones with a USB-C port.
Plug RECAP S2 into the adapter.
Plug your wired headset into the RECAP S2 headset port.
Connect the RECAP S2 output cable to your recording device’s microphone input.
Open your calling app (WhatsApp, Signal, Zoom, whatever you need) and make or receive a call. Hit record on your recording device.
Connect a USB-C to 3.5mm adapter with a built-in DAC to your Android phone. (If your phone still has a 3.5mm jack, skip this step.)
Plug RECAP S2 into the adapter (or directly into the headphone jack).
Plug your wired headset into the RECAP S2 headset port.
Connect the RECAP S2 output cable to your recording device’s microphone input.
Open your calling app and make or receive a call. Hit record on your recording device.
Important for Samsung and Pixel users: You need a USB-C to 3.5mm adapter with a built-in DAC (not a cheap passive adapter). The Apple USB-C adapter works on all Android phones. See our compatible adapters guide for the full tested list.
RECAP S2 works with both WhatsApp voice calls and video calls. During video calls, you hear and speak through your wired headset while the video displays on screen normally – RECAP captures the audio portion.
WhatsApp uses end-to-end encryption, which protects your call data while it travels over the internet. By the time the audio reaches your headset jack, your phone has already decrypted it. RECAP captures the decrypted analog audio – the same audio you hear with your ears. Encryption protects data in transit, not what plays through your headphones.
Signal
Signal is designed for maximum privacy, and its encryption is among the strongest available. The same principle applies: encryption protects the data between phones. Once Signal decrypts the audio on your device and sends it to your headset, it is an analog audio signal like any other. RECAP captures that signal. The encryption is not broken, bypassed, or weakened – the recording happens after decryption, at the hardware level.
Zoom and Microsoft Teams
RECAP S2 works when you join a Zoom or Teams meeting from the mobile app with your headset connected. This is a useful alternative to Zoom’s and Teams’ built-in recording features, which notify all participants that the meeting is being recorded. With RECAP, the recording happens locally at your headset connection – no notification is sent to other participants.
Note: Skype was discontinued by Microsoft in May 2025. Skype users were migrated to Microsoft Teams. The same hardware setup works with Teams.
Frequently Asked Questions
Can I record WhatsApp calls on iPhone?
Not with any built-in feature or app. Apple’s built-in call recording only works with the Phone app and FaceTime – not WhatsApp. There is no App Store app that can record WhatsApp call audio on iPhone. RECAP S2 records WhatsApp calls (and every other calling app) because it captures audio from the headset connection at the hardware level, outside of Apple’s software restrictions. See our iPhone call recording guide for the full setup.
Does recording Signal calls break the encryption?
No. Signal’s end-to-end encryption protects your call data while it travels between devices over the internet. RECAP captures audio after your phone has already decrypted it – at the analog headset connection. This is the same audio you hear through your headphones. The encryption remains intact for its intended purpose (protecting data in transit). Recording what you hear through your own headset does not compromise Signal’s security model.
Will the other person know I’m recording?
RECAP S2 is a passive hardware device. It does not send any notification, play any announcement, or alter the call in any way. The other party has no technical indication that you are recording. That said, recording laws vary by jurisdiction – some places require you to inform the other party. Check your local laws before recording any call.
Can I record video calls, or just audio?
RECAP S2 captures audio only. During a video call on WhatsApp, Signal, Zoom, or any other app, the video displays on your phone screen as normal while RECAP captures the audio portion through your headset connection. If you need both audio and video, you would need to pair RECAP’s audio recording with a separate screen capture – but for most use cases, the audio is what matters.
What about Zoom’s built-in recording?
Zoom’s built-in recording feature works, but it notifies all participants that the meeting is being recorded. If you are the host, this may be fine. If you are a participant and want a personal record of the meeting, or if the notification is a problem for your use case, RECAP S2 records locally without any notification to other participants. The same applies to Microsoft Teams’ built-in recording.
Do I need different equipment for different apps?
No. The exact same RECAP S2 setup works with every calling app. Once you have your headset, adapter, and recording device connected, you can switch between WhatsApp, Signal, Zoom, Teams, FaceTime, or any other app without changing anything. The hardware does not know or care which app is generating the audio.
Record WhatsApp, Signal, Zoom, and every other calling app – on any phone.
You recorded a phone call and played it back only to hear hiss, hum, or a low rumble underneath the conversation. It happens. The good news is that Audacity — a free, open-source audio editor — has a solid noise reduction tool that can clean up most recordings in under a minute. This guide walks you through the entire process, from opening your file to exporting a clean version.
What You Need
Audacity — Free download from audacityteam.org. Available for Windows, Mac, and Linux.
Your audio file — WAV, MP3, M4A, FLAC, or any other common format. Audacity opens them all. If you recorded a phone call with RECAP S2 or similar hardware, you likely have a WAV or MP3 file ready to go.
That’s it. No plugins or paid add-ons required.
Step 1: Open Your Recording
Launch Audacity and go to File > Open. Navigate to your audio file and select it. Audacity will import the file and display the waveform on screen.
If you recorded in a format like M4A, Audacity may need the FFmpeg library to import it. The program will prompt you if that’s the case — follow the on-screen instructions to install it once, and you won’t need to think about it again.
Step 2: Select a Noise Sample
Before Audacity can remove noise, it needs to know what the noise sounds like. Find a section of your recording where nobody is talking — just the background noise by itself. This is your noise sample.
Click and drag in the waveform to highlight 1 to 2 seconds of that silent-but-noisy section. The longer the sample, the more accurate the noise profile, but even half a second works in a pinch.
Look for gaps between sentences, the beginning of the recording before the call connects, or any pause in the conversation. You want pure noise with no speech mixed in.
Step 3: Get the Noise Profile
With your noise sample still selected, go to Effect > Noise Reduction. In the dialog that opens, click Get Noise Profile.
The dialog will close immediately. It may look like nothing happened, but Audacity has now analyzed your selection and built a profile of the noise frequencies. This profile is what it will use to separate noise from speech in the next step.
Step 4: Apply Noise Reduction
Now select the entire track by pressing Ctrl+A (or Cmd+A on Mac). You want the noise reduction applied to the whole recording, not just the sample.
Go to Effect > Noise Reduction again. This time, you’ll adjust the settings and apply them.
Recommended starting settings:
Setting
Value
What It Does
Noise reduction (dB)
12
How much quieter the noise will become. Higher values remove more noise but risk distorting speech.
Sensitivity
6
How aggressively Audacity identifies sounds as noise. Higher values catch more noise but may also catch parts of speech.
Frequency smoothing (bands)
3
Smooths out the reduction across neighboring frequencies. Helps avoid a “musical” or watery artifact in the result.
Click Preview to hear a few seconds of the result before committing. If the voice sounds natural and the noise is reduced, click OK to apply.
A word of caution: Don’t crank the noise reduction to 24 dB on the first pass hoping to eliminate every trace of noise. Over-reduction makes voices sound robotic or like they’re underwater. Start at 12 dB, listen, and increase by a few dB at a time if you need more. You can always run the effect again — applying two passes of moderate reduction often sounds better than one pass of aggressive reduction.
Step 5: Normalize the Audio (Optional)
After noise reduction, your audio may be quieter than you’d like. Normalizing brings the volume up to a consistent level without clipping.
Go to Effect > Normalize and set the peak amplitude to -1.0 dB. Leave the “Remove DC offset” box checked. Click OK.
This ensures the loudest point in your recording sits just below the maximum level, giving you a full, even volume throughout the file.
Step 6: Export Your Clean Recording
Go to File > Export Audio. Choose your format:
WAV — Lossless quality. Best if you plan to edit further or archive the recording.
MP3 — Smaller file size. Good for sharing or uploading. Use 128 kbps or higher for voice recordings.
Name your file, choose a destination folder, and click Save.
Bonus: Quick EQ for Phone Call Audio
Phone calls carry a narrow band of audio frequencies — roughly 300 Hz to 3,400 Hz. Anything outside that range is not voice; it’s noise. You can use Audacity’s EQ to cut those unwanted frequencies and get a noticeably cleaner result.
Go to Effect > Filter Curve EQ (or Graphic EQ, depending on your version). Then:
Roll off everything below 200 Hz. This removes low-frequency rumble, electrical hum, and HVAC noise.
Roll off everything above 4,000 Hz. This removes high-frequency hiss and static.
Apply this before or after noise reduction — either order works, though applying EQ first can make the noise reduction step more effective since there’s less noise for it to deal with.
Tips for Better Recordings
If you’re recording phone calls with RECAP S2, the audio signal itself is typically clean. RECAP taps the headset audio directly at line level, so there’s no ambient room noise in the signal. When noise does show up, it usually comes from the recording device — a computer’s built-in mic input picking up electrical interference, gain set too high in the recording software, or a ground loop between devices.
A few things that help:
Use proper input levels. Set your recording software’s input gain so peaks hit around -12 dB to -6 dB during normal speech. This leaves headroom and keeps the noise floor low.
Use a USB audio interface if your computer’s built-in audio input introduces noise. Even an inexpensive one will be quieter.
Check your cables. A loose or damaged 3.5mm connection can introduce crackling and static.
Yes. If you use OBS Studio for recording, it has built-in noise suppression filters you can apply in real time during the recording — no post-processing needed. Other options include paid tools like iZotope RX and Adobe Podcast’s online enhancer. Our software guide covers several options.
Will noise reduction affect voice quality?
It can, if you overdo it. Aggressive settings strip out frequencies that overlap with speech, making voices sound thin, hollow, or robotic. Start with a noise reduction value of 12 dB, preview the result, and increase only if needed. Two moderate passes sound better than one heavy pass.
What if I can’t find a section of pure noise in my recording?
Look at the very beginning or end of the file — there’s often a second or two before the call connects or after it ends. If your entire recording has voice throughout, find the quietest gap between sentences. Even a fraction of a second can work, though a longer sample gives Audacity more data to build an accurate noise profile.
Your recording sounds distorted. The audio is crunchy, harsh, or outright painful to listen to. When you open the file in an editor, the waveform peaks are chopped flat instead of rounded. This is clipping — and it happens when the audio signal is louder than what your recording equipment can handle.
Clipping is one of the most common audio problems, and in most cases it is entirely preventable. This guide covers what causes it, how to stop it before it happens, and what you can do to salvage a recording that already has clipping damage.
What Clipping Looks Like
Open a clipped recording in a waveform editor like Audacity. Instead of smooth, rounded peaks and valleys, you will see flat tops and flat bottoms — the waveform hits the maximum level and stays there, as if someone took a pair of scissors to every peak.
A good way to think about it: normal audio looks like rolling hills. Clipped audio looks like a brick wall. The louder the original signal, the more of the waveform gets shaved off, and the worse the distortion sounds.
What Causes Clipping
Clipping occurs when the audio signal exceeds the maximum level your recording device can capture. Several things can push a signal past that limit:
Input level too high. The microphone or line input volume on your computer is turned up higher than the incoming signal requires. This is the most common cause.
Source too loud. The phone volume is set too high, or the audio source is outputting a strong line-level signal into a sensitive mic-level input. Hardware adapters like RECAP S2 output line-level audio, which is significantly hotter than what a typical mic input expects.
Microphone Boost enabled. Many computers have a Microphone Boost setting that adds extra gain on top of the input volume. This can push an otherwise acceptable signal well over the limit.
Multiple gain stages. Every device in the audio chain — the phone, the adapter, the computer — can add its own gain. These compound. A signal that is slightly hot at one stage becomes severely clipped after passing through two or three stages of amplification.
How to Prevent Clipping Before Recording
Prevention is always more effective than repair. A few adjustments before you hit record will save you from dealing with damaged audio later.
Lower the input volume on your computer. This is the single most effective fix. Open your system’s sound settings and reduce the recording input level. For a detailed walkthrough, see our microphone volume guide.
Disable Microphone Boost. On Windows, go to Sound settings, open the Recording tab, right-click your input device, select Properties, then go to the Levels tab. If Microphone Boost is enabled, set it to 0 dB.
Lower the phone volume slightly. If the audio source itself is too loud, reducing the volume at the source is the cleanest fix.
If using RECAP S2: The adapter outputs clean line-level audio, which is hotter than mic-level. Start with your computer’s input volume at 40-50% and adjust from there. For full setup instructions, see our computer recording guide.
Do a test recording. Before an important call, make a short test call and check the levels. Look at the waveform — if the peaks are hitting the top, lower the input. Aim for peaks around -6 dB, which gives you headroom without sacrificing quality. Adjust and repeat until the levels look clean.
How to Fix Clipping After Recording
If you already have a clipped recording, there are tools that can help — but set your expectations appropriately. Mild clipping can be improved. Severe clipping causes permanent data loss that no software can fully reverse.
Clip Fix (Audacity)
Go to Effect > Clip Fix. This effect examines the flat-topped peaks and interpolates what the original waveform probably looked like, reconstructing the missing curve. It works best on recordings with mild, occasional clipping.
Recommended settings: set the threshold to around 95% of maximum amplitude, and reduce the amplitude slightly to leave room for the restored peaks. Preview the result before applying — if the audio still sounds harsh, the clipping may be too severe for this approach.
Limiter for Future Recordings (Audacity)
While not a fix for existing clipping, applying a limiter during recording or as a post-processing step prevents future clipping. Go to Effect > Limiter, set it to “hard limit” at -1 dB. This catches peaks just before they hit the ceiling and holds them below the clipping threshold.
The Honest Truth About Severe Clipping
When peaks are flat-lined for extended stretches, the original audio data is gone. Software can guess at what was there, but the result is an approximation at best. If the recording is critical, professional audio restoration services may be able to improve it marginally, but even they cannot recreate data that was never captured. The takeaway: always get the levels right before you record.
Clipping vs. Other Distortion
Not all audio problems are clipping. Here is how to tell the difference:
Crackling or popping is usually caused by buffer underruns, a bad cable, or an incompatible audio device. The waveform will show sharp spikes rather than flat-topped peaks. This is a hardware or driver issue, not a level issue.
Muffled or underwater sound typically indicates a sample rate mismatch or the wrong input device being selected. Check that your recording software is using the correct input and that the sample rate matches your device’s settings.
Constant buzz or hum points to electrical interference or a ground loop. This shows up as a steady wave pattern overlaid on your audio, usually at 50 Hz or 60 Hz. It is unrelated to signal level.
If you are unsure which problem you are dealing with, see our software guide for recording setup recommendations that help avoid all of these issues.
Tips for RECAP S2 Users
RECAP S2 outputs clean, consistent line-level audio. If you hear clipping in your recordings, the issue is almost always on the computer side — the input gain is set too high for a line-level signal.
Start with your computer’s input volume at 40-50%. Make a test call and check the waveform. Adjust until the peaks sit around -6 dB — loud enough to be clear, with enough headroom to avoid clipping on louder moments.
If your computer only has a mic input and no dedicated line input, the signal may be too hot even at the lowest volume setting. In this case, a USB audio adapter with a line-level input will solve the problem cleanly. See our adapter guide for tested recommendations.
FAQ
Can I fix badly clipped audio? Mildly clipped audio can be improved with tools like Audacity’s Clip Fix effect, which estimates and reconstructs the missing peaks. Severely clipped audio — where the waveform is flat-lined for long stretches — is permanently damaged. The original data was never captured, so no software can fully restore it.
Is clipping the same as peaking? No. Peaking means the signal is approaching maximum level. Clipping means it exceeded the maximum and was cut off. A signal can peak without clipping, and brief peaks near 0 dB are normal. Clipping is what happens when the signal tries to go beyond what the system can represent — that is when distortion occurs.
If you need to record phone calls on your computer for legal documentation, business compliance, journalism, or personal reference, this guide covers every method available — including the complete hardware setup and recording process on both Windows and Mac. By the end, you should have working call recording in a single sitting.
Methods to Record Phone Calls on a Computer
There are several ways to capture phone call audio on a PC or Mac. Each method has different trade-offs in audio quality, reliability, and convenience. Here is an honest overview before we dive into the step-by-step instructions.
The RECAP S2 ($99) is a dedicated audio adapter that connects between your phone and a wired headset, then outputs both sides of the call directly to your computer’s microphone input. Because it captures the electrical audio signal rather than re-recording through the air, you get clean, full-fidelity audio of both voices. No apps, no batteries, no subscriptions — just a hardware connection.
Trade-offs: Requires a wired headset (not Bluetooth), an adapter for phones without a headphone jack, and a separate recording setup on your computer. The rest of this guide walks through the full RECAP S2 setup in detail.
The simplest approach: put your phone on speaker and use your computer’s built-in microphone (or an external USB microphone) to record the room audio.
How: Place your phone near your computer’s microphone, start a call on speaker, and hit record in any audio software (Audacity, OBS, QuickTime, Windows Sound Recorder).
Trade-offs: Audio quality is poor — you pick up room echo, background noise, and your voice will be much louder than the caller’s. Recordings are often unusable for transcription or legal purposes. This method works in a pinch but is not suitable for anything that requires clear, reliable audio.
Method 3: Google Voice Recording to Computer
If you make calls through Google Voice on your computer’s web browser, you can record incoming calls directly. Google Voice has a built-in recording feature (press 4 during a call to start recording), but it only works on incoming calls and announces the recording to all parties.
Trade-offs: Only works for incoming calls made through Google Voice. The recording announcement cannot be disabled. Call quality depends on your internet connection. You cannot record outgoing calls. Not suitable if you need discreet or flexible recording.
Method 4: Third-Party VoIP Apps with Built-In Recording
Some VoIP (Voice over IP) applications — such as Skype (discontinued May 2025, now redirects to Microsoft Teams), Zoom, Microsoft Teams, and other conferencing tools — offer built-in call recording when you make phone calls through them.
Trade-offs: Requires making your calls through the app rather than your phone’s native dialer. Many VoIP apps notify all participants that recording is active. Recording quality depends on your internet connection. Monthly subscriptions may apply for phone number access. Not practical if you need to record standard cell phone calls from your phone’s regular number.
Why RECAP S2 Is the Best Option for Most Users
Unlike speakerphone recording, RECAP S2 captures a clean analog signal — no room noise, no echo, balanced volume on both sides. Unlike Google Voice or VoIP apps, it works with any phone call from any carrier, on any phone, using your regular phone number. There is no recording announcement, no subscription, and no dependency on internet quality. For anyone who needs reliable, high-quality phone call recordings on their computer, RECAP S2 is the most straightforward solution.
Recording phone calls to a computer with RECAP S2 requires a hardware adapter to route the call audio from your phone to your PC. Here is the complete list:
RECAP S2 audio adapter ($99) — connects between your phone and headset, and outputs both sides of the call to a recording device
A wired headset with a 3.5mm TRRS plug (most earbuds with a built-in microphone work)
A USB-C or Lightning to 3.5mm adapter — if your phone does not have a headphone jack (most modern phones). See our adapter compatibility guide for tested recommendations.
Recording software on your PC — Audacity (free), OBS Studio (free), Windows Sound Recorder, QuickTime, or another audio recorder
You may also need one of the following depending on your computer’s audio ports:
A USB audio adapter — if your PC has no 3.5mm microphone input at all. See our adapter guide for recommendations.
A TRRS splitter — if your laptop has a single combo headset jack instead of separate mic and headphone jacks
Check Your Computer First (30 Seconds)
Before setting up, run our free Audio Device Scanner to check whether your computer has a stereo microphone input. The scanner runs in your browser in 30 seconds and tells you exactly what audio inputs your computer supports. If your computer does not have a stereo input (common on modern Macs and thin laptops), the scanner will tell you — and a USB audio adapter will solve it.
Hardware Setup: Step by Step
The signal chain is straightforward. Audio flows from your phone call, through RECAP S2, and into your computer’s microphone input.
Step 1: Connect Your Phone to RECAP S2
If your phone has a 3.5mm headset jack, plug RECAP S2 directly into it.
If your phone uses USB-C (Samsung Galaxy S20+, Google Pixel 6+, most modern Android phones): connect a USB-C to 3.5mm adapter to your phone first, then plug RECAP S2 into the adapter. Use an active adapter with a built-in DAC — cheap passive adapters will not work with Samsung or Pixel phones.
If your iPhone uses Lightning: connect Apple’s Lightning to 3.5mm adapter to your phone first, then plug RECAP S2 into the adapter.
If your iPhone uses USB-C: use a USB-C to 3.5mm adapter.
See our compatible adapters guide for tested options, pricing, and where to buy for your specific phone.
Step 2: Connect Your Headset
Plug your wired headset into the headset port on RECAP S2. You will talk and listen through this headset during your calls, just as you normally would. RECAP S2 passes audio through transparently — there is no change to call quality or experience for you or the other party.
Step 3: Connect RECAP S2 to Your Computer
RECAP S2 has a separate output cable that carries both sides of the call audio. This cable connects to your computer’s microphone input (not the headphone jack).
Identify your computer’s audio ports:
Desktop PC with separate jacks: Look for the pink 3.5mm jack on the back or front panel — that is the microphone input. Plug RECAP S2’s output cable directly into it.
Laptop with separate mic and headphone jacks: Plug RECAP S2’s output cable into the microphone jack (usually marked with a microphone icon or colored pink).
Laptop with a single combo headset jack (most modern laptops): You need a TRRS splitter that separates the combo jack into individual microphone and headphone connections. Plug RECAP S2’s output cable into the microphone side of the splitter. TRRS splitters are widely available on Amazon.
Computer with no 3.5mm jacks (USB-C only or no audio ports): You need a USB audio adapter that adds a 3.5mm microphone input via USB. See our compatible adapters guide for recommended USB audio adapters. Plug RECAP S2’s output cable into the adapter’s mic input, and plug the adapter into a USB port on your computer.
Once everything is connected, make a test call before recording anything important. Call a friend or your voicemail, and confirm that you can hear the caller through your headset and that they can hear you.
Recording on Windows
Selecting the Right Input Device
Before recording, you need to tell Windows to use the correct microphone input — the one RECAP S2 is connected to.
Right-click the speaker icon in the system tray (bottom-right of your screen).
Click Sound settings (Windows 11) or Open Sound settings (Windows 10).
Scroll down to the Input section.
Under “Choose a device for speaking or recording,” select the input that RECAP S2 is connected to. This will be your computer’s built-in microphone jack (labeled something like “Microphone – Realtek Audio”) or your USB audio adapter (labeled something like “Microphone – USB Audio Device”).
Speak into your headset while watching the input level meter. You should see it move. If it does not, you have the wrong device selected — try the other options in the dropdown.
Adjusting Microphone Volume
The input volume needs to be set correctly or your recording will be too quiet or distorted.
In the same Sound settings window, click on the input device you selected.
Adjust the Input volume slider. Start at 80% and test.
Make a test call and watch the level meter. The meter should bounce actively during conversation without hitting the maximum constantly.
If the audio is too quiet even at 100%, you may need to enable Microphone Boost in the advanced audio settings. See our detailed guide: How to adjust microphone volume on PC.
In the top toolbar, click the Audio Setup button (or go to Edit > Preferences > Audio Settings).
Set the Recording Device to your microphone input (the same one you selected in Windows Sound settings).
Set Recording Channels to Mono. Phone calls are mono audio — recording in stereo doubles the file size for no benefit.
Click OK.
Recording a call:
Open Audacity and confirm the correct input device is selected in the toolbar.
Start your phone call.
Click the red Record button in Audacity. You should see a waveform appear as audio comes through.
When the call ends, click Stop.
Go to File > Export Audio and save as MP3 (128kbps is sufficient for voice) or WAV.
Voice-activated recording (hands-free):
If you want Audacity to start recording automatically when a call begins:
Go to Transport > Transport Options > Sound Activated Recording and enable it.
Go to Transport > Transport Options > Sound Activation Level and set the threshold. Start at -30dB and adjust — the threshold should be above your room’s background noise level but below normal conversation volume.
Click Record. Audacity will wait silently until it detects audio above the threshold, then begin capturing.
OBS Studio is a free, open-source tool primarily known for streaming and screen recording, but it also works well as a dedicated audio recorder. OBS is a strong choice if you already use it for other tasks or want to record audio alongside screen activity.
Under Global Audio Devices, set Mic/Auxiliary Audio to the input RECAP S2 is connected to.
Click OK.
In the Audio Mixer panel at the bottom, you should see the mic channel. Speak into your headset and confirm the level meter moves.
To record audio only (no video), go to Settings > Output, set Recording Format to MKV or MP4, and under Audio Encoder, choose AAC or MP3.
Click Start Recording when your call begins, and Stop Recording when it ends.
OBS is more complex than Audacity for simple call recording, but it offers flexible multi-source mixing if you need it. For a full comparison of OBS, Audacity, and other recording software, see our software guide.
Option C: Recording with Windows Sound Recorder
If you do not want to install any software, Windows has a built-in option.
Open the Start menu and search for Sound Recorder (Windows 11) or Voice Recorder (Windows 10).
If prompted, select the correct input device.
Click the large Record button to start.
Click Stop when your call ends.
The recording saves automatically in M4A format.
Sound Recorder is simpler than Audacity or OBS but lacks level monitoring, voice activation, and editing tools. It works well for quick, occasional recordings.
Recording on Mac
Selecting the Input Device
Important — Mac users, check your audio inputs first: Run our Audio Device Scanner to see what inputs your Mac supports. Most modern MacBooks (2021 and newer, with Apple Silicon chips) have a single combo 3.5mm jack that is designed for headsets, not line-level input. This combo jack will not detect RECAP S2’s output cable as a microphone input — even though it works fine with Apple earbuds. If the scanner shows no stereo microphone input, you need a USB audio adapter like the Andrea USB-MA. Older Macs (pre-2021) with a separate “Line In” port work directly.
Open System Settings (click the Apple menu > System Settings).
Go to Sound in the sidebar.
Scroll down to the Input section.
Select the input that RECAP S2 is connected to. On older Macs this will be “Line In.” On newer Macs with a USB audio adapter, select the adapter’s name (e.g., “USB Audio Device” or “Andrea USB-MA”).
Speak into your headset and watch the Input level meter. It should respond. If it does not, try selecting a different input device.
Adjust the Input volume slider. Start at 80% and test during a call.
Option A: Recording with QuickTime (Built-In)
QuickTime Player is already installed on every Mac and works well for simple call recording.
Open QuickTime Player (find it in Applications or use Spotlight search).
Go to File > New Audio Recording.
Click the small dropdown arrow next to the record button. Select the input device that RECAP S2 is connected to.
Adjust the volume slider to set recording level. Watch the level meter as you speak.
Click the red Record button when your call starts.
Click Stop when the call ends.
Go to File > Save or File > Export As to save the recording. QuickTime saves in M4A format by default.
QuickTime is simple and reliable but does not offer voice activation or waveform display during recording.
Option B: Recording with Audacity on Mac
Audacity works identically on Mac as it does on Windows. Follow the same steps from the Windows Audacity section above:
Whatever software you use on either platform, these settings produce the best results for phone call audio:
Setting
Recommended Value
Why
Sample rate
44,100 Hz
Standard quality, more than sufficient for voice
Bit depth
16-bit
Adequate for phone audio dynamic range
Channels
Mono
Phone calls are mono — stereo doubles file size with no benefit
Export format
MP3 (128kbps) or WAV
MP3 for smaller files, WAV for maximum quality
Input volume
Peaks at -6dB to -3dB
Strong signal without clipping
Troubleshooting Common Issues
No Audio Detected
Symptom: Your recording software shows no input, the level meter does not move.
Fix: 1. Check that you selected the correct input device in your OS sound settings AND in your recording software. These are separate settings — both must point to the right input. 2. Make sure RECAP S2’s output cable is plugged into your PC’s microphone input, not the headphone output. 3. Try a different USB port if using a USB audio adapter. 4. On Windows, make sure the microphone is not muted or disabled in Sound settings > Input device properties. 5. On Mac (2021 and newer with Apple Silicon): The combo 3.5mm jack on modern MacBooks does not accept line-level input from RECAP S2’s output cable. Run our Audio Device Scanner to confirm — if no stereo microphone input appears, you need a USB audio adapter like the Andrea USB-MA.
Audio Too Quiet
Symptom: The recording is barely audible even at full playback volume.
Fix: 1. Increase the microphone input volume in your OS sound settings (see instructions above). 2. On Windows, enable Microphone Boost in the advanced input device properties. 3. In Audacity, use Effect > Amplify after recording to boost the volume. 4. See our detailed guide: How to adjust microphone volume.
Audio Distorted or Clipping
Symptom: The recording sounds crunchy, harsh, or distorted. The waveform in Audacity looks like it is hitting the top and bottom edges (flat-topped).
Fix: 1. Lower the microphone input volume in your OS sound settings. Try 50-60%. 2. Lower the phone’s call volume during the call. 3. In Audacity, if the waveform is clipped, use Effect > Clip Fix to attempt repair (results vary). 4. See our detailed guide: How to fix clipping sound in recordings.
Only Hearing One Side of the Call
Symptom: The recording captures your voice but not the caller’s, or vice versa.
Fix: 1. Make sure your phone adapter is an active adapter with a built-in DAC (not a passive adapter). This is the most common cause on Samsung and Pixel phones. See our adapter compatibility guide. 2. Check that RECAP S2 is fully seated in the adapter and the headset is fully plugged into RECAP S2. 3. Try unplugging and reconnecting each connection in the chain. 4. If using a USB-C adapter on Android, try a different adapter — see our compatible adapters guide for tested options that work reliably on all phones.
Recording Starts but Audio Cuts In and Out
Symptom: Audio drops intermittently during the recording.
Fix: 1. Check all physical connections — a loose cable is the most common cause. 2. If using voice-activated recording in Audacity, the activation threshold may be set too high. Lower it (e.g., from -20dB to -35dB) so the software does not cut out during quieter speech. 3. Try a different cable or adapter to rule out a hardware defect.
Advanced: Automatic Recording
If you record calls regularly and want a hands-free workflow where every call is captured without pressing buttons, you have two options:
Audacity’s Sound Activated Recording — Audacity listens for audio above a threshold and records automatically. Leave it running in the background, and it captures every call. See the setup steps in the Windows and Mac sections above.
A dedicated voice-activated recorder — Digital voice recorders from Sony, Olympus, and Zoom have VOR (Voice Operated Recording) modes that start and stop based on audio detection. Connect RECAP S2’s output to the recorder instead of your PC.
Can I record phone calls on my computer without any hardware?
Not with high quality. Your phone and computer are separate devices, so there is no software that can route live phone call audio from your cell phone to your PC with full fidelity. You can use the speakerphone method (put the call on speaker and record with your computer’s microphone), but the audio quality will be poor due to room noise and echo. For clean recordings of both sides of the call, you need a hardware connection like RECAP S2.
Do I need a specific type of headset?
Any wired headset or earbuds with a 3.5mm TRRS plug (the kind with a built-in microphone) will work. Bluetooth headsets and AirPods will not work — RECAP S2 requires a wired connection because it captures the audio signal from the physical cable.
Can I use RECAP S2 with any phone?
Yes. RECAP S2 works with every phone that supports a wired headset — iPhones (all models, using the appropriate adapter), Android phones (all manufacturers and OS versions), and even landline desk phones with a headset jack. See our adapter guide for the right adapter for your specific phone.
What if my computer only has USB-C ports and no audio jacks?
Use a USB audio adapter that adds a 3.5mm microphone input via USB. See our compatible adapters guide for recommended USB audio adapters. Plug RECAP S2’s output into the adapter, and plug the adapter into your computer’s USB port.
Will the other person know I am recording?
RECAP S2 is a hardware device that does not interact with your phone’s software in any way. It does not trigger any recording notification, beep, or announcement. The other party will not know unless you tell them. Whether you are required to tell them depends on your local recording laws.
What audio quality can I expect?
RECAP S2 delivers a clean analog audio signal directly from the call. Recording quality depends on your software settings, but with the recommended settings (44,100 Hz, 16-bit, MP3 128kbps), you will get clear, professional-quality audio suitable for transcription, legal documentation, or archiving.
Can I use OBS Studio instead of Audacity to record calls?
Yes. OBS Studio works as an audio recorder by setting your microphone input to the RECAP S2 source and starting a recording. OBS is a good choice if you already use it for streaming or screen recording. However, Audacity is generally easier for audio-only call recording because it offers voice-activated recording, a waveform display, and built-in editing tools. See our software comparison guide for a full breakdown.
Is there a way to record phone calls on my computer for free?
The recording software itself is free — Audacity, OBS Studio, QuickTime, and Windows Sound Recorder all cost nothing. The hardware is the only cost: the RECAP S2 adapter is $99 (one-time purchase, no subscription), and you may need a phone adapter if your phone lacks a headphone jack (see our adapter guide for options and pricing).
Ready to start recording phone calls on your computer?
Get RECAP S2 — $99 — captures both sides of any phone call and outputs directly to your PC. No apps, no batteries, no subscriptions.
Already have recordings? Try Recap — upload any audio file and get AI transcription with speaker labels, summaries, and full-text search. Free during early access.
How to Record Phone Calls to a Digital Voice Recorder in 2026
Most call recording guides assume you want an app or a computer. But a digital voice recorder paired with the right adapter is simpler, more portable, and more reliable for people who record phone calls regularly.
This guide covers every way to record phone calls to a voice recorder, which recorders work best, and how to set up voice-activated recording so you never miss a call.
All the Ways to Record Phone Calls
Before diving into voice recorders specifically, here is a quick overview of every method for recording phone calls — because the right approach depends on your situation.
Built-In Phone Recording
Some phones have native call recording. Google Pixel phones (Pixel 6 and later) support call recording directly in the Phone app. Samsung Galaxy phones with recent One UI versions offer it in some regions. On iPhone, Apple introduced call recording natively.
Pros: No extra hardware. Free. Cons: Limited availability by device and region. Recordings stored on the phone. Some implementations notify the other party automatically, which may not be desirable for all use cases.
Recording Apps
Third-party apps like Rev Call Recorder, TapeACall, or Cube ACR can record calls on both Android and iPhone.
Pros: Easy to install. Some offer transcription. Cons: Many require a monthly subscription. Call quality varies. Some route calls through a third-party server, raising privacy concerns. App-based recording has become increasingly restricted on both Android and iOS in recent years.
Recording to a Computer
You can record phone calls to a PC or Mac using the RECAP S2 adapter connected to software like Audacity or OBS. This gives you studio-level control over recording quality and format.
Pros: Full control over audio settings. Large storage capacity. Easy file management. Cons: Requires a computer and desk setup. Not portable.
Recording to a Digital Voice Recorder
This is the focus of this guide. A dedicated voice recorder paired with the RECAP S2 adapter gives you a portable, self-contained recording setup — no computer, no apps, no subscriptions. You plug in, make your call, and the recorder captures both sides of the conversation.
Pros: Extremely portable. Dedicated device — no crashes, no notifications. Battery lasts 20-100+ hours. Voice-activated recording means hands-free operation. Cons: Requires the RECAP S2 adapter ($99) and a wired headset. Modern phones without a 3.5mm jack need an adapter (see compatible adapters).
Why a voice recorder wins for many use cases: If you record calls away from a desk — in the car, in the field, at client sites — a voice recorder is the most reliable and portable option. The rest of this guide shows you exactly how to set it up.
Why Use a Voice Recorder Instead of a Computer?
Recording phone calls to a computer works when you are at a desk. But plenty of situations call for something more portable. Here is why a dedicated voice recorder makes sense:
Portability
A voice recorder fits in a shirt pocket. Combined with the RECAP S2 and a pair of earbuds, you have a complete call recording setup you can carry anywhere — in the car, out in the field, at a client site, or on the road between meetings. No laptop bag required.
Instant On
Voice recorders power up in seconds. There is no operating system to boot, no software to launch, no driver updates interrupting you mid-call. Slide a switch or press a button and you are recording.
Battery Life That Lasts
Modern voice recorders run for 20 to 100+ hours on a single charge or a pair of AAA batteries. Compare that to a laptop that might give you 6 to 8 hours on a good day. For people who record calls throughout a full workday or across multi-day trips, that battery life is a genuine advantage.
Dedicated Device
When you record on a computer, your recording software competes with everything else running on the machine — notifications, video calls, system updates. A voice recorder does one thing and does it well. It will not crash because your browser ran out of memory.
Voice-Activated Recording
Many voice recorders have a voice-activated recording mode (often called VOR or VAR). This means the recorder starts automatically when it detects audio and pauses when the line goes silent. Set it up once, and you get automatic recording of every call without pressing a single button. More on this below.
What You Need
The setup requires just a few pieces. No apps, no batteries to worry about (the recorder handles its own power), and no subscriptions:
Your phone (any cell phone or desk phone with a headset jack or adapter)
The RECAP S2 ($99) — connects between your phone and headset, outputs call audio to a recording device
A digital voice recorder with a 3.5mm mic or line input
Earbuds or a headset with a 3.5mm plug
That is the entire kit. The RECAP S2 requires no batteries or charging — it is powered passively by the audio signal. Everything except the phone fits in a pocket.
Important to know: The RECAP S2 requires a wired headset connection. If your phone does not have a 3.5mm headphone jack (most modern phones), you will need a compatible adapter. Our adapters guide covers which adapters work with which phones, including the difference between passive and active DAC adapters.
The RECAP S2 sits between your phone and your headset. It passes audio through to your earbuds so you hear the call normally, and simultaneously outputs that same audio through a separate cable that plugs into your recorder.
Step 2: Connect the Recorder
Take the RECAP S2 output cable (3.5mm) and plug it into the mic input or line input on your voice recorder. Most recorders have a single 3.5mm input jack that serves both purposes.
Step 3: Configure the Recorder’s Input
This step is important. You need to tell the recorder to capture audio from its external input rather than its built-in microphone:
Navigate to the recorder’s input source or recording source setting
Select “External Mic”, “Mic In”, or “Line In” (the label varies by model)
If your recorder offers both mic and line input modes, start with mic mode — the RECAP S2 output level works well with mic-level inputs
If the recording sounds distorted or too loud, switch to line-in mode or reduce the input level. If it sounds too quiet, increase the input level or ensure you are in mic mode.
Step 4: Set Recording Quality
For phone call recordings, you do not need studio-quality settings. A good balance of audio clarity and file size:
Format: MP3
Bitrate: 128 kbps
Sample rate: 44.1 kHz
At 128 kbps MP3, a 4GB recorder holds roughly 60 hours of recordings. That is a lot of calls before you need to transfer files.
If you need higher fidelity for legal or compliance purposes, record in WAV format at 44.1 kHz / 16-bit. Files will be larger (about 10 MB per minute of stereo audio), but the quality will be lossless.
Step 5: Test Before Your First Real Call
Call a friend or your own voicemail. Verify that:
You can hear the call through your earbuds
The recorder captures both your voice and the other party
The volume levels are reasonable on playback
There is no distortion or clipping
Adjust input levels as needed, then you are ready to go.
Recommended Voice Recorders for Phone Call Recording
Any digital voice recorder with a 3.5mm mic/line input will work with the RECAP S2. Here are solid options at three price points:
If you want simplicity, go with the OM System VN-541PC. It is inexpensive and has one-touch recording. You press one button and it records. Connect via USB to transfer files. Done. Note that this model does not include voice-activated recording (VOR), so you will need to manually start and stop recording for each call.
If you want the best balance of features and quality, the Sony ICD-UX570 is hard to beat. The built-in USB connector means you do not need a cable to transfer files — just flip out the USB plug and connect directly to your computer. Voice-activated recording, an OLED display, and microSD expansion make it a capable all-around recorder. Check current pricing at Sony.com as retail price varies.
If you want professional-grade audio, the Zoom H1essential gives you 32-bit float recording, which means the recorder captures an enormous dynamic range and essentially eliminates the risk of clipping or distortion. Its 3.5mm mic/line input works perfectly with the RECAP S2. The trade-off is that it uses microSD cards (not built-in storage) and runs on AAA batteries, but those batteries last about 10 hours and are replaceable anywhere.
If you want versatility, the Tascam DR-05X doubles as a USB audio interface and has excellent auto-level controls (limiter, peak reduction, auto level) that help prevent distortion without manual adjustment. Tascam has also released the DR-05XP as a successor with updated features — both work well with the RECAP S2.
Voice-Activated Recording: Record Every Call Automatically
Voice-activated recording is the feature that makes this setup truly hands-free. Here is how to configure it.
Many recorders label this feature VOR (Voice-Operated Recording) or VAR (Voice-Activated Recording). Find it in your recorder’s settings menu and turn it on.
Note: Not all recorders include VOR. Of the models recommended in this guide, the Sony ICD-UX570, Tascam DR-05X/DR-05XP, and Zoom H1essential support voice-activated recording. The OM System VN-541PC does not — if automatic recording is essential to your workflow, choose one of the other three models.
Set the Sensitivity
The recorder’s sensitivity threshold determines how loud the audio needs to be before recording starts. You want it sensitive enough to trigger on call audio coming through the RECAP S2, but not so sensitive that room noise starts and stops the recording constantly.
Start with a medium sensitivity setting
Make a test call and check if the recorder starts and stops reliably
If it misses the beginning of sentences, increase sensitivity
If it triggers on background noise when no one is talking, decrease sensitivity
How It Works in Practice
With voice-activated recording configured:
You plug in the RECAP S2 and put your earbuds in
The recorder sits in your pocket or on the desk, powered on and in VOR mode
When a call comes in and audio flows, the recorder starts capturing automatically
When the call ends and audio stops, the recorder pauses
The next call triggers a new recording (or continues the same file, depending on your recorder’s settings)
No buttons to press. No “I forgot to hit record.” Every call gets captured.
Transferring and Organizing Recordings
After a day of recording calls, you will want to get those files off the recorder and organized.
Transfer via USB
Most voice recorders connect to a PC or Mac via USB (micro-USB, USB-C, or a built-in USB connector). The recorder appears as a removable drive, and you can copy files directly.
File Naming
Recorders typically name files sequentially (e.g., VOICE001.mp3, VOICE002.mp3). After transferring, rename files with useful information:
2026-01-15_john-smith_contract-review.mp3
2026-01-15_client-call_support-issue-4821.mp3
A consistent naming convention saves time when you need to find a specific call later.
Backup Strategy
Do not rely on the recorder as your only copy. After transferring files:
Keep a local folder on your computer organized by date or client
Back up to cloud storage (Google Drive, Dropbox, OneDrive) for redundancy
Delete files from the recorder once confirmed on your computer to free up space
Transcription
Once your recordings are on your computer as MP3 or WAV files, you can run them through any transcription service — Google Docs voice typing, Otter.ai, or desktop transcription software. Having both the audio file and a text transcript is useful for reference, searchability, and compliance.
The Portable Field Setup
One of the biggest advantages of recording to a voice recorder is how portable the entire setup becomes. Here is what the pocket-sized field kit looks like:
Phone — in your hand or pocket as usual
RECAP S2 — clips to a pocket or sits in a bag
Voice recorder — in a pocket, set to voice-activated mode
Earbuds — in your ears
That is it. No laptop, no power outlet, no desk. Everything travels with you. No apps to install, no batteries to charge for the RECAP S2 (it draws power from the audio signal), and no subscriptions eating into your budget month after month.
This setup is particularly valuable for:
Journalists conducting phone interviews in the field
Investigators who need reliable call documentation away from the office
Sales reps recording client calls from the car between appointments
Insurance adjusters documenting claims calls on location
Legal professionals capturing witness or client conversations on the go
The entire kit weighs a few ounces and records for hours on a single charge.
Legal Considerations
Before you start recording, know the laws in your jurisdiction. Recording laws vary by state and country:
Some jurisdictions require one-party consent (only you need to know about the recording)
Others require all-party consent (everyone on the call must be informed)
Always check your local laws before recording phone calls.
Frequently Asked Questions
Can I use any voice recorder with the RECAP S2?
Yes, as long as it has a 3.5mm mic or line input jack. The RECAP S2 outputs standard analog audio through a 3.5mm cable. Budget recorders, professional field recorders, and everything in between will work.
Will the other person hear any difference on the call?
No. The RECAP S2 passes audio through to your earbuds without affecting call quality. The other party will not know a recorder is connected.
What if my voice recorder does not have voice-activated recording?
You can still use it — you will just need to manually press record when a call starts and stop when it ends. If automatic recording is important to you, look for a recorder with VOR or VAR mode. Of the four models recommended in this guide, three support voice-activated recording: the Sony ICD-UX570, Tascam DR-05X/DR-05XP, and Zoom H1essential. The OM System VN-541PC requires manual start/stop.
How much recording time do I get?
It depends on the recorder’s storage and your quality settings. At 128 kbps MP3, expect roughly 15 hours of recording per gigabyte. A recorder with 4GB of internal storage holds about 60 hours. With a 32GB microSD card, you are looking at 480+ hours — more than most people will ever need between transfers.
Do I need a computer at all?
Not for recording. The RECAP S2 and a voice recorder handle everything independently. You will only need a computer when you want to transfer files off the recorder, back them up, or run transcription software. The recording itself is completely computer-free.
Get Started
The RECAP S2 adapter is $99 and works with any phone and any recording device with a 3.5mm input. Pair it with a voice recorder and you have a simple, portable call recording setup that works anywhere — no computer, no software, no subscriptions.
Pick up a RECAP S2 and any of the recorders above, and you will be recording calls in minutes.
If your phone call recordings sound too quiet or distorted, the problem is almost always the microphone input level on your computer. Setting it too low gives you a barely audible recording. Setting it too high causes clipping and distortion that no amount of post-processing can fix.
The good news: adjusting it takes about 30 seconds on both Windows and Mac. Here is how to do it, plus how to tell when you have it right.
When You Need to Adjust
There are two symptoms to watch for:
Too quiet. You play back a recording and have to crank the volume to hear anything. If you open the file in audio software, the waveform is a thin line hugging the center.
Too loud (clipping). The recording sounds harsh or crunchy. Loud parts are distorted. In an audio editor, the waveform is smashed flat against the top and bottom edges — the signal exceeded what the system could capture, and the peaks were chopped off.
The goal is a strong, clean signal without clipping. You want your loudest peaks landing around 50-80% of the maximum level. In decibel terms, that means peaks between -12 dB and -6 dB. This leaves enough headroom for sudden loud moments while keeping the signal well above the noise floor.
Adjusting Microphone Volume on Windows
Windows 11
Open Settings (Win + I).
Go to System > Sound.
Scroll down to Input and select your microphone device.
Use the Input volume slider to raise or lower the level.
Windows 10
Open Settings (Win + I).
Go to System > Sound.
Under Input, choose your microphone from the dropdown.
Click Device properties.
Use the Volume slider to adjust.
Advanced Controls (Windows 10 and 11)
For finer control, use the classic Sound panel:
Right-click the speaker icon in the taskbar.
Select Sound settings, then scroll down and click More sound settings (Windows 11) or click Sound Control Panel (Windows 10).
Go to the Recording tab.
Double-click your microphone device to open its Properties.
Go to the Levels tab.
Here you will find two controls:
Microphone — the main input volume slider (0-100).
Microphone Boost — adds hardware-level gain in +10 dB increments.
Microphone Boost is useful when the signal is extremely weak even at 100% volume, but it amplifies everything, including background noise and electrical hum. Use it sparingly and only when the main slider is not enough.
Adjusting Microphone Volume on Mac
System Settings
Open System Settings (click the Apple menu, then System Settings).
Click Sound.
Select the Input tab.
Choose your microphone or audio input device from the list.
Drag the Input volume slider to adjust.
The input level meter next to the slider shows real-time activity. Speak or play audio and watch the meter respond.
Audio MIDI Setup (Advanced)
For more precise control, open Audio MIDI Setup (found in /Applications/Utilities/). This utility lets you select specific sample rates and bit depths and adjust input gain for devices that support it. It is especially useful when working with external audio interfaces or USB audio devices.
Setting the Right Level
The best way to dial in your level is to watch the meter while sending a real signal:
Start a test call, or speak into the microphone at the volume you expect during actual use.
Watch the input level meter in your software. Aim for peaks that land in the green-to-yellow range. The meter should bounce actively but never hit red.
In Audacity specifically, the recording meter should peak between -12 dB and -6 dB. If it regularly hits 0 dB, you are clipping.
Go back to your system settings and nudge the input volume up or down until the meter sits in the right zone.
It is better to record slightly too quiet than too loud. A quiet recording can be amplified later with minimal quality loss. A clipped recording is permanently damaged.
Common Problems
No signal at all. The most likely cause is having the wrong input device selected. If you have multiple audio devices connected (built-in mic, USB headset, external adapter), check both your OS sound settings and your recording software to make sure they are pointed at the correct device.
Very quiet even at 100%. On Windows, try enabling Microphone Boost in the advanced Levels tab (see above). On Mac, verify that your input is not set to Line In when you need Mic In, or vice versa. These are different signal levels, and using the wrong one will result in a very weak or very hot signal.
Crackling or distortion. The input level is too high. Reduce the input volume slider. If you have Microphone Boost enabled on Windows, try lowering it by one step or disabling it entirely.
Electrical hum or buzz. This is often caused by a ground loop, which happens when two connected devices have slightly different electrical ground potentials. Try plugging into a different USB port. If the problem persists, a USB audio adapter with galvanic isolation can break the ground loop. Moving the audio cable away from power cables can also help.
If You Are Using RECAP S2
RECAP S2 outputs a line-level audio signal, which is significantly stronger than a typical microphone signal. This is by design — it gives you a clean, full-strength signal — but it means your input level settings will be different from what you would use with a regular mic.
If the recording is distorted: reduce the input level to around 50% as a starting point.
If the recording is too quiet: increase toward 75-80% and test again.
Because the signal is line-level, you should generally not need Microphone Boost enabled on Windows. If you do, something else may be misconfigured.
For complete setup instructions — including how to connect RECAP S2 to your computer and configure your recording software — see our computer recording guide.
FAQ
Should I use Microphone Boost? Only as a last resort. If your signal is too quiet with the main volume slider at 100%, Boost can help, but it adds noise proportional to the gain. Try one step of Boost (+10 dB) and see if the noise is acceptable. If you need more than one step, the root issue is likely an impedance mismatch or wrong input type, not insufficient gain.
My USB device does not show a volume slider in system settings. Some USB audio devices handle gain internally and do not expose a system-level volume control. Check whether the device came with its own software or control panel — the volume adjustment may live there instead. If there is no software, the device may have a physical volume knob or be fixed-gain by design.
Does this apply to Mac and Windows the same way? The concept is identical: you are adjusting how much the system amplifies the incoming signal before it reaches your recording software. The only differences are where the controls live in each operating system. The target levels (-12 dB to -6 dB peaks) apply regardless of platform.
This guide covers every method to record phone calls on iPhone — from Apple’s built-in call recording feature to third-party apps, Google Voice, and dedicated hardware. You will learn what works, what does not, and which option fits your situation.
Method 1: iPhone Built-In Call Recording
Apple introduced native call recording to the iPhone with a recent iOS update. It was the first time iPhone users had an official recording tool built into the operating system.
How to Use It
Make or receive a phone call (or FaceTime audio call).
During the call, tap the waveform icon in the top-left corner of the call screen.
An automated voice announces to both parties that the call is being recorded. This announcement cannot be skipped or disabled.
Tap the icon again to stop recording.
The recording is automatically saved to the Notes app, along with a transcription (on supported models — see below).
Supported iPhones and Feature Tiers
The call recording feature works on a wide range of iPhones, but capabilities differ by model:
Recording + Transcription (iPhone 12 and later — A14 chip or newer):
iPhone 12 / 12 mini / 12 Pro / 12 Pro Max
iPhone 13 / 13 mini / 13 Pro / 13 Pro Max
iPhone 14 / 14 Plus / 14 Pro / 14 Pro Max
iPhone 15 / 15 Plus / 15 Pro / 15 Pro Max
iPhone 16 / 16 Plus / 16 Pro / 16 Pro Max (and newer)
iPhone SE (3rd generation)
These models get both the audio recording and an on-device transcription powered by Apple’s speech recognition engine.
Recording Only — No Transcription (iPhone XR, XS, 11, SE 2nd gen):
iPhone XR
iPhone XS / XS Max
iPhone 11 / 11 Pro / 11 Pro Max
iPhone SE (2nd generation)
These older models can record calls and save the audio, but they do not generate a transcription. The on-device transcription feature requires an A14 Bionic chip or later, which these models lack.
AI-powered call summaries (part of Apple Intelligence) require an iPhone 15 Pro or later. Older models that support transcription get the transcript but not the AI summary.
Transcription Languages
iPhone call transcriptions currently support: English (US, UK, Australia, New Zealand), Spanish (US, Mexico, Spain), French (France), German (Germany), Italian (Italy), Portuguese (Brazil), Japanese, Korean, Mandarin Chinese (China mainland, Taiwan), and Cantonese (Hong Kong). Apple has been expanding this list with each update, so additional languages may be available by the time you read this.
Limitations
Mandatory announcement. Every recording starts with an audible notification that tells the other party the call is being recorded. There is no way to turn this off. For journalists, attorneys, private investigators, and many business users, this eliminates the utility of the feature entirely.
Not available in many countries. Apple blocks the recording feature in the European Union and many other countries. If your iPhone’s region setting is set to one of these locations, the record button simply won’t appear. Apple made this decision to comply with GDPR and regional privacy regulations. Check Apple’s support page for the current list of supported regions.
No auto-recording. You must manually tap the record button on every single call. If you forget, you miss the recording. There is no setting to record all calls automatically.
Phone app and FaceTime only. The recording feature does not work with third-party calling apps. Calls made through WhatsApp, Signal, Zoom, Microsoft Teams, or any other app are not supported.
No transcription on older models. As noted above, iPhone XR, XS, 11, and SE (2nd generation) get the audio recording but no transcript. If you need searchable text from your calls on those devices, you will need to transcribe manually or use external software.
When This Method Works
iPhone built-in recording is fine for casual use if you are in a supported country, you are making a standard phone or FaceTime call, and you do not mind the other party hearing a recording announcement. It is a welcome addition, but it is designed for transparency-first personal use, not professional recording needs.
Historically, recording calls on iPhone through a third-party app has been close to impossible. Unlike Android, iOS has never allowed apps to access the call audio stream. No app on the App Store can simply “tap into” a live phone call.
How These Apps Work
Apps like TapeACall use a workaround: three-way (conference) calling. Here is the process:
You are on a phone call.
You open the recording app, which dials a recording server.
You tap Merge Calls on your iPhone to create a three-way call between you, the other party, and the recording service.
The recording service captures the audio from its end of the conference call.
In theory, this gives you a recording of both sides. In practice, it is cumbersome and unreliable.
Note: Rev Call Recorder, which was once a popular free option in this category, has been discontinued. The app is no longer available for download and the recording service has been shut down. If you previously relied on Rev Call Recorder, you will need to switch to another method.
Limitations
Complicated workflow. Despite marketing claims of a “one-tap” experience, the actual process involves multiple steps across multiple apps. You need to put your call on hold, dial the service, wait for it to answer, then merge. Users report the real process takes seven or more taps across three different screens.
Carrier support required. Three-way calling must be enabled by your mobile carrier. Some carriers and prepaid plans (SimpleTalk, H2O Wireless, and many international carriers) do not support conference calling, which makes these apps completely non-functional.
Your audio goes through third-party servers. The recording happens on the app company’s servers, not on your phone. Your private conversations are transmitted to and stored on servers you do not control. For anyone handling sensitive calls — legal, medical, financial, or journalistic — this is a serious privacy and compliance concern.
Subscription fees. TapeACall requires a paid subscription (check the App Store listing for current pricing). These subscription costs add up over time compared to one-time purchase alternatives.
Conference call notification. When you merge calls, the other party may hear a tone or brief interruption, potentially alerting them to the recording.
Geographic restrictions. TapeACall has broad support but still requires a carrier that supports three-way calling, and coverage varies by region.
Truecaller discontinued iPhone recording. Truecaller shut down its call recording feature on iPhone entirely, citing Apple’s native recording feature.
When This Method Works
Three-way calling apps can work if you have a carrier that supports conference calling and you are willing to pay a subscription. But the workflow is clunky, your audio passes through external servers, and the reliability is inconsistent. For most users, there are better options.
Method 3: Google Voice (Press 4 to Record)
If you use Google Voice as your phone number, it has a simple built-in recording feature:
In the Google Voice app, go to Settings > Calls and enable Incoming call options.
When you receive a call to your Google Voice number, press 4 on the dialpad to start recording.
An automated announcement plays, informing both parties that the call is being recorded.
Press 4 again to stop recording. The audio saves to your Google Voice voicemail inbox.
Limitations
Incoming calls only. Google Voice recording does not work on outgoing calls — only calls that someone else makes to your Google Voice number. This is a severe limitation for anyone who initiates most of their calls.
Mandatory announcement. Both parties hear a notification when recording starts and stops. There is no way to disable this, even if the call is muted on your end.
Manual activation. You must remember to press 4 during the call. There is no auto-record option on the free plan.
Google Voice number required. You need a Google Voice account and must route calls through it. Not everyone wants to give out a Google Voice number for professional use.
Limited availability. Google Voice is only available in the US (and select other countries). It is not an option for international users.
No VoIP app calls. This only works for phone calls routed through Google Voice — not WhatsApp, Signal, or other apps.
When This Method Works
Google Voice recording is useful if you already use Google Voice as your primary number, you mainly receive calls rather than making them, and you are comfortable with both parties hearing the recording announcement. It is free and simple, but too limited for most professional use cases.
Method 4: Voicemail Forwarding Trick
Some guides online suggest a workaround where you merge your active call with your own voicemail to create a recording:
During a call, tap Add Call and dial your own number.
When it goes to voicemail, tap Merge Calls.
The voicemail system records the merged audio.
Why This Is Unreliable
Carrier-dependent. This trick depends on your carrier allowing you to merge with your own voicemail, and many carriers block or do not support this.
Voicemail time limits. Most voicemail systems cut off after 1-3 minutes, making it useless for anything longer than a brief exchange.
Terrible audio quality. Voicemail systems are compressed for voice messages, not high-quality recording. The result is usually muffled and clipped.
May drop the call. Merging with voicemail can cause the original call to disconnect on some carriers.
No way to organize or export. Recordings are buried in your voicemail inbox with no easy way to file, search, or share them.
This method is a hack at best. We do not recommend relying on it for any purpose.
Method 5: Speakerphone + External Recorder
The lowest-tech option: put the call on speakerphone and record the room audio with another device.
Make or receive your call and tap Speaker.
Use a second phone, digital voice recorder, laptop, or tablet to record the audio playing from your iPhone’s speaker.
Limitations
Poor audio quality. You are recording room audio, which means echo, background noise, uneven volume between your voice and the caller’s voice, and distortion from the speaker. Call recordings made this way are often difficult to understand or transcribe.
No privacy. Everyone in the room hears the entire conversation. This is a non-starter for confidential calls — legal consultations, medical discussions, business negotiations, or any sensitive topic.
Unprofessional. If you are on a business call and the other party hears room echo, it is obvious you are on speakerphone. This can undermine trust.
Difficult to transcribe. Automatic transcription services perform poorly on speakerphone recordings because both voices are picked up unevenly by the external microphone, often overlapping with room noise.
When This Method Works
In a pinch, when you have no other option and the call is not confidential. That is about it.
Method 6: Hardware Audio Adapter (RECAP S2)
Every method above has significant trade-offs: mandatory announcements, regional blocks, three-way calling hassles, incoming-only restrictions, or unusable audio quality. A hardware adapter avoids all of these because it captures the audio at the electrical signal level, completely outside the reach of iOS software restrictions.
RECAP S2 is an audio adapter that connects between your iPhone and a wired headset. It taps both sides of the call audio (your voice and the caller’s) and routes a copy to any recording device – a computer, digital voice recorder, tablet, or second phone. No apps, no batteries, no subscriptions.
How It Works — and What You Should Know Up Front
RECAP S2 is a passive analog device, which means it has real strengths and honest trade-offs:
Requirements: – A wired headset with a 3.5mm TRRS plug (most standard earbuds with a built-in microphone work). Bluetooth headsets will not work — the audio must travel through the wire. – If your iPhone lacks a 3.5mm headphone jack (iPhone 7 and later), you need a Lightning to 3.5mm adapter or USB-C to 3.5mm adapter. See our compatible adapters guide for tested options. – A separate recording device (PC, Mac, digital voice recorder, tablet, or a second phone). RECAP routes audio to this device — it does not record internally.
These requirements mean RECAP is not a pocket-and-go solution like pressing a button in Apple’s built-in recorder. It is a desk setup or a prepared-in-advance kit. For professionals who need reliable, private, high-quality recordings, that trade-off is well worth it.
How to Record Phone Calls on iPhone with RECAP S2
Connect RECAP S2 to your iPhone’s headset jack (or to an Apple adapter — see below).
Plug your headset into the RECAP S2 headset port. You talk and listen through your headset as normal.
Connect the RECAP S2 output to your recording device’s microphone input using the included cable.
Start your call and hit record on your recording device. Both sides of the conversation are captured in clear, full-quality audio.
Because RECAP is a hardware device operating at the analog audio level, iOS restrictions do not apply. There is no recording announcement, no region block, and no dependency on any specific software version or app.
iPhone Adapter Guide
iPhones have used three different audio connector types over the years. Here is what you need for each:
iPhone 6s and older / iPhone SE (1st gen): No adapter needed These models have a built-in 3.5mm headphone jack. Plug RECAP S2 directly into the phone.
iPhone 7 through iPhone 14 / iPhone SE (2nd and 3rd gen): Lightning to 3.5mm adapter These models use Lightning and have no headphone jack. You need Apple’s Lightning to 3.5mm Headphone Jack Adapter. Important: use the genuine Apple adapter. Third-party Lightning to 3.5mm adapters frequently do not pass microphone audio correctly, which means your voice will not be captured. The Apple adapter is specifically designed to carry both headphone and microphone signals through Lightning. This is the number-one compatibility issue we see with iPhone setups. See our compatible adapters guide for tested adapters, pricing, and where to buy.
iPhone 15, iPhone 16 (and future models): USB-C to 3.5mm adapter These models use USB-C. You need a USB-C to 3.5mm Headphone Jack Adapter. The Apple USB-C adapter works reliably for both headphone audio and microphone input. Third-party USB-C adapters with a built-in DAC also work well with these models — the compatibility issues that plague Lightning adapters are less common with USB-C. See our compatible adapters guide for tested options, pricing, and where to buy.
What RECAP S2 Works With (Beyond Phone Calls)
Because RECAP captures audio from the headset jack, it works with any app that routes audio through headphones:
Standard phone calls (carrier calls)
FaceTime (audio and video)
WhatsApp calls
Signal calls
Zoom meetings
Microsoft Teams calls
Skype calls
Any other VoIP or calling app
This is a major advantage over Apple’s built-in recording, which only works with the Phone app and FaceTime.
What You Need
RECAP S2 audio adapter ($99 — one-time purchase, no subscriptions)
A recording device: PC, Mac, digital voice recorder, tablet, or a second phone running any voice recording app
A wired headset with a 3.5mm TRRS plug (most standard earbuds with a built-in microphone work)
If your iPhone lacks a 3.5mm jack: a compatible adapter (Lightning to 3.5mm or USB-C to 3.5mm — see our adapter guide)
Compatible iPhones
RECAP S2 works with every iPhone that supports a wired headset:
3.5mm jack (no adapter needed): iPhone 4, 4s, 5, 5c, 5s, 6, 6 Plus, 6s, 6s Plus, SE (1st gen)
Lightning (Apple Lightning adapter required): iPhone 7, 7 Plus, 8, 8 Plus, X, XR, XS, XS Max, 11, 11 Pro, 11 Pro Max, 12 mini, 12, 12 Pro, 12 Pro Max, 13 mini, 13, 13 Pro, 13 Pro Max, 14, 14 Plus, 14 Pro, 14 Pro Max, SE (2nd gen), SE (3rd gen)
USB-C (Apple USB-C adapter required): iPhone 15, 15 Plus, 15 Pro, 15 Pro Max, 16, 16 Plus, 16 Pro, 16 Pro Max (and future USB-C models)
Since RECAP is hardware, it works on every iOS version — past, present, and future. No software updates can break it.
Comparison: All Methods to Record Phone Calls on iPhone
Use iPhone built-in recording if: You are in a supported country, you are making standard phone or FaceTime calls, and you are fine with the other party hearing a recording announcement. Good for casual, transparent recording.
Use Google Voice if: You already use Google Voice, you mainly receive calls, and you only need occasional recordings. Free but severely limited.
Use RECAP S2 if: You need reliable, high-quality recording of both sides on any iPhone, with any calling app, in any country, without announcing the recording to the other party. RECAP is the choice for professionals — journalists, lawyers, researchers, compliance officers, business owners — who need recordings they can count on. It is a one-time purchase that does not depend on iOS versions, carrier support, or regional availability.
Avoid three-way calling apps unless you have exhausted other options. The workflow is frustrating, your audio passes through external servers, and carrier compatibility is a gamble. Note that Rev Call Recorder has been discontinued entirely, further shrinking this category.
Avoid the speakerphone/voicemail methods entirely for anything you need to actually use afterward.
Frequently Asked Questions
Can I record phone calls on iPhone without the other person knowing?
With Apple’s built-in recording, no. Apple’s feature plays a mandatory announcement that cannot be disabled. Third-party apps like TapeACall also produce audible artifacts (conference call merge tones). RECAP S2 is a hardware device that operates silently at the audio signal level — no announcements, no tones, no notifications are sent to the other party.
Important legal note: Recording laws vary by jurisdiction. In the US, federal law allows one-party consent (you can record if you are a participant), but 12 states require all-party consent: California, Connecticut, Delaware, Florida, Illinois, Maryland, Massachusetts, Michigan, Montana, New Hampshire, Oregon, and Washington. Pennsylvania’s wiretapping statute is also frequently interpreted as requiring all-party consent. Always verify your local regulations before recording any call.
Does iPhone call recording work in the EU?
No. As of this writing, Apple has blocked the call recording feature in all European Union countries, citing GDPR compliance. The feature remains unavailable in the EU. Users in the EU who need to record phone calls on iPhone must use alternative methods like RECAP S2.
Why do I need to use an Apple-brand Lightning adapter with RECAP?
Apple’s Lightning connector is a proprietary standard. Third-party Lightning to 3.5mm adapters often cut corners on microphone passthrough — they will play audio to your headphones, but they will not carry your microphone signal back to the phone correctly. This means RECAP would capture the other party’s voice but not yours. The genuine Apple Lightning to 3.5mm adapter is specifically engineered to support full bidirectional audio (headphone + microphone), and it resolves this issue completely. USB-C adapters do not have this problem as frequently, but we still recommend Apple’s USB-C to 3.5mm adapter for guaranteed compatibility. See our compatible adapters guide for the full tested list.
Can RECAP S2 record WhatsApp, Signal, and Zoom calls on iPhone?
Yes. Because RECAP captures audio from the headset connection, it works with any app that routes sound through wired headphones. This includes WhatsApp, Signal, Telegram, Zoom, Microsoft Teams, Skype, FaceTime, Google Meet, and standard carrier phone calls. Apple’s built-in recording, by contrast, only works with the Phone app and FaceTime — no third-party apps.
Can I automatically record every phone call on iPhone?
Not with any software-based method. Apple’s built-in recording requires a manual tap on every call. Third-party apps require a multi-step merge process each time. Google Voice requires pressing 4 during each call.
With RECAP S2, automatic recording is possible on the recording device side. RECAP continuously passes audio through whenever your headset is connected. If your recording device (a digital voice recorder, PC, or tablet) is set to record continuously or activated by voice detection, every call is captured without any manual action on your iPhone. See our full guide on how to automatically record every phone call for detailed setup instructions.
What recording software should I use with RECAP S2?
RECAP routes audio to any device with a microphone input. Popular options include:
On a second phone or tablet: Any voice recorder app — Voice Memos (iPhone), Easy Voice Recorder (Android), or similar.
Dedicated voice recorder: Sony, Olympus, and Zoom digital recorders all work. Many support voice-activated recording for hands-free operation.
Is it legal to record phone calls on iPhone?
Laws vary significantly by jurisdiction. In the United States, federal law permits one-party consent (you can record a call you are participating in without telling the other party). However, 12 states require all-party consent, meaning everyone on the call must know about and agree to the recording. These states are: California, Connecticut, Delaware, Florida, Illinois, Maryland, Massachusetts, Michigan, Montana, New Hampshire, Oregon, and Washington. Pennsylvania is also frequently classified as an all-party consent state. Outside the US, laws vary widely by country.
This is true regardless of which recording method you use. The recording tool does not change the law — your legal obligation is the same whether you use Apple’s built-in feature, an app, or RECAP.
How does RECAP S2 audio quality compare to iPhone built-in recording?
iPhone built-in recording produces good-quality audio saved in the Notes app. RECAP S2 captures a raw analog audio signal directly from the headset connection and sends it to your recording device. Because it captures the electrical signal rather than processing it through software layers, the output is typically cleaner and more consistent — especially for the caller’s voice. The final quality depends on your recording device and settings (sample rate, bit depth, format), giving you full control. For professional transcription, archiving, or evidence purposes, RECAP recordings tend to be superior.
Need reliable call recording on any iPhone, with any calling app, in any country?
Already have recordings? Try Recap — upload any audio file and get AI transcription with speaker labels, summaries, and full-text search. Free during early access.
If you need to record phone calls on Android, Google has made it harder than ever — most third-party recording apps no longer work on recent Android versions. This guide covers every method that actually works to record phone calls on Android, from built-in features to hardware solutions, so you can pick the right one for your situation.
The easiest option — if your phone and region support it. Several Android manufacturers now ship native call recording in their dialer apps.
Google Pixel
Google rolled out native call recording to Pixel phones (Pixel 6 and newer), making it available in the US, UK, and several other countries through the Google Phone app.
How to use it: 1. Open the Phone app and make or receive a call. 2. Tap the Record button on the call screen. 3. An audible announcement plays: “This call is being recorded.” 4. Tap Stop recording when done. The file saves to your phone.
Limitations: – Both parties are notified — an audible announcement plays that you cannot disable. This is a dealbreaker for many professional use cases (journalism, legal, business calls) where you need discreet recording. – Requires a recent Android version and the Google Phone app on a Pixel 6 or newer. – Not available everywhere — while the US and UK are now supported, many countries in Europe, South America, and Asia are still excluded. If your phone’s region setting doesn’t match a supported country, the record button won’t appear. – No auto-recording — you have to manually tap Record on every call. If you want hands-free recording on every call, see our guide on how to automatically record every phone call. – Recordings save in M4A format, which is a standard audio format that works in most players and editors.
Samsung Galaxy
Samsung added native call recording in the US with Samsung’s One UI. Samsung calls the feature “Call Transcript.”
The feature is available on a wide range of Galaxy devices including the Galaxy S25, S24, S23, Z Fold 6, Z Fold 5, Z Flip 6, Z Flip 5, A55, A54, and other eligible models. The exact availability varies by carrier and region.
How to use it: 1. During a call in the Samsung Phone app, tap the Record or Transcript button. 2. An audible announcement notifies both parties that the call is being recorded. 3. Samsung saves both the audio recording and an AI-generated transcript.
Limitations: – Both parties are notified — same as Pixel, an audible announcement plays. – Requires a recent One UI version — available on Galaxy S25, S24, S23, Z Fold/Flip 5 and 6, and select A-series devices that have received the update. Older models are not supported. – No auto-recording — must be activated manually each call. – Region-dependent — while the US is now supported, many regions where Samsung previously offered recording (parts of Asia) have different availability depending on local laws. – Transcripts available in about 20 languages.
Xiaomi, OnePlus, and Other OEMs
Several Chinese manufacturers include call recording in their phone apps: – Xiaomi (MIUI/HyperOS): Built-in call recording in the Xiaomi Phone app. Often available in more regions than Pixel or Samsung. – OnePlus (OxygenOS): Recording available in the default Phone app on some models. – Realme, Vivo, Oppo: Various levels of support depending on regional firmware.
These tend to be the least restricted, but availability changes between firmware updates and regions. Don’t count on consistency across devices.
When Built-In Recording Works
Built-in recording is fine if: – Your phone supports it in your region – You don’t mind the other party hearing a recording announcement – You only need occasional, manual recording – M4A or standard audio format output is acceptable
It’s not suitable when you need discreet recording, automatic recording, or when your phone/region combination doesn’t support it.
Method 2: Third-Party Call Recording Apps
Despite Google’s crackdown, a handful of third-party apps still attempt to record phone calls on Android. But “attempt” is the key word.
What’s Still Available
Cube ACR is the most well-known surviving call recording app. It uses an “App Connector” plugin to work outside the Play Store restrictions. However: – On current Android versions, many users report it only records their own voice, not the other party’s. This makes it useless for most purposes. – The App Connector plugin may need to be downloaded and configured separately from the main app. – Functionality varies wildly between phone manufacturers. What works on Samsung may not work on Xiaomi, and vice versa.
A few other apps (Call Recorder Automatic, various regional apps) exist on the Play Store, but they face the same fundamental limitation: Android blocks apps from accessing the other party’s audio stream during a call.
The Reality of App-Based Recording Today
Here’s what you should know before investing time in app-based solutions:
Most apps can only record your voice, not both sides of the conversation. This is an OS-level restriction, not an app bug.
Apps that claim to record both sides typically require root access (voiding your warranty and potentially bricking your phone).
Every Android update can break recording apps. If you find something that works today, it may stop working after the next security patch.
Apps installed from outside the Play Store receive no automatic security vetting. You’re trusting unknown developers with microphone access.
When Third-Party Apps Work
App-based recording can work if: – You have an older Android version where restrictions are less severe – You only need to record your own side of the conversation – You’re willing to root your phone (advanced users only) – You accept that it may break with any update
For everyone else, app-based recording is unreliable at best.
Method 3: Google Voice and VoIP Workarounds
If you use Google Voice for calls, it has a built-in recording option:
Open the Google Voice app and go to Settings > Calls > Incoming call options.
During an incoming call, press 4 on the dial pad to start recording.
Press 4 again to stop. The recording saves to your Google Voice inbox.
Limitations: – Only works for incoming calls — you cannot record outgoing calls. – Both parties hear an announcement when recording starts and stops. – Requires a Google Voice number and routing calls through Google Voice. – Audio quality depends on your internet connection.
Other VoIP services (Skype, Zoom, Teams) have their own recording features, but these only work for calls made through those apps — not regular phone calls.
Method 4: Speakerphone + External Recorder
A low-tech option: put the call on speaker and record with another device.
Make or receive your call and tap Speaker.
Use a second phone, digital voice recorder, or computer to record the audio in the room.
Limitations: – Terrible audio quality — room echo, background noise, and uneven volume between your voice and the caller’s. – Not private — everyone nearby hears the conversation. – Unreliable — background noise can make recordings unusable.
This works in a pinch, but anyone who needs reliable, clear recordings for professional use will find it inadequate.
How to Record Phone Calls on Android with a Hardware Adapter
The methods above all have significant trade-offs: notification announcements, one-sided recording, region restrictions, or poor audio quality. A hardware adapter bypasses all of these limitations because it captures audio at the electrical signal level — outside the reach of Android’s software restrictions.
RECAP S2 is an audio adapter that connects between your phone and a headset. It taps the audio signal carrying both sides of the conversation and routes it to any recording device — a computer, digital voice recorder, tablet, or second phone. No apps to install, no batteries to charge, and no subscriptions — just plug in and record.
How RECAP S2 Works
Connect RECAP S2 to your phone’s 3.5mm headset jack. If your phone uses USB-C (most modern Android phones), use a USB-C to 3.5mm adapter with a built-in DAC — see the adapter compatibility guide.
Plug your headset into the RECAP S2 headset port. You talk and listen through your headset normally.
Connect the RECAP S2 output to your recording device’s microphone input using the included cable.
Hit record on your recording device. Both sides of the call are captured in clear, full-quality audio.
Because RECAP works at the physical audio level, it doesn’t matter what Android version you’re running, what manufacturer made your phone, or what region you’re in. Google’s software restrictions don’t apply.
What You Should Know About RECAP S2
RECAP S2 is a dedicated hardware solution, and that comes with trade-offs worth understanding:
Requires a wired headset — you need a headset with a 3.5mm TRRS plug (most standard earbuds with a built-in microphone work). Bluetooth headsets won’t work because the audio signal needs to pass through the physical adapter.
Needs an adapter for modern phones — since most Android phones manufactured after 2019 lack a 3.5mm headphone jack, you’ll need a USB-C to 3.5mm adapter with a built-in DAC. Not every adapter works — see our compatible adapters guide for tested options.
Requires a separate recording device — RECAP S2 outputs the audio signal to a recorder. This can be a computer running recording software like Audacity or OBS, a digital voice recorder, a tablet, or even a second phone with a voice memo app. You need to bring your own recorder.
These requirements mean RECAP S2 is best suited for people who record calls regularly and can set up a consistent recording station — a desk with a computer, or a portable kit with a voice recorder. It’s not a casual “tap a button” solution, but it’s the most reliable way to record phone calls on Android when the built-in options don’t meet your needs.
Most modern Android phones (Samsung Galaxy S20 and newer, all Pixels, recent OnePlus) don’t have a 3.5mm headphone jack. You’ll need a USB-C to 3.5mm adapter — but not all adapters are the same.
There are two types: – Passive adapters (cheap, no electronics inside) — only work with phones that output analog audio through USB-C. This includes some OnePlus, Oppo, Realme, and Vivo phones. – Active adapters with a built-in DAC (digital-to-analog converter) — required for Samsung Galaxy, Google Pixel, and most other major brands that output digital audio through USB-C.
If you have a Samsung or Pixel phone, you need an active DAC adapter. A cheap passive adapter will not work. See our compatible adapters guide for tested options and where to buy.
A recording device: PC, Mac, digital voice recorder, tablet, or a second phone running any voice recording app
A headset with a 3.5mm TRRS plug (most standard earbuds with a built-in microphone work)
If your phone lacks a 3.5mm jack: a USB-C to 3.5mm adapter with built-in DAC (see compatible adapters)
Compatible Android Phones
RECAP S2 works with every Android phone through the headset jack (or USB-C adapter):
Samsung Galaxy: S25, S24, S23, S22, S21, S20 series, Z Fold and Z Flip series, A series, and older
Google Pixel: Pixel 9, 8, 7, 6 series and older
OnePlus, Xiaomi, Motorola, Sony, Realme, Oppo, Vivo, and all other Android phones
Since RECAP is hardware, it works identically on every Android version — past, present, and future.
Which Method Should You Choose?
Use built-in recording if: You have a supported Pixel or Samsung phone, your region supports it, and you don’t mind the other party being notified. Good for casual use.
Use Google Voice if: You only need to record incoming calls and are already using Google Voice as your phone number.
Use RECAP S2 if: You need reliable, clear recordings of both sides on any Android phone, without notification announcements, regardless of Android version or region. This is the choice for professionals — journalists, researchers, lawyers, business owners — who can’t afford unreliable recordings. Learn more about RECAP S2.
Avoid third-party apps unless you’re on an older Android version or willing to root your phone. The era of reliable app-based call recording on Android is over.
Frequently Asked Questions
Can I record phone calls on Android without the other person knowing?
Built-in call recording on Pixel and Samsung phones always notifies the other party with an audible announcement that cannot be disabled. Third-party apps that bypass this are blocked on modern Android versions. RECAP S2 is a hardware solution that does not trigger any software-based notification — the other party is not alerted. Note: recording laws vary by state and country. In the US, federal law requires one-party consent (you can record if you’re a participant), but some states require all-party consent. Always check your local laws.
My phone doesn’t have a headphone jack. Can I use RECAP S2?
Yes. Use a USB-C to 3.5mm adapter with a built-in DAC (digital-to-analog converter). Most modern phones — including all Samsung Galaxy S20+, Google Pixel 6+, and recent OnePlus models — require an active DAC adapter, not a cheap passive one. Check our compatible adapters guide for tested options.
Does Google’s built-in call recording on Pixel phones work in the US?
Yes. Google rolled out native call recording to Pixel 6 and newer phones in the US, UK, and several other countries. However, it requires a recent Android version, plays a mandatory recording announcement to both parties, and must be activated manually on each call.
What about Samsung’s call recording?
Samsung added call recording in the US with a recent One UI update. The feature is available on Galaxy S25, S24, S23, Z Fold/Flip 5 and 6, and select A-series devices. Like Pixel, it plays a mandatory announcement. Samsung also generates AI-powered transcripts of recorded calls.
Will third-party call recording apps work on modern Android?
In most cases, no. Third-party apps like Cube ACR exist, but on recent Android versions they typically only record your own voice, not the other party’s. This is an OS-level restriction that can’t be fixed by the app developer. Apps that claim full recording usually require root access.
What’s the audio quality like with RECAP S2 compared to built-in recording?
Built-in recording (Pixel and Samsung) saves in M4A format at acceptable quality. RECAP S2 outputs a raw analog signal to your recording device, so quality depends on your recorder settings — but because it captures the audio signal directly rather than through software processing, it typically produces cleaner, more consistent recordings. You have full control over format, bitrate, and quality settings on your recording device.
Can I automatically record all calls with RECAP S2?
RECAP S2 is always passing audio through — it’s a passive hardware device with no on/off switch. Whether recording is automatic depends on your recording device. Many digital voice recorders have a voice-activated recording mode, and PC software like Audacity can be configured to start recording automatically. Built-in Pixel and Samsung recording, by contrast, requires you to manually tap Record on every call.
How is RECAP S2 different from putting the call on speaker and recording?
Speakerphone recording captures room audio — including echo, background noise, and uneven volume between you and the caller. RECAP S2 captures the electrical audio signal directly from the headset connection, producing clear audio of both sides at consistent volume with no room noise. It’s the difference between recording a concert from the audience versus plugging directly into the soundboard.
Need reliable call recording on any Android phone, with no announcements and no software restrictions?
RECAP S2 sits between your phone and your recording device. Before you buy, make sure you have the right connections — this is the #1 source of setup issues.
How RECAP Connects
RECAP has three connection points. Each one needs to be right for recording to work:
CALL plug → goes into your phone’s headphone jack (or an adapter if your phone doesn’t have one)
HEADSET port → your wired headset plugs in here (you talk and listen through this)
OUTPUT plug → goes into your recording device (computer mic input, voice recorder, or mixer)
If any of these three connections has a problem, recording won’t work. Let’s check each one.
1. Your Phone Connection
RECAP’s CALL plug is a standard 3.5mm connector. If your phone has a headphone jack, plug it straight in — no adapter needed.
No headphone jack? You need an adapter. Here’s what works:
Has a built-in DAC and supports microphone passthrough. Works with RECAP.
iPhone 7 through iPhone 14 (Lightning)
Apple Lightning to 3.5mm Headphone Jack Adapter — Amazon | Best Buy
Apple no longer sells this directly, but it’s widely available from retailers.
Use Apple’s adapter only. Third-party Lightning adapters often skip the microphone channel, which means RECAP can’t capture your voice.
Android phones (USB-C, no headphone jack)
Best option: Apple USB-C to 3.5mm adapter (same one listed above) — has a built-in DAC, supports mic passthrough, and works on every Android phone we’ve tested.
Active (with DAC) — contains a small digital-to-analog converter chip. Works on all phones. Apple, Samsung, and Google adapters are all active.
Passive (no DAC) — a bare wire remap with no electronics. Only works on phones that output analog audio over USB-C (some OnePlus, Oppo, Realme, Vivo models). Will not work on Samsung Galaxy, Google Pixel, iPhones, most Motorola, or Sony phones.
How to tell: If the adapter costs under $5 and weighs almost nothing, it’s passive. Active adapters have a small inline housing for the chip. When in doubt, get the Apple USB-C adapter — it’s active and works universally.
2. Your Headset
RECAP requires a wired headset with a microphone. The headset plugs into RECAP’s HEADSET port — this is how you talk and listen during the call.
Any standard wired headset with a 3.5mm plug and inline microphone works.
The headset that came with your phone works (if it has a 3.5mm plug).
Bluetooth headphones and AirPods do not work. RECAP captures audio from the physical cable — Bluetooth bypasses it entirely.
3. Your Recording Device
RECAP’s OUTPUT plug sends the call audio to whatever records it. This is where most compatibility issues happen with computers.
Recording to a computer
RECAP sends each voice to a separate stereo channel (yours on the left, theirs on the right). This requires a stereo microphone input. Most laptops made after 2015 only have mono inputs and can’t capture both channels.
Check your input before you buy: Run our Audio Device Scanner — it takes 10 seconds, runs in your browser, and tells you whether your input is stereo or mono. No data leaves your computer.
If your input is mono (or your computer has no mic input at all), you need:
Adds a stereo 3.5mm mic input via USB. No drivers needed on Windows or Mac.
Also works: Plugable USB Audio Adapter — works with RECAP, but the default mic gain is very low. You’ll need to increase the input gain significantly in your OS audio settings or recording software.
Most digital voice recorders accept an external stereo microphone — check your recorder’s manual. RECAP’s output looks like a standard stereo mic signal. Make sure your recorder is set to stereo recording mode (not mono).
May work, but output volume is often very low — you’ll need to crank the gain significantly. They may also be passive (no DAC) or missing mic passthrough. The Apple adapter avoids these issues.
Landline phones
RECAP is designed for cell phones with 3.5mm headset jacks. Landlines need a different type of recorder.
Verify you can hear the caller through your headset
Verify the caller can hear you
Check your recording — both voices should be captured
Only hear one side? Your adapter may not support microphone passthrough (common with third-party Lightning adapters and cheap USB-C adapters). Switch to one of the recommended adapters above.
Recording to a computer and only getting one channel? Your mic input is probably mono. Run the Audio Device Scanner to confirm, and get the Andrea USB-MA adapter.
For more setup help and troubleshooting, visit our support page.
Get RECAP S2 — no apps, no batteries, no subscriptions.