If your phone call recordings sound too quiet or distorted, the problem is almost always the microphone input level on your computer. Setting it too low gives you a barely audible recording. Setting it too high causes clipping and distortion that no amount of post-processing can fix.
The good news: adjusting it takes about 30 seconds on both Windows and Mac. Here is how to do it, plus how to tell when you have it right.
When You Need to Adjust
There are two symptoms to watch for:
Too quiet. You play back a recording and have to crank the volume to hear anything. If you open the file in audio software, the waveform is a thin line hugging the center.
Too loud (clipping). The recording sounds harsh or crunchy. Loud parts are distorted. In an audio editor, the waveform is smashed flat against the top and bottom edges — the signal exceeded what the system could capture, and the peaks were chopped off.
The goal is a strong, clean signal without clipping. You want your loudest peaks landing around 50-80% of the maximum level. In decibel terms, that means peaks between -12 dB and -6 dB. This leaves enough headroom for sudden loud moments while keeping the signal well above the noise floor.
Adjusting Microphone Volume on Windows
Windows 11
Open Settings (Win + I).
Go to System > Sound.
Scroll down to Input and select your microphone device.
Use the Input volume slider to raise or lower the level.
Windows 10
Open Settings (Win + I).
Go to System > Sound.
Under Input, choose your microphone from the dropdown.
Click Device properties.
Use the Volume slider to adjust.
Advanced Controls (Windows 10 and 11)
For finer control, use the classic Sound panel:
Right-click the speaker icon in the taskbar.
Select Sound settings, then scroll down and click More sound settings (Windows 11) or click Sound Control Panel (Windows 10).
Go to the Recording tab.
Double-click your microphone device to open its Properties.
Go to the Levels tab.
Here you will find two controls:
Microphone — the main input volume slider (0-100).
Microphone Boost — adds hardware-level gain in +10 dB increments.
Microphone Boost is useful when the signal is extremely weak even at 100% volume, but it amplifies everything, including background noise and electrical hum. Use it sparingly and only when the main slider is not enough.
Adjusting Microphone Volume on Mac
System Settings
Open System Settings (click the Apple menu, then System Settings).
Click Sound.
Select the Input tab.
Choose your microphone or audio input device from the list.
Drag the Input volume slider to adjust.
The input level meter next to the slider shows real-time activity. Speak or play audio and watch the meter respond.
Audio MIDI Setup (Advanced)
For more precise control, open Audio MIDI Setup (found in /Applications/Utilities/). This utility lets you select specific sample rates and bit depths and adjust input gain for devices that support it. It is especially useful when working with external audio interfaces or USB audio devices.
Setting the Right Level
The best way to dial in your level is to watch the meter while sending a real signal:
Start a test call, or speak into the microphone at the volume you expect during actual use.
Watch the input level meter in your software. Aim for peaks that land in the green-to-yellow range. The meter should bounce actively but never hit red.
In Audacity specifically, the recording meter should peak between -12 dB and -6 dB. If it regularly hits 0 dB, you are clipping.
Go back to your system settings and nudge the input volume up or down until the meter sits in the right zone.
It is better to record slightly too quiet than too loud. A quiet recording can be amplified later with minimal quality loss. A clipped recording is permanently damaged.
Common Problems
No signal at all. The most likely cause is having the wrong input device selected. If you have multiple audio devices connected (built-in mic, USB headset, external adapter), check both your OS sound settings and your recording software to make sure they are pointed at the correct device.
Very quiet even at 100%. On Windows, try enabling Microphone Boost in the advanced Levels tab (see above). On Mac, verify that your input is not set to Line In when you need Mic In, or vice versa. These are different signal levels, and using the wrong one will result in a very weak or very hot signal.
Crackling or distortion. The input level is too high. Reduce the input volume slider. If you have Microphone Boost enabled on Windows, try lowering it by one step or disabling it entirely.
Electrical hum or buzz. This is often caused by a ground loop, which happens when two connected devices have slightly different electrical ground potentials. Try plugging into a different USB port. If the problem persists, a USB audio adapter with galvanic isolation can break the ground loop. Moving the audio cable away from power cables can also help.
If You Are Using RECAP S2
RECAP S2 outputs a line-level audio signal, which is significantly stronger than a typical microphone signal. This is by design — it gives you a clean, full-strength signal — but it means your input level settings will be different from what you would use with a regular mic.
If the recording is distorted: reduce the input level to around 50% as a starting point.
If the recording is too quiet: increase toward 75-80% and test again.
Because the signal is line-level, you should generally not need Microphone Boost enabled on Windows. If you do, something else may be misconfigured.
For complete setup instructions — including how to connect RECAP S2 to your computer and configure your recording software — see our computer recording guide.
FAQ
Should I use Microphone Boost? Only as a last resort. If your signal is too quiet with the main volume slider at 100%, Boost can help, but it adds noise proportional to the gain. Try one step of Boost (+10 dB) and see if the noise is acceptable. If you need more than one step, the root issue is likely an impedance mismatch or wrong input type, not insufficient gain.
My USB device does not show a volume slider in system settings. Some USB audio devices handle gain internally and do not expose a system-level volume control. Check whether the device came with its own software or control panel — the volume adjustment may live there instead. If there is no software, the device may have a physical volume knob or be fixed-gain by design.
Does this apply to Mac and Windows the same way? The concept is identical: you are adjusting how much the system amplifies the incoming signal before it reaches your recording software. The only differences are where the controls live in each operating system. The target levels (-12 dB to -6 dB peaks) apply regardless of platform.
“.get_post(2271)->post_content.”@@E@@”;’ –skip-themes –skip-plugins
==================================================
⚠️ SSH_AUTH_SOCK is set but the agent is unreachable — falling back to an on-disk key
🔌 Connecting to u765740122@217.196.55.96:65002
🔑 Using SSH key: /Users/igor/.ssh/id_rsa_mc
✅ Connected to Hostinger Business Hosting as u765740122
@@B@@
This guide covers every method to record phone calls on iPhone — from Apple’s built-in call recording feature to third-party apps, Google Voice, and dedicated hardware. You will learn what works, what does not, and which option fits your situation.
Method 1: iPhone Built-In Call Recording
Apple introduced native call recording to the iPhone with a recent iOS update. It was the first time iPhone users had an official recording tool built into the operating system.
How to Use It
Make or receive a phone call (or FaceTime audio call).
During the call, tap the waveform icon in the top-left corner of the call screen.
An automated voice announces to both parties that the call is being recorded. This announcement cannot be skipped or disabled.
Tap the icon again to stop recording.
The recording is automatically saved to the Notes app, along with a transcription (on supported models — see below).
Supported iPhones and Feature Tiers
The call recording feature works on a wide range of iPhones, but capabilities differ by model:
Recording + Transcription (iPhone 12 and later — A14 chip or newer):
iPhone 12 / 12 mini / 12 Pro / 12 Pro Max
iPhone 13 / 13 mini / 13 Pro / 13 Pro Max
iPhone 14 / 14 Plus / 14 Pro / 14 Pro Max
iPhone 15 / 15 Plus / 15 Pro / 15 Pro Max
iPhone 16 / 16 Plus / 16 Pro / 16 Pro Max (and newer)
iPhone SE (3rd generation)
These models get both the audio recording and an on-device transcription powered by Apple’s speech recognition engine.
Recording Only — No Transcription (iPhone XR, XS, 11, SE 2nd gen):
iPhone XR
iPhone XS / XS Max
iPhone 11 / 11 Pro / 11 Pro Max
iPhone SE (2nd generation)
These older models can record calls and save the audio, but they do not generate a transcription. The on-device transcription feature requires an A14 Bionic chip or later, which these models lack.
AI-powered call summaries (part of Apple Intelligence) require an iPhone 15 Pro or later. Older models that support transcription get the transcript but not the AI summary.
Transcription Languages
iPhone call transcriptions currently support: English (US, UK, Australia, New Zealand), Spanish (US, Mexico, Spain), French (France), German (Germany), Italian (Italy), Portuguese (Brazil), Japanese, Korean, Mandarin Chinese (China mainland, Taiwan), and Cantonese (Hong Kong). Apple has been expanding this list with each update, so additional languages may be available by the time you read this.
Limitations
Mandatory announcement. Every recording starts with an audible notification that tells the other party the call is being recorded. There is no way to turn this off. For journalists, attorneys, private investigators, and many business users, this eliminates the utility of the feature entirely.
Not available in many countries. Apple blocks the recording feature in the European Union and many other countries. If your iPhone’s region setting is set to one of these locations, the record button simply won’t appear. Apple made this decision to comply with GDPR and regional privacy regulations. Check Apple’s support page for the current list of supported regions.
No auto-recording. You must manually tap the record button on every single call. If you forget, you miss the recording. There is no setting to record all calls automatically.
Phone app and FaceTime only. The recording feature does not work with third-party calling apps. Calls made through WhatsApp, Signal, Zoom, Microsoft Teams, or any other app are not supported.
If these limitations rule out the built-in method, a phone recording device like RECAP S2 removes all of them — no announcements, works in every country, supports all calling apps, and captures both sides.
No transcription on older models. As noted above, iPhone XR, XS, 11, and SE (2nd generation) get the audio recording but no transcript. If you need searchable text from your calls on those devices, you will need to transcribe manually or use external software.
When This Method Works
iPhone built-in recording is fine for casual use if you are in a supported country, you are making a standard phone or FaceTime call, and you do not mind the other party hearing a recording announcement. It is a welcome addition, but it is designed for transparency-first personal use, not professional recording needs.
Historically, recording calls on iPhone through a third-party app has been close to impossible. Unlike Android, iOS has never allowed apps to access the call audio stream. No app on the App Store can simply “tap into” a live phone call.
How These Apps Work
Apps like TapeACall use a workaround: three-way (conference) calling. Here is the process:
You are on a phone call.
You open the recording app, which dials a recording server.
You tap Merge Calls on your iPhone to create a three-way call between you, the other party, and the recording service.
The recording service captures the audio from its end of the conference call.
In theory, this gives you a recording of both sides. In practice, it is cumbersome and unreliable.
Note: Rev Call Recorder, which was once a popular free option in this category, has been discontinued. The app is no longer available for download and the recording service has been shut down. If you previously relied on Rev Call Recorder, you will need to switch to another method.
Limitations
Complicated workflow. Despite marketing claims of a “one-tap” experience, the actual process involves multiple steps across multiple apps. You need to put your call on hold, dial the service, wait for it to answer, then merge. Users report the real process takes seven or more taps across three different screens.
Carrier support required. Three-way calling must be enabled by your mobile carrier. Some carriers and prepaid plans (SimpleTalk, H2O Wireless, and many international carriers) do not support conference calling, which makes these apps completely non-functional.
Your audio goes through third-party servers. The recording happens on the app company’s servers, not on your phone. Your private conversations are transmitted to and stored on servers you do not control. For anyone handling sensitive calls — legal, medical, financial, or journalistic — this is a serious privacy and compliance concern.
Subscription fees. TapeACall requires a paid subscription (check the App Store listing for current pricing). These subscription costs add up over time compared to one-time purchase alternatives.
Conference call notification. When you merge calls, the other party may hear a tone or brief interruption, potentially alerting them to the recording.
Geographic restrictions. TapeACall has broad support but still requires a carrier that supports three-way calling, and coverage varies by region.
Truecaller discontinued iPhone recording. Truecaller shut down its call recording feature on iPhone entirely, citing Apple’s native recording feature.
When This Method Works
Three-way calling apps can work if you have a carrier that supports conference calling and you are willing to pay a subscription. But the workflow is clunky, your audio passes through external servers, and the reliability is inconsistent. For most users, there are better options.
Method 3: Google Voice (Press 4 to Record)
If you use Google Voice as your phone number, it has a simple built-in recording feature:
In the Google Voice app, go to Settings > Calls and enable Incoming call options.
When you receive a call to your Google Voice number, press 4 on the dialpad to start recording.
An automated announcement plays, informing both parties that the call is being recorded.
Press 4 again to stop recording. The audio saves to your Google Voice voicemail inbox.
Limitations
Incoming calls only. Google Voice recording does not work on outgoing calls — only calls that someone else makes to your Google Voice number. This is a severe limitation for anyone who initiates most of their calls.
Mandatory announcement. Both parties hear a notification when recording starts and stops. There is no way to disable this, even if the call is muted on your end.
Manual activation. You must remember to press 4 during the call. There is no auto-record option on the free plan.
Google Voice number required. You need a Google Voice account and must route calls through it. Not everyone wants to give out a Google Voice number for professional use.
Limited availability. Google Voice is only available in the US (and select other countries). It is not an option for international users.
No VoIP app calls. This only works for phone calls routed through Google Voice — not WhatsApp, Signal, or other apps.
When This Method Works
Google Voice recording is useful if you already use Google Voice as your primary number, you mainly receive calls rather than making them, and you are comfortable with both parties hearing the recording announcement. It is free and simple, but too limited for most professional use cases.
Method 4: Voicemail Forwarding Trick
Some guides online suggest a workaround where you merge your active call with your own voicemail to create a recording:
During a call, tap Add Call and dial your own number.
When it goes to voicemail, tap Merge Calls.
The voicemail system records the merged audio.
Why This Is Unreliable
Carrier-dependent. This trick depends on your carrier allowing you to merge with your own voicemail, and many carriers block or do not support this.
Voicemail time limits. Most voicemail systems cut off after 1-3 minutes, making it useless for anything longer than a brief exchange.
Terrible audio quality. Voicemail systems are compressed for voice messages, not high-quality recording. The result is usually muffled and clipped.
May drop the call. Merging with voicemail can cause the original call to disconnect on some carriers.
No way to organize or export. Recordings are buried in your voicemail inbox with no easy way to file, search, or share them.
This method is a hack at best. We do not recommend relying on it for any purpose.
Method 5: Speakerphone + External Recorder
The lowest-tech option: put the call on speakerphone and record the room audio with another device.
Make or receive your call and tap Speaker.
Use a second phone, digital voice recorder, laptop, or tablet to record the audio playing from your iPhone’s speaker.
Limitations
Poor audio quality. You are recording room audio, which means echo, background noise, uneven volume between your voice and the caller’s voice, and distortion from the speaker. Call recordings made this way are often difficult to understand or transcribe.
No privacy. Everyone in the room hears the entire conversation. This is a non-starter for confidential calls — legal consultations, medical discussions, business negotiations, or any sensitive topic.
Unprofessional. If you are on a business call and the other party hears room echo, it is obvious you are on speakerphone. This can undermine trust.
Difficult to transcribe. Automatic transcription services perform poorly on speakerphone recordings because both voices are picked up unevenly by the external microphone, often overlapping with room noise.
When This Method Works
In a pinch, when you have no other option and the call is not confidential. That is about it.
Method 6: Hardware Audio Adapter (RECAP S2)
Every method above has significant trade-offs: mandatory announcements, regional blocks, three-way calling hassles, incoming-only restrictions, or unusable audio quality. A hardware adapter avoids all of these because it captures the audio at the electrical signal level, completely outside the reach of iOS software restrictions.
Looking for a phone call recording device? See our complete guide to phone call recording devices — why hardware beats apps, how it works, and which phones are compatible.
RECAP S2 is an audio adapter that connects between your iPhone and a wired headset. It taps both sides of the call audio (your voice and the caller’s) and routes a copy to any recording device – a computer, digital voice recorder, tablet, or second phone. No apps, no batteries, no subscriptions.
How It Works — and What You Should Know Up Front
RECAP S2 is a passive analog device, which means it has real strengths and honest trade-offs:
Requirements: – A wired headset with a 3.5mm TRRS plug (most standard earbuds with a built-in microphone work). Bluetooth headsets will not work — the audio must travel through the wire. – If your iPhone lacks a 3.5mm headphone jack (iPhone 7 and later), you need a Lightning to 3.5mm adapter or USB-C to 3.5mm adapter. See our compatible adapters guide for tested options. – A separate recording device (PC, Mac, digital voice recorder, tablet, or a second phone). RECAP routes audio to this device — it does not record internally.
These requirements mean RECAP is not a pocket-and-go solution like pressing a button in Apple’s built-in recorder. It is a desk setup or a prepared-in-advance kit. For professionals who need reliable, private, high-quality recordings, that trade-off is well worth it.
How to Record Phone Calls on iPhone with RECAP S2
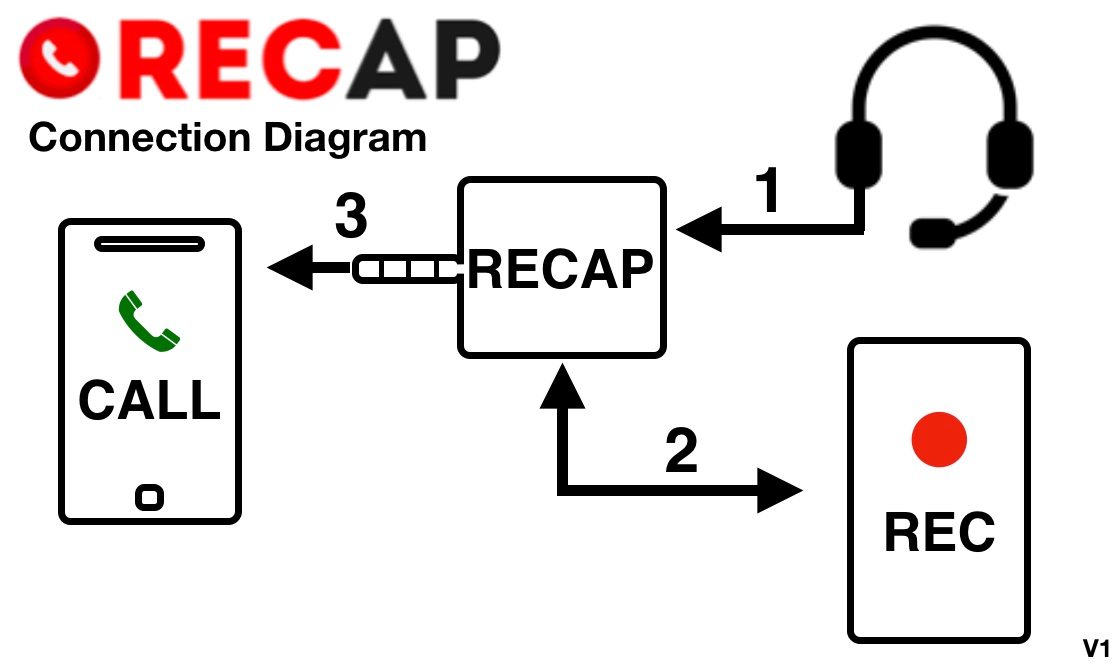
Follow the Connection Diagram above — the numbers match these steps:
① Plug your headset into RECAP.
② Connect RECAP’s output to your REC device — a separate computer, digital voice recorder, or second phone. This is what records — not the CALL phone you’re talking on.
③ Plug RECAP into your CALL phone last (use an Apple USB‑C or Lightning → 3.5mm adapter if it has no headphone jack).
Start the call and hit record on your REC device. Both sides are captured in clear, full‑quality audio.
Record in stereo — and check your input. RECAP puts your voice and the caller’s voice on two separate channels, so your REC device needs a stereo microphone input. A mono input — common on laptops, and on phone “headphone” dongles — collapses both sides into one and drops your voice. Not sure what yours captures? Run our free Audio Device Scanner, and see the compatibility guide for tested stereo adapters.
Because RECAP is a hardware device operating at the analog audio level, iOS restrictions do not apply. There is no recording announcement, no region block, and no dependency on any specific software version or app.
iPhone Adapter Guide
iPhones have used three different audio connector types over the years. Here is what you need for each:
iPhone 6s and older / iPhone SE (1st gen): No adapter needed These models have a built-in 3.5mm headphone jack. Plug RECAP S2 directly into the phone.
iPhone 7 through iPhone 14 / iPhone SE (2nd and 3rd gen): Lightning to 3.5mm adapter These models use Lightning and have no headphone jack. You need Apple’s Lightning to 3.5mm Headphone Jack Adapter. Important: use the genuine Apple adapter. Third-party Lightning to 3.5mm adapters frequently do not pass microphone audio correctly, which means your voice will not be captured. The Apple adapter is specifically designed to carry both headphone and microphone signals through Lightning. This is the number-one compatibility issue we see with iPhone setups. See our compatible adapters guide for tested adapters, pricing, and where to buy.
iPhone 15, iPhone 16 (and future models): USB-C to 3.5mm adapter These models use USB-C. You need a USB-C to 3.5mm Headphone Jack Adapter. The Apple USB-C adapter works reliably for both headphone audio and microphone input. Third-party USB-C adapters with a built-in DAC also work well with these models — the compatibility issues that plague Lightning adapters are less common with USB-C. See our compatible adapters guide for tested options, pricing, and where to buy.
What RECAP S2 Works With (Beyond Phone Calls)
Because RECAP captures audio from the headset jack, it works with any app that routes audio through headphones:
Standard phone calls (carrier calls)
FaceTime (audio and video)
WhatsApp calls
Signal calls
Zoom meetings
Microsoft Teams calls
Skype calls
Any other VoIP or calling app
This is a major advantage over Apple’s built-in recording, which only works with the Phone app and FaceTime.
What You Need
RECAP S2 audio adapter ($99 — one-time purchase, no subscriptions)
A recording device: PC, Mac, digital voice recorder, tablet, or a second phone running any voice recording app
A wired headset with a 3.5mm TRRS plug (most standard earbuds with a built-in microphone work)
If your iPhone lacks a 3.5mm jack: a compatible adapter (Lightning to 3.5mm or USB-C to 3.5mm — see our adapter guide)
Compatible iPhones
RECAP S2 works with every iPhone that supports a wired headset:
3.5mm jack (no adapter needed): iPhone 4, 4s, 5, 5c, 5s, 6, 6 Plus, 6s, 6s Plus, SE (1st gen)
Lightning (Apple Lightning adapter required): iPhone 7, 7 Plus, 8, 8 Plus, X, XR, XS, XS Max, 11, 11 Pro, 11 Pro Max, 12 mini, 12, 12 Pro, 12 Pro Max, 13 mini, 13, 13 Pro, 13 Pro Max, 14, 14 Plus, 14 Pro, 14 Pro Max, SE (2nd gen), SE (3rd gen)
USB-C (Apple USB-C adapter required): iPhone 15, 15 Plus, 15 Pro, 15 Pro Max, 16, 16 Plus, 16 Pro, 16 Pro Max (and future USB-C models)
Since RECAP is hardware, it works on every iOS version — past, present, and future. No software updates can break it.
Comparison: All Methods to Record Phone Calls on iPhone
Use iPhone built-in recording if: You are in a supported country, you are making standard phone or FaceTime calls, and you are fine with the other party hearing a recording announcement. Good for casual, transparent recording.
Use Google Voice if: You already use Google Voice, you mainly receive calls, and you only need occasional recordings. Free but severely limited.
Use RECAP S2 if: You need reliable, high-quality recording of both sides on any iPhone, with any calling app, in any country, without announcing the recording to the other party. RECAP is the choice for professionals — journalists, lawyers, researchers, compliance officers, business owners — who need recordings they can count on. It is a one-time purchase that does not depend on iOS versions, carrier support, or regional availability.
Avoid three-way calling apps unless you have exhausted other options. The workflow is frustrating, your audio passes through external servers, and carrier compatibility is a gamble. Note that Rev Call Recorder has been discontinued entirely, further shrinking this category.
Avoid the speakerphone/voicemail methods entirely for anything you need to actually use afterward.
Frequently Asked Questions
Can I record phone calls on iPhone without the other person knowing?
With Apple’s built-in recording, no. Apple’s feature plays a mandatory announcement that cannot be disabled. Third-party apps like TapeACall also produce audible artifacts (conference call merge tones). RECAP S2 is a hardware device that operates silently at the audio signal level — no announcements, no tones, no notifications are sent to the other party.
Important legal note: Recording laws vary by jurisdiction. In the US, federal law allows one-party consent (you can record if you are a participant), but 12 states require all-party consent: California, Connecticut, Delaware, Florida, Illinois, Maryland, Massachusetts, Michigan, Montana, New Hampshire, Oregon, and Washington. Pennsylvania’s wiretapping statute is also frequently interpreted as requiring all-party consent. Always verify your local regulations before recording any call.
Does iPhone call recording work in the EU?
No. As of this writing, Apple has blocked the call recording feature in all European Union countries, citing GDPR compliance. The feature remains unavailable in the EU. Users in the EU who need to record phone calls on iPhone must use alternative methods like RECAP S2.
Why do I need to use an Apple-brand Lightning adapter with RECAP?
Apple’s Lightning connector is a proprietary standard. Third-party Lightning to 3.5mm adapters often cut corners on microphone passthrough — they will play audio to your headphones, but they will not carry your microphone signal back to the phone correctly. This means RECAP would capture the other party’s voice but not yours. The genuine Apple Lightning to 3.5mm adapter is specifically engineered to support full bidirectional audio (headphone + microphone), and it resolves this issue completely. USB-C adapters do not have this problem as frequently, but we still recommend Apple’s USB-C to 3.5mm adapter for guaranteed compatibility. See our compatible adapters guide for the full tested list.
Can RECAP S2 record WhatsApp, Signal, and Zoom calls on iPhone?
Yes. Because RECAP captures audio from the headset connection, it works with any app that routes sound through wired headphones. This includes WhatsApp, Signal, Telegram, Zoom, Microsoft Teams, Skype, FaceTime, Google Meet, and standard carrier phone calls. Apple’s built-in recording, by contrast, only works with the Phone app and FaceTime — no third-party apps.
Can I automatically record every phone call on iPhone?
Not with any software-based method. Apple’s built-in recording requires a manual tap on every call. Third-party apps require a multi-step merge process each time. Google Voice requires pressing 4 during each call.
With RECAP S2, automatic recording is possible on the recording device side. RECAP continuously passes audio through whenever your headset is connected. If your recording device (a digital voice recorder, PC, or tablet) is set to record continuously or activated by voice detection, every call is captured without any manual action on your iPhone. See our full guide on how to automatically record every phone call for detailed setup instructions.
Can I record the call on the same iPhone I’m talking on?
No — your REC device has to be separate from your CALL phone. A single phone port can’t run RECAP’s headset path and a recording input at the same time, and phone “headphone” dongles capture mono, so you’d lose one side. Record on a separate computer, digital voice recorder, or a second phone with a stereo microphone input.
What recording software should I use with RECAP S2?
RECAP routes audio to any device with a microphone input. Popular options include:
On a second phone or tablet: Any voice recorder app — Voice Memos (iPhone), Easy Voice Recorder (Android), or similar.
Dedicated voice recorder: Sony, Olympus, and Zoom digital recorders all work. Many support voice-activated recording for hands-free operation.
Is it legal to record phone calls on iPhone?
Laws vary significantly by jurisdiction. In the United States, federal law permits one-party consent (you can record a call you are participating in without telling the other party). However, 12 states require all-party consent, meaning everyone on the call must know about and agree to the recording. These states are: California, Connecticut, Delaware, Florida, Illinois, Maryland, Massachusetts, Michigan, Montana, New Hampshire, Oregon, and Washington. Pennsylvania is also frequently classified as an all-party consent state. Outside the US, laws vary widely by country.
This is true regardless of which recording method you use. The recording tool does not change the law — your legal obligation is the same whether you use Apple’s built-in feature, an app, or RECAP.
How does RECAP S2 audio quality compare to iPhone built-in recording?
iPhone built-in recording produces good-quality audio saved in the Notes app. RECAP S2 captures a raw analog audio signal directly from the headset connection and sends it to your recording device. Because it captures the electrical signal rather than processing it through software layers, the output is typically cleaner and more consistent — especially for the caller’s voice. The final quality depends on your recording device and settings (sample rate, bit depth, format), giving you full control. For professional transcription, archiving, or evidence purposes, RECAP recordings tend to be superior.
Need reliable call recording on any iPhone, with any calling app, in any country?
Already have recordings? Try Recap — upload any audio file and get AI transcription with speaker labels, summaries, and full-text search. Free during early access.
If you need to record phone calls on Android, Google has made it harder than ever — most third-party recording apps no longer work on recent Android versions. This guide covers every method that actually works to record phone calls on Android, from built-in features to hardware solutions, so you can pick the right one for your situation.
The easiest option — if your phone and region support it. Several Android manufacturers now ship native call recording in their dialer apps.
Google Pixel
Google rolled out native call recording to Pixel phones (Pixel 6 and newer), making it available in the US, UK, and several other countries through the Google Phone app.
How to use it: 1. Open the Phone app and make or receive a call. 2. Tap the Record button on the call screen. 3. An audible announcement plays: “This call is being recorded.” 4. Tap Stop recording when done. The file saves to your phone.
Limitations: – Both parties are notified — an audible announcement plays that you cannot disable. This is a dealbreaker for many professional use cases (journalism, legal, business calls) where you need discreet recording. – Requires a recent Android version and the Google Phone app on a Pixel 6 or newer. – Not available everywhere — while the US and UK are now supported, many countries in Europe, South America, and Asia are still excluded. If your phone’s region setting doesn’t match a supported country, the record button won’t appear. – No auto-recording — you have to manually tap Record on every call. If you want hands-free recording on every call, see our guide on how to automatically record every phone call. – Recordings save in M4A format, which is a standard audio format that works in most players and editors.
Samsung Galaxy
Samsung added native call recording in the US with Samsung’s One UI. Samsung calls the feature “Call Transcript.”
The feature is available on a wide range of Galaxy devices including the Galaxy S25, S24, S23, Z Fold 6, Z Fold 5, Z Flip 6, Z Flip 5, A55, A54, and other eligible models. The exact availability varies by carrier and region.
How to use it: 1. During a call in the Samsung Phone app, tap the Record or Transcript button. 2. An audible announcement notifies both parties that the call is being recorded. 3. Samsung saves both the audio recording and an AI-generated transcript.
Limitations: – Both parties are notified — same as Pixel, an audible announcement plays. – Requires a recent One UI version — available on Galaxy S25, S24, S23, Z Fold/Flip 5 and 6, and select A-series devices that have received the update. Older models are not supported. – No auto-recording — must be activated manually each call. – Region-dependent — while the US is now supported, many regions where Samsung previously offered recording (parts of Asia) have different availability depending on local laws. – Transcripts available in about 20 languages.
Xiaomi, OnePlus, and Other OEMs
Several Chinese manufacturers include call recording in their phone apps: – Xiaomi (MIUI/HyperOS): Built-in call recording in the Xiaomi Phone app. Often available in more regions than Pixel or Samsung. – OnePlus (OxygenOS): Recording available in the default Phone app on some models. – Realme, Vivo, Oppo: Various levels of support depending on regional firmware.
These tend to be the least restricted, but availability changes between firmware updates and regions. Don’t count on consistency across devices.
When Built-In Recording Works
Built-in recording is fine if: – Your phone supports it in your region – You don’t mind the other party hearing a recording announcement – You only need occasional, manual recording – M4A or standard audio format output is acceptable
It’s not suitable when you need discreet recording, automatic recording, or when your phone/region combination doesn’t support it.
Method 2: Third-Party Call Recording Apps
Despite Google’s crackdown, a handful of third-party apps still attempt to record phone calls on Android. But “attempt” is the key word.
What’s Still Available
Cube ACR is the most well-known surviving call recording app. It uses an “App Connector” plugin to work outside the Play Store restrictions. However: – On current Android versions, many users report it only records their own voice, not the other party’s. This makes it useless for most purposes. – The App Connector plugin may need to be downloaded and configured separately from the main app. – Functionality varies wildly between phone manufacturers. What works on Samsung may not work on Xiaomi, and vice versa.
A few other apps (Call Recorder Automatic, various regional apps) exist on the Play Store, but they face the same fundamental limitation: Android blocks apps from accessing the other party’s audio stream during a call.
The Reality of App-Based Recording Today
Here’s what you should know before investing time in app-based solutions:
Most apps can only record your voice, not both sides of the conversation. This is an OS-level restriction, not an app bug.
Apps that claim to record both sides typically require root access (voiding your warranty and potentially bricking your phone).
Every Android update can break recording apps. If you find something that works today, it may stop working after the next security patch.
Apps installed from outside the Play Store receive no automatic security vetting. You’re trusting unknown developers with microphone access.
When Third-Party Apps Work
App-based recording can work if: – You have an older Android version where restrictions are less severe – You only need to record your own side of the conversation – You’re willing to root your phone (advanced users only) – You accept that it may break with any update
For everyone else, app-based recording is unreliable at best.
Method 3: Google Voice and VoIP Workarounds
If you use Google Voice for calls, it has a built-in recording option:
Open the Google Voice app and go to Settings > Calls > Incoming call options.
During an incoming call, press 4 on the dial pad to start recording.
Press 4 again to stop. The recording saves to your Google Voice inbox.
Limitations: – Only works for incoming calls — you cannot record outgoing calls. – Both parties hear an announcement when recording starts and stops. – Requires a Google Voice number and routing calls through Google Voice. – Audio quality depends on your internet connection.
Other VoIP services (Skype, Zoom, Teams) have their own recording features, but these only work for calls made through those apps — not regular phone calls.
Method 4: Speakerphone + External Recorder
A low-tech option: put the call on speaker and record with another device.
Make or receive your call and tap Speaker.
Use a second phone, digital voice recorder, or computer to record the audio in the room.
Limitations: – Terrible audio quality — room echo, background noise, and uneven volume between your voice and the caller’s. – Not private — everyone nearby hears the conversation. – Unreliable — background noise can make recordings unusable.
This works in a pinch, but anyone who needs reliable, clear recordings for professional use will find it inadequate.
How to Record Phone Calls on Android with a Hardware Adapter
The methods above all have significant trade-offs: notification announcements, one-sided recording, region restrictions, or poor audio quality. A hardware adapter bypasses all of these limitations because it captures audio at the electrical signal level — outside the reach of Android’s software restrictions.
RECAP S2 is an audio adapter that connects between your phone and a headset. It taps the audio signal carrying both sides of the conversation and routes it to any recording device — a computer, digital voice recorder, tablet, or second phone. No apps to install, no batteries to charge, and no subscriptions — just plug in and record.
How RECAP S2 Works
Connect RECAP S2 to your phone’s 3.5mm headset jack. If your phone uses USB-C (most modern Android phones), use a USB-C to 3.5mm adapter with a built-in DAC — see the adapter compatibility guide.
Plug your headset into the RECAP S2 headset port. You talk and listen through your headset normally.
Connect the RECAP S2 output to your recording device’s microphone input using the included cable.
Hit record on your recording device. Both sides of the call are captured in clear, full-quality audio.
Because RECAP works at the physical audio level, it doesn’t matter what Android version you’re running, what manufacturer made your phone, or what region you’re in. Google’s software restrictions don’t apply.
What You Should Know About RECAP S2
RECAP S2 is a dedicated hardware solution, and that comes with trade-offs worth understanding:
Requires a wired headset — you need a headset with a 3.5mm TRRS plug (most standard earbuds with a built-in microphone work). Bluetooth headsets won’t work because the audio signal needs to pass through the physical adapter.
Needs an adapter for modern phones — since most Android phones manufactured after 2019 lack a 3.5mm headphone jack, you’ll need a USB-C to 3.5mm adapter with a built-in DAC. Not every adapter works — see our compatible adapters guide for tested options.
Requires a separate recording device — RECAP S2 outputs the audio signal to a recorder. This can be a computer running recording software like Audacity or OBS, a digital voice recorder, a tablet, or even a second phone with a voice memo app. You need to bring your own recorder.
These requirements mean RECAP S2 is best suited for people who record calls regularly and can set up a consistent recording station — a desk with a computer, or a portable kit with a voice recorder. It’s not a casual “tap a button” solution, but it’s the most reliable way to record phone calls on Android when the built-in options don’t meet your needs.
Most modern Android phones (Samsung Galaxy S20 and newer, all Pixels, recent OnePlus) don’t have a 3.5mm headphone jack. You’ll need a USB-C to 3.5mm adapter — but not all adapters are the same.
There are two types: – Passive adapters (cheap, no electronics inside) — only work with phones that output analog audio through USB-C. This includes some OnePlus, Oppo, Realme, and Vivo phones. – Active adapters with a built-in DAC (digital-to-analog converter) — required for Samsung Galaxy, Google Pixel, and most other major brands that output digital audio through USB-C.
If you have a Samsung or Pixel phone, you need an active DAC adapter. A cheap passive adapter will not work. See our compatible adapters guide for tested options and where to buy.
A recording device: PC, Mac, digital voice recorder, tablet, or a second phone running any voice recording app
A headset with a 3.5mm TRRS plug (most standard earbuds with a built-in microphone work)
If your phone lacks a 3.5mm jack: a USB-C to 3.5mm adapter with built-in DAC (see compatible adapters)
Compatible Android Phones
RECAP S2 works with every Android phone through the headset jack (or USB-C adapter):
Samsung Galaxy: S25, S24, S23, S22, S21, S20 series, Z Fold and Z Flip series, A series, and older
Google Pixel: Pixel 9, 8, 7, 6 series and older
OnePlus, Xiaomi, Motorola, Sony, Realme, Oppo, Vivo, and all other Android phones
Since RECAP is hardware, it works identically on every Android version — past, present, and future.
Which Method Should You Choose?
Use built-in recording if: You have a supported Pixel or Samsung phone, your region supports it, and you don’t mind the other party being notified. Good for casual use.
Use Google Voice if: You only need to record incoming calls and are already using Google Voice as your phone number.
Use RECAP S2 if: You need reliable, clear recordings of both sides on any Android phone, without notification announcements, regardless of Android version or region. This is the choice for professionals — journalists, researchers, lawyers, business owners — who can’t afford unreliable recordings. Learn more about RECAP S2.
Avoid third-party apps unless you’re on an older Android version or willing to root your phone. The era of reliable app-based call recording on Android is over.
Frequently Asked Questions
Can I record phone calls on Android without the other person knowing?
Built-in call recording on Pixel and Samsung phones always notifies the other party with an audible announcement that cannot be disabled. Third-party apps that bypass this are blocked on modern Android versions. RECAP S2 is a hardware solution that does not trigger any software-based notification — the other party is not alerted. Note: recording laws vary by state and country. In the US, federal law requires one-party consent (you can record if you’re a participant), but some states require all-party consent. Always check your local laws.
My phone doesn’t have a headphone jack. Can I use RECAP S2?
Yes. Use a USB-C to 3.5mm adapter with a built-in DAC (digital-to-analog converter). Most modern phones — including all Samsung Galaxy S20+, Google Pixel 6+, and recent OnePlus models — require an active DAC adapter, not a cheap passive one. Check our compatible adapters guide for tested options.
Does Google’s built-in call recording on Pixel phones work in the US?
Yes. Google rolled out native call recording to Pixel 6 and newer phones in the US, UK, and several other countries. However, it requires a recent Android version, plays a mandatory recording announcement to both parties, and must be activated manually on each call.
What about Samsung’s call recording?
Samsung added call recording in the US with a recent One UI update. The feature is available on Galaxy S25, S24, S23, Z Fold/Flip 5 and 6, and select A-series devices. Like Pixel, it plays a mandatory announcement. Samsung also generates AI-powered transcripts of recorded calls.
Will third-party call recording apps work on modern Android?
In most cases, no. Third-party apps like Cube ACR exist, but on recent Android versions they typically only record your own voice, not the other party’s. This is an OS-level restriction that can’t be fixed by the app developer. Apps that claim full recording usually require root access.
What’s the audio quality like with RECAP S2 compared to built-in recording?
Built-in recording (Pixel and Samsung) saves in M4A format at acceptable quality. RECAP S2 outputs a raw analog signal to your recording device, so quality depends on your recorder settings — but because it captures the audio signal directly rather than through software processing, it typically produces cleaner, more consistent recordings. You have full control over format, bitrate, and quality settings on your recording device.
Can I automatically record all calls with RECAP S2?
RECAP S2 is always passing audio through — it’s a passive hardware device with no on/off switch. Whether recording is automatic depends on your recording device. Many digital voice recorders have a voice-activated recording mode, and PC software like Audacity can be configured to start recording automatically. Built-in Pixel and Samsung recording, by contrast, requires you to manually tap Record on every call.
How is RECAP S2 different from putting the call on speaker and recording?
Speakerphone recording captures room audio — including echo, background noise, and uneven volume between you and the caller. RECAP S2 captures the electrical audio signal directly from the headset connection, producing clear audio of both sides at consistent volume with no room noise. It’s the difference between recording a concert from the audience versus plugging directly into the soundboard.
Need reliable call recording on any Android phone, with no announcements and no software restrictions?
RECAP S2 sits between your phone and your recording device. Before you buy, make sure you have the right connections — this is the #1 source of setup issues.
How RECAP Connects
RECAP has three connection points. Each one needs to be right for recording to work:
CALL plug → goes into your phone’s headphone jack (or an adapter if your phone doesn’t have one)
HEADSET port → your wired headset plugs in here (you talk and listen through this)
OUTPUT plug → goes into your recording device (computer mic input, voice recorder, or mixer)
If any of these three connections has a problem, recording won’t work. Let’s check each one.
1. Your Phone Connection
RECAP’s CALL plug is a standard 3.5mm connector. If your phone has a headphone jack, plug it straight in — no adapter needed.
No headphone jack? You need an adapter. Here’s what works:
Has a built-in DAC and supports microphone passthrough. Works with RECAP.
iPhone 7 through iPhone 14 (Lightning)
Apple Lightning to 3.5mm Headphone Jack Adapter — Amazon | Best Buy
Apple no longer sells this directly, but it’s widely available from retailers.
Use Apple’s adapter only. Third-party Lightning adapters often skip the microphone channel, which means RECAP can’t capture your voice.
Android phones (USB-C, no headphone jack)
Best option: Apple USB-C to 3.5mm adapter (same one listed above) — has a built-in DAC, supports mic passthrough, and works on every Android phone we’ve tested.
Active (with DAC) — contains a small digital-to-analog converter chip. Works on all phones. Apple, Samsung, and Google adapters are all active.
Passive (no DAC) — a bare wire remap with no electronics. Only works on phones that output analog audio over USB-C (some OnePlus, Oppo, Realme, Vivo models). Will not work on Samsung Galaxy, Google Pixel, iPhones, most Motorola, or Sony phones.
How to tell: If the adapter costs under $5 and weighs almost nothing, it’s passive. Active adapters have a small inline housing for the chip. When in doubt, get the Apple USB-C adapter — it’s active and works universally.
One thing to know: these adapters connect your phone to RECAP’s CALL plug only — they’re not your recording connection. RECAP’s OUTPUT plug needs a stereo mic input; a headphone dongle can’t capture it (see Your Recording Device below).
2. Your Headset
RECAP requires a wired headset with a microphone. The headset plugs into RECAP’s HEADSET port — this is how you talk and listen during the call.
Any standard wired headset with a 3.5mm plug and inline microphone works.
The headset that came with your phone works (if it has a 3.5mm plug).
Bluetooth headphones and AirPods do not work. RECAP captures audio from the physical cable — Bluetooth bypasses it entirely.
3. Your Recording Device
RECAP’s OUTPUT plug sends the call audio to whatever records it. This is where most compatibility issues happen with computers.
Recording to a computer
RECAP sends each voice to a separate stereo channel (yours on the left, theirs on the right). This requires a stereo microphone input. Most laptops made after 2015 only have mono inputs and can’t capture both channels.
Check your input before you buy: Run our Audio Device Scanner — it takes 10 seconds, runs in your browser, and tells you whether your input is stereo or mono. No data leaves your computer.
If your input is mono (or your computer has no mic input at all), you need:
Adds a stereo 3.5mm mic input via USB. No drivers needed on Windows or Mac.
Also works: Plugable USB Audio Adapter — works with RECAP, but the default mic gain is very low. You’ll need to increase the input gain significantly in your OS audio settings or recording software.
Most digital voice recorders accept an external stereo microphone — check your recorder’s manual. RECAP’s output looks like a standard stereo mic signal. Make sure your recorder is set to stereo recording mode (not mono).
You can record on a phone — but only as a separate device from the one you’re calling on, and only through a real USB audio interface with a stereo mic input (for example, an Andrea USB-MA on a USB-C or Lightning adapter) — not a headphone dongle, which records mono. One phone can’t both place the call and record it. Heads up: we haven’t fully verified this on current USB-C iPhones, and it needs a recording app that captures stereo from a USB input — so for most people, recording to a computer or a voice recorder is simpler and more reliable.
What Won’t Work
Setup
Why It Fails
Bluetooth headphones or AirPods
RECAP captures audio from the physical cable. Bluetooth bypasses it.
Passive USB-C adapter on Samsung or Pixel
These phones don’t output analog audio over USB-C. You need an active adapter with a DAC.
USB-C hub with a 3.5mm jack
Most hubs only pass audio out (headphones), not audio in (microphone). RECAP needs both directions.
May work, but output volume is often very low — you’ll need to crank the gain significantly. They may also be passive (no DAC) or missing mic passthrough. The Apple adapter avoids these issues.
Landline phones
RECAP is designed for cell phones with 3.5mm headset jacks. Landlines need a different type of recorder.
Verify you can hear the caller through your headset
Verify the caller can hear you
Check your recording — both voices should be captured
Only hear one side? Your adapter may not support microphone passthrough (common with third-party Lightning adapters and cheap USB-C adapters). Switch to one of the recommended adapters above.
Recording to a computer and only getting one channel? Your mic input is probably mono. Run the Audio Device Scanner to confirm, and get the Andrea USB-MA adapter.
For more setup help and troubleshooting, visit our support page.
Get RECAP S2 — no apps, no batteries, no subscriptions.
If you need to automatically record phone calls — every one, not just the ones you remember to tap “Record” on — your options are more limited than you think. This guide covers every method for automatic call recording on Android, iPhone, and landline.
The Problem: Manual Recording Misses Calls
Both Google Pixel and Samsung Galaxy now offer built-in call recording, and Apple has added it to the iPhone. But all three share the same limitation: you have to manually tap “Record” on every single call.
That means: – You forget to record an important call, and it’s gone forever – You can’t record calls you don’t expect to be important (they often are) – If you’re recording for compliance, legal, or business reasons, manual recording creates gaps
For anyone who needs consistent, automatic recording of every call, manual tap-to-record is not a real solution.
Option 1: Android Apps with Auto-Record (Limited)
Some third-party Android apps claim to offer automatic call recording:
Cube ACR is available on the Google Play Store and has an auto-record setting that triggers recording when a call starts. However: – On current Android versions, it typically only records your side of the conversation due to OS-level restrictions Google has tightened with every recent Android version – Functionality varies significantly by phone manufacturer and Android version – Google can break it with any system update – Audio quality is inconsistent — some devices produce garbled or one-sided recordings
Samsung and Xiaomi phones in certain regions have auto-record settings in their native dialer apps. But: – Region-locked — not available in the US, UK, or EU – Still plays a notification announcement to the other party – Only works on the manufacturer’s built-in phone app
Bottom line: There is no reliable way to auto-record both sides of every call using software alone on a modern Android phone.
Option 2: Google Voice (Incoming Calls Only)
Google Voice can record incoming calls — press 4 during the call. But: – Outgoing calls cannot be recorded – You still have to press 4 manually each time – There is no true auto-record feature – Both parties hear a notification announcement
Google Voice is not a solution for automatic recording.
Option 3: iPhone — No Auto-Record Option
Apple’s iPhone call recording must be activated manually on each call. There is no auto-record setting, no Shortcut automation for it, and no third-party app can do it either. iOS has never allowed background call recording by apps, and there is no indication this will change.
This is the only method that reliably auto-records every call on any phone — Android, iPhone, or landline — with no apps, no batteries, and no subscriptions.
How It Works
RECAP S2 is a hardware audio adapter that sits between your phone and a wired headset. It passes the full audio from both sides of the call to a recording device. Pair it with a voice-activated recorder (VAR), and you get true automatic recording:
RECAP S2 connects to your phone (via 3.5mm jack or USB-C/Lightning adapter)
Your wired headset plugs into RECAP S2 — you talk and listen normally
RECAP S2’s output goes to a digital voice recorder set to voice activation mode
When a call starts, the recorder detects audio and starts recording automatically
When the call ends, the recorder stops automatically after a few seconds of silence
No buttons to press. No apps to open. Every call recorded, both sides, clear audio.
What You Should Know About This Setup
RECAP S2 is a passive audio adapter, not a standalone recording device. To use it, you need:
A wired headset — Bluetooth headsets will not work. The audio passes through the physical cable.
A phone with a 3.5mm headphone jack, or a USB-C/Lightning to 3.5mm adapter for phones that lack one. Not all adapters work — see our adapter compatibility guide for tested options.
A separate recording device — either a digital voice recorder or a computer with recording software.
These requirements are the trade-off for getting reliable, OS-independent, two-sided recording that no software solution can match.
Best Voice-Activated Recorders for This Setup
Any digital voice recorder with a “VOR” (Voice Operated Recording) or “voice activation” feature works. Here are proven options:
Sony ICD-UX570 — Compact, excellent audio quality, voice activation mode, USB charging, (check current pricing as it varies by retailer)
Olympus WS-882 — Reliable voice activation (VOR), stereo recording, USB direct connection, simple operation
Zoom H1n — Higher-end audio quality, great for professional recording and transcription
Any recorder with a 3.5mm mic/line input and voice activation mode
If you work at a desk, you can use your computer instead of a dedicated recorder:
Connect RECAP S2’s output to your PC’s microphone input (or use a USB audio adapter if your PC only has USB-C — see our adapter guide for recommendations)
Use recording software with auto-start:
Audacity (free) — Use the “Sound Activated Recording” feature under Transport menu. Set the activation threshold just above your room’s background noise level.
OBS Studio (free) — Can be scripted to start/stop recording based on audio input levels
Windows Voice Recorder / Mac Voice Memos — Simple but lack auto-start; you’d need to press record manually
Digital voice recorder: Look for VOR/VAR mode in settings. Set sensitivity to medium or high.
Audacity: Transport > Sound Activated Recording. Set threshold to -26dB to -30dB (adjust based on your environment).
Test with a short call. Call a friend, verify both sides are captured, and adjust the voice activation sensitivity if it’s cutting off the beginning of speech.
Leave it connected. From now on, every call you make or receive through your headset is automatically recorded.
Tips for Best Results
Keep the recorder plugged in or charged. A dead recorder means missed recordings.
Use a high-capacity SD card if recording all day. At 128kbps, a 32GB card holds ~500 hours of recordings.
Label recordings by date/time. Most digital recorders do this automatically. Audacity can be configured with auto-naming.
Check local recording laws. In the US, federal law allows one-party consent, but some states require all-party consent. Check your local laws before recording.
Frequently Asked Questions
Can I auto-record calls on my iPhone without hardware?
No. iOS does not allow any app to automatically record phone calls. Apple’s built-in recording requires manual activation on each call. There is no Shortcut or automation that can trigger call recording. RECAP S2 paired with a voice-activated recorder is the only way to auto-record on iPhone.
Can I auto-record calls on Android without hardware?
In limited cases. Some Android phones (Samsung, Xiaomi) in certain regions offer auto-record in the native dialer, but it’s region-locked and notifies the other party. Third-party apps like Cube ACR have auto-record settings but typically only capture your side on current Android versions. For reliable, two-sided auto-recording on any Android phone, a hardware solution is the only dependable option.
What’s the audio quality like with a voice-activated recorder?
Excellent. RECAP S2 delivers a clean analog signal directly from the call audio. With a quality digital recorder (Sony ICD-UX570, Olympus WS-882, Zoom H1n), you’ll get professional-quality recordings that are clear enough for transcription, legal proceedings, or broadcast.
How much storage do I need?
Phone call audio at standard quality (128kbps MP3) uses about 1MB per minute, or 60MB per hour. A 32GB card holds roughly 500 hours. If you’re on calls 4 hours a day, that’s about 4 months of recordings before you need to clear space.
Does the other party know they’re being recorded?
RECAP S2 does not trigger any software notification or announcement. Whether you should inform the other party depends on your local laws.
Can I use RECAP S2 with a Bluetooth headset?
No. RECAP S2 requires a wired headset because it captures audio from the physical cable connection. Bluetooth headsets send audio wirelessly and bypass the adapter entirely.
Do I need a computer, or can I use just a portable recorder?
Either works. A portable digital voice recorder with voice activation (VOR mode) gives you a fully mobile setup — no computer required. If you work at a desk, a computer with recording software like Audacity gives you more storage and editing options.
Is it legal to record phone calls automatically?
Recording laws vary by jurisdiction. In the US, federal law requires one-party consent (you can record your own calls), but some states require all-party consent. Check your local laws before you begin.
Free US shipping · ships within 5 business days · one-time purchase, no subscription
Get RECAP S2 — $99 | No apps, no batteries, no subscriptions. Pair with any voice-activated recorder for hands-free, automatic call recording on any phone.
Once you’ve connected your phone to your computer for call recording (using a RECAP S2 audio adapter or similar setup), you need call recording software to actually capture the audio. This guide covers the best free and paid options for Windows and Mac so you can start recording immediately.
Not every audio recording app is suited for phone calls. Here’s what matters when choosing recording software:
Mic/line input recording — must be able to record from an external audio input, not just system audio
Real-time monitoring — lets you see audio levels while recording so you can catch problems
Voice activation (optional) — auto-start/stop recording when audio is detected, for hands-free operation. See our guide to automatic call recording for detailed setup steps.
Standard export formats — MP3, WAV, or M4A for easy sharing and transcription
Low CPU usage — shouldn’t slow down your computer while recording in the background
Note that RECAP S2 requires a wired headset to capture both sides of the call, and most modern phones need a compatible adapter (Lightning or USB-C to 3.5mm). Once the hardware is set up, any of the software below will work.
Free Options
1. Audacity (Windows, Mac, Linux)
The gold standard for free call recording software. Audacity is open-source, has been around for 20+ years, and handles call recording extremely well.
Setup for call recording: 1. Go to Audio Setup (top toolbar) and set the input to your microphone/line-in port (where RECAP S2 is connected) 2. Set recording channels to Mono (phone calls are mono audio — stereo wastes space) 3. Click the red Record button when your call starts 4. Click Stop when done 5. Export via File > Export Audio as MP3 or WAV
Voice-activated recording (auto-record): 1. Go to Transport > Transport Options > Sound Activated Recording 2. Set the activation level under Transport > Transport Options > Sound Activation Level (start at -30dB, adjust based on background noise) 3. Audacity will auto-start recording when it detects audio and pause during silence
Pros: – Free and open-source – Extremely reliable – Voice activation for hands-free recording – Supports every audio format – Built-in noise reduction, amplification, and editing tools – Cross-platform (Windows, Mac, Linux)
Cons: – Interface looks dated – No automatic file splitting (long recordings become one large file) – Crashes can lose unsaved work (save frequently, or enable Audacity’s auto-save)
Best for: Most users. If you’re recording calls to a PC, start with Audacity.
OBS is primarily a streaming/screen recording tool, but it works well as an audio recorder and has some features Audacity doesn’t.
Setup for call recording: 1. In Sources, click + and add Audio Input Capture 2. Select your mic/line-in input (where RECAP S2 is connected) 3. Go to Settings > Output > Recording and set format to MKV — OBS can record audio-only tracks within MKV containers, or you can remux to MP4 after recording 4. Click Start Recording during calls
While OBS defaults to video container formats (MKV/MP4), the audio track is easily extracted using the built-in Remux Recordings tool (File > Remux Recordings) or free tools like FFmpeg. You can also configure OBS to capture only the audio input with no video sources, keeping file sizes small.
Pros: – Free and open-source – Can record audio + screen simultaneously (useful for documenting calls with on-screen notes) – Hotkey support for start/stop recording – Automatic file naming with timestamps – Very stable, low CPU usage
Cons: – No built-in voice activation for audio-only recording – Overkill for simple audio recording – Requires extra step to extract audio from container format – No built-in audio editing
Best for: Users who also stream or need screen + audio recording.
3. Windows Voice Recorder / Sound Recorder (Windows)
The built-in Windows audio recorder. Simple, works, nothing fancy.
Setup: Open Sound Recorder from the Start menu. Select your input device. Click Record.
Pros: – Already installed on Windows – Dead simple – Saves in M4A format
Cons: – No voice activation – No audio level monitoring during recording – No editing tools – Limited export options – No automatic file naming
Best for: Quick, one-off recordings when you don’t want to install anything.
4. QuickTime Player (Mac)
Mac’s built-in option.
Setup: 1. Open QuickTime Player 2. File > New Audio Recording 3. Click the dropdown arrow next to the record button and select your input (RECAP S2 / line-in) 4. Click Record
Pros: – Already installed on every Mac – Clean, simple interface – Exports to M4A and WAV
Cons: – No voice activation – No waveform display during recording – Minimal editing (trim only) – No automatic file splitting or naming
Best for: Mac users who need something quick without installing Audacity.
5. Voice Memos (Mac / iPhone)
If your “recording device” is a second iPhone or iPad (connected to RECAP S2’s output via a Lightning/USB-C mic adapter), Voice Memos is the simplest option.
Pros: – Already on every Apple device – iCloud sync across devices – Simple, one-tap recording
Cons: – No voice activation – No audio level monitoring – Limited editing – Requires the right adapter to get RECAP’s output into the device
Best for: Using a second iPhone/iPad as your recorder.
Paid Options
6. Adobe Audition (Windows, Mac)
Professional audio workstation. Adobe Audition requires a Creative Cloud subscription. Worth it if you’re a journalist, podcaster, or legal professional who records calls daily.
Key advantages over Audacity: – Non-destructive editing – Superior noise reduction (Adaptive Noise Reduction is excellent for cleaning up call audio) – Multi-track recording – Automatic speech alignment – Professional-grade effects and processing
Best for: Professionals who need to edit and clean up recordings regularly.
7. Reaper (Windows, Mac, Linux)
A professional DAW (digital audio workstation) at an indie price. Full-featured, lightweight, and extremely customizable. Reaper offers two license tiers: personal/small-business (revenue under $20K/year) and commercial. Both are one-time purchases with no subscription. See reaper.fm for current pricing.
Key advantages: – One-time purchase (no subscription) – Scripting support for automation (auto-split recordings by silence, auto-name files) – Very low CPU usage – Highly customizable interface and workflow
Best for: Power users who want Audition-level features without a subscription.
Audio distorted or clipping? Lower the input volume or phone call volume. See: How to fix clipping sound
Only hearing one side of the call? Check that RECAP S2 is properly connected between the phone and headset. Both sides should come through the same output.
Quick Comparison
Software
Price
Voice Activation
Audio Editing
Ease of Use
Platform
Audacity
Free
Yes
Yes
Medium
Win/Mac/Linux
OBS Studio
Free
No
No
Medium
Win/Mac/Linux
Sound Recorder
Free (built-in)
No
No
Easy
Windows
QuickTime
Free (built-in)
No
Trim only
Easy
Mac
Voice Memos
Free (built-in)
No
Trim only
Easy
Mac/iOS
Adobe Audition
Subscription
No
Professional
Complex
Win/Mac
Reaper
One-time purchase
Via scripting
Professional
Complex
Win/Mac/Linux
Our Recommendation
For most people: Audacity. It’s free, it has voice activation for automatic recording, it handles every audio format, and it has built-in tools to clean up recordings if needed. It’s what we recommend to RECAP S2 customers.
If you need it simpler: Use your OS built-in recorder (Sound Recorder on Windows, QuickTime on Mac). No learning curve.
If you’re a professional: Reaper (one-time purchase for personal use) gives you professional features without a subscription. Adobe Audition (subscription) if you’re already in the Adobe ecosystem.
Frequently Asked Questions
Can I use free software for call recording?
Yes. Audacity is completely free, open-source, and has every feature most people need for recording phone calls on a PC — including voice activation, noise reduction, and export to MP3 or WAV. The built-in recorders on Windows (Sound Recorder) and Mac (QuickTime) also work for basic recording at no cost.
Which software has voice-activated recording?
Audacity is the only free option with built-in voice-activated recording. Enable it under Transport > Transport Options > Sound Activated Recording, and Audacity will automatically start capturing when it hears audio and pause during silence. Reaper can also do this through its scripting system, and Adobe Audition supports it through custom workflows. For a full walkthrough, see our guide to automatically recording every phone call.
What audio format should I save call recordings in?
For most purposes, MP3 at 128kbps is the best balance of quality and file size for phone call audio. A one-hour call will be roughly 55 MB. If you need maximum quality for legal or archival purposes, use WAV (16-bit, 44.1kHz) — the file will be larger (roughly 300 MB per hour) but lossless. Avoid proprietary formats that may not be playable on other devices.
Do I need special software to record phone calls on Mac?
No. QuickTime Player, which comes pre-installed on every Mac, can record audio from an external input like RECAP S2. Just open QuickTime, choose File > New Audio Recording, select your input device, and press Record. For more advanced features like voice activation or audio editing, install Audacity (free) or Reaper (one-time purchase).
Can I record both sides of a phone call with Audacity?
Yes, but Audacity alone only records what comes through your computer’s audio input. To capture both sides of a phone call, you need hardware like the RECAP S2 that taps into the audio between your phone and headset and sends it to your PC. Without a hardware adapter, Audacity can only record your microphone — not the other caller.
Need to connect your phone to your PC for recording?
Get RECAP S2 — $99 captures both sides of phone calls and outputs to any recording device or computer. No apps, no batteries, no subscriptions.
 “.get_post(2271)->post_content.”@@E@@”;’ –skip-themes –skip-plugins
==================================================
⚠️ SSH_AUTH_SOCK is set but the agent is unreachable — falling back to an on-disk key
🔌 Connecting to u765740122@217.196.55.96:65002
🔑 Using SSH key: /Users/igor/.ssh/id_rsa_mc
✅ Connected to Hostinger Business Hosting as u765740122
@@B@@
“.get_post(2271)->post_content.”@@E@@”;’ –skip-themes –skip-plugins
==================================================
⚠️ SSH_AUTH_SOCK is set but the agent is unreachable — falling back to an on-disk key
🔌 Connecting to u765740122@217.196.55.96:65002
🔑 Using SSH key: /Users/igor/.ssh/id_rsa_mc
✅ Connected to Hostinger Business Hosting as u765740122
@@B@@