You recorded a phone call and played it back only to hear hiss, hum, or a low rumble underneath the conversation. It happens. The good news is that Audacity — a free, open-source audio editor — has a solid noise reduction tool that can clean up most recordings in under a minute. This guide walks you through the entire process, from opening your file to exporting a clean version.
What You Need
Audacity — Free download from audacityteam.org. Available for Windows, Mac, and Linux.
Your audio file — WAV, MP3, M4A, FLAC, or any other common format. Audacity opens them all. If you recorded a phone call with RECAP S2 or similar hardware, you likely have a WAV or MP3 file ready to go.
That’s it. No plugins or paid add-ons required.
Step 1: Open Your Recording
Launch Audacity and go to File > Open. Navigate to your audio file and select it. Audacity will import the file and display the waveform on screen.
If you recorded in a format like M4A, Audacity may need the FFmpeg library to import it. The program will prompt you if that’s the case — follow the on-screen instructions to install it once, and you won’t need to think about it again.
Step 2: Select a Noise Sample
Before Audacity can remove noise, it needs to know what the noise sounds like. Find a section of your recording where nobody is talking — just the background noise by itself. This is your noise sample.
Click and drag in the waveform to highlight 1 to 2 seconds of that silent-but-noisy section. The longer the sample, the more accurate the noise profile, but even half a second works in a pinch.
Look for gaps between sentences, the beginning of the recording before the call connects, or any pause in the conversation. You want pure noise with no speech mixed in.
Step 3: Get the Noise Profile
With your noise sample still selected, go to Effect > Noise Reduction. In the dialog that opens, click Get Noise Profile.
The dialog will close immediately. It may look like nothing happened, but Audacity has now analyzed your selection and built a profile of the noise frequencies. This profile is what it will use to separate noise from speech in the next step.
Step 4: Apply Noise Reduction
Now select the entire track by pressing Ctrl+A (or Cmd+A on Mac). You want the noise reduction applied to the whole recording, not just the sample.
Go to Effect > Noise Reduction again. This time, you’ll adjust the settings and apply them.
Recommended starting settings:
Setting
Value
What It Does
Noise reduction (dB)
12
How much quieter the noise will become. Higher values remove more noise but risk distorting speech.
Sensitivity
6
How aggressively Audacity identifies sounds as noise. Higher values catch more noise but may also catch parts of speech.
Frequency smoothing (bands)
3
Smooths out the reduction across neighboring frequencies. Helps avoid a “musical” or watery artifact in the result.
Click Preview to hear a few seconds of the result before committing. If the voice sounds natural and the noise is reduced, click OK to apply.
A word of caution: Don’t crank the noise reduction to 24 dB on the first pass hoping to eliminate every trace of noise. Over-reduction makes voices sound robotic or like they’re underwater. Start at 12 dB, listen, and increase by a few dB at a time if you need more. You can always run the effect again — applying two passes of moderate reduction often sounds better than one pass of aggressive reduction.
Step 5: Normalize the Audio (Optional)
After noise reduction, your audio may be quieter than you’d like. Normalizing brings the volume up to a consistent level without clipping.
Go to Effect > Normalize and set the peak amplitude to -1.0 dB. Leave the “Remove DC offset” box checked. Click OK.
This ensures the loudest point in your recording sits just below the maximum level, giving you a full, even volume throughout the file.
Step 6: Export Your Clean Recording
Go to File > Export Audio. Choose your format:
WAV — Lossless quality. Best if you plan to edit further or archive the recording.
MP3 — Smaller file size. Good for sharing or uploading. Use 128 kbps or higher for voice recordings.
Name your file, choose a destination folder, and click Save.
Bonus: Quick EQ for Phone Call Audio
Phone calls carry a narrow band of audio frequencies — roughly 300 Hz to 3,400 Hz. Anything outside that range is not voice; it’s noise. You can use Audacity’s EQ to cut those unwanted frequencies and get a noticeably cleaner result.
Go to Effect > Filter Curve EQ (or Graphic EQ, depending on your version). Then:
Roll off everything below 200 Hz. This removes low-frequency rumble, electrical hum, and HVAC noise.
Roll off everything above 4,000 Hz. This removes high-frequency hiss and static.
Apply this before or after noise reduction — either order works, though applying EQ first can make the noise reduction step more effective since there’s less noise for it to deal with.
Tips for Better Recordings
If you’re recording phone calls with RECAP S2, the audio signal itself is typically clean. RECAP taps the headset audio directly at line level, so there’s no ambient room noise in the signal. When noise does show up, it usually comes from the recording device — a computer’s built-in mic input picking up electrical interference, gain set too high in the recording software, or a ground loop between devices.
A few things that help:
Use proper input levels. Set your recording software’s input gain so peaks hit around -12 dB to -6 dB during normal speech. This leaves headroom and keeps the noise floor low.
Use a USB audio interface if your computer’s built-in audio input introduces noise. Even an inexpensive one will be quieter.
Check your cables. A loose or damaged 3.5mm connection can introduce crackling and static.
Yes. If you use OBS Studio for recording, it has built-in noise suppression filters you can apply in real time during the recording — no post-processing needed. Other options include paid tools like iZotope RX and Adobe Podcast’s online enhancer. Our software guide covers several options.
Will noise reduction affect voice quality?
It can, if you overdo it. Aggressive settings strip out frequencies that overlap with speech, making voices sound thin, hollow, or robotic. Start with a noise reduction value of 12 dB, preview the result, and increase only if needed. Two moderate passes sound better than one heavy pass.
What if I can’t find a section of pure noise in my recording?
Look at the very beginning or end of the file — there’s often a second or two before the call connects or after it ends. If your entire recording has voice throughout, find the quietest gap between sentences. Even a fraction of a second can work, though a longer sample gives Audacity more data to build an accurate noise profile.
Is it legal to record phone calls? In most of the United States, you can legally record a phone call as long as you are a participant. But in 12 states, every person on the call must consent to the recording. Getting this wrong can mean felony charges, civil lawsuits, or having your recording thrown out of court.
This guide breaks down federal law, explains the difference between one-party and all-party consent, provides a complete 50-state reference table, and covers how these laws apply regardless of whether you use a built-in phone feature, a recording app, or dedicated hardware like the RECAP S2.
Disclaimer: This article is for informational purposes only and does not constitute legal advice. Recording laws are subject to change. If you need guidance for a specific situation, consult a licensed attorney in your state.
What Does Federal Law Say About Recording Phone Calls?
At the federal level, recording phone calls is governed by the Electronic Communications Privacy Act (ECPA), specifically 18 U.S.C. Section 2511. This is the federal wiretapping statute, and it sets the baseline for the entire country.
Federal law follows one-party consent. That means a recording is legal as long as at least one person on the call consents to it. If you are a participant in the conversation and you decide to record, you are the consenting party. No additional permission is needed under federal law.
However, there is an important limitation: you cannot record a conversation you are not a part of. Placing a recording device on someone else’s phone line or intercepting a call between two other people is illegal wiretapping under federal law, regardless of consent.
The FCC also requires that if you are recording an interstate phone call, you must either use an automatic tone warning (a beep) during the recording or provide prior verbal notification to all parties. This applies specifically to calls that cross state lines.
The catch: Federal law is the floor, not the ceiling. Individual states are free to impose stricter requirements, and many do. When state law is stricter than federal law, the state law controls.
One-Party Consent vs. All-Party Consent
Understanding the difference between these two standards is the key to knowing whether it is legal to record phone calls in your situation.
One-Party Consent
In a one-party consent state, only one person involved in the conversation needs to agree to the recording. That person can be you. If you are on a phone call and you decide to hit “record,” that is legal. You do not need to tell the other person.
38 states plus Washington, D.C. follow one-party consent rules (including three states with nuances explained below).
All-Party (Two-Party) Consent
In an all-party consent state, every person on the call must know about and agree to the recording before it begins. The term “two-party” is slightly misleading because if there are three or more people on a conference call, all of them must consent. The more accurate name is “all-party consent.”
If you record a call in one of these states without getting everyone’s permission, you could face criminal charges (often a felony) and civil liability.
12 states require all-party consent for phone call recordings: California, Connecticut, Delaware, Florida, Illinois, Maryland, Massachusetts, Montana, Nevada, New Hampshire, Pennsylvania, and Washington.
What Counts as “Consent”?
Consent requirements vary by state, but generally fall into two categories:
Explicit consent: The person verbally agrees to being recorded, or provides written consent in advance. This is the gold standard and protects you in every jurisdiction.
Implied consent: In some states, if you announce “this call is being recorded” and the other person continues the conversation without objecting, their continued participation may constitute implied consent. Montana, for example, does not require a clear “yes” as long as all parties are clearly informed.
Best practice: Always announce that you are recording at the start of the call, regardless of which state you are in. This protects you legally and avoids any ambiguity.
Does the Recording Method Matter?
Whether you use your phone’s built-in call recording feature, a third-party app, or a dedicated hardware recorder like the RECAP S2, the same consent laws apply. The law governs the act of recording, not the tool. A recording made with an app has exactly the same legal standing as one made with a hardware device or a landline recorder.
Complete 50-State Phone Call Recording Laws Table
This is the definitive reference. The table below lists every U.S. state and whether it follows one-party or all-party consent for recording phone calls.
State
Consent Type
Notes
Alabama
One-Party
Alaska
One-Party
Arizona
One-Party
Arkansas
One-Party
California
All-Party
Cal. Penal Code Section 632. One of the strictest states. Recording a “confidential communication” without all-party consent can be a felony.
Colorado
One-Party
Connecticut
All-Party
Hybrid state. Criminal law is one-party, but civil law (C.G.S. Section 52-570d) imposes liability for recording phone calls without all-party consent. Treat as all-party for phone calls.
Delaware
All-Party
Conflicting statutes create ambiguity. Section 1335 requires all-party consent; Section 2402 allows one-party. Courts and most sources recommend treating it as all-party to be safe.
Florida
All-Party
Violations can be charged as a felony. Applies to all “oral communications.”
Georgia
One-Party
Hawaii
One-Party
Special rules apply in private settings (e.g., hidden microphones in private rooms may require additional consent).
Idaho
One-Party
Illinois
All-Party
Revised in 2014 after the old statute was struck down as unconstitutional. Current law (720 ILCS 5/14-2) requires all-party consent for “private conversations.” Recording in public spaces is generally permitted.
Indiana
One-Party
Iowa
One-Party
Kansas
One-Party
Kentucky
One-Party
Louisiana
One-Party
Maine
One-Party
Maryland
All-Party
All-party consent required regardless of how or where the conversation happens. Violations carry up to 5 years in prison.
Massachusetts
All-Party
One of the strictest states. Violations carry up to 5 years in prison. The law prohibits secret recording of any oral or wire communication.
Michigan
One-Party (Effective)
Technically the statute (MCL 750.539c) requires all-party consent, but courts have recognized a “participant exception” for 40+ years (Sullivan v. Gray, 1982). You can record your own conversations. A third party cannot record without all-party consent.
Minnesota
One-Party
Mississippi
One-Party
Missouri
One-Party
Montana
All-Party
All parties must be informed. Explicit verbal “yes” is not strictly required if all parties are clearly notified and do not object.
Nebraska
One-Party
Nevada
All-Party
NRS 200.620 requires all-party consent for phone calls specifically. In-person conversations only require one-party consent (NRS 200.650). This distinction is unique to Nevada. Violations are a category D felony.
New Hampshire
All-Party
All-party consent required for both phone and in-person recordings.
New Jersey
One-Party
New Mexico
One-Party
New York
One-Party
New York has periodically considered all-party consent legislation. Check current state law for any recent changes.
North Carolina
One-Party
North Dakota
One-Party
Ohio
One-Party
Oklahoma
One-Party
Oregon
One-Party (Phone)
One-party consent for phone calls. However, Oregon requires all-party consent for in-person conversations (ORS 165.540). Oregon also expanded its statute to require all-party consent for certain electronic communications, including video conferencing. For standard phone calls, one-party consent applies.
Pennsylvania
All-Party
Strictly all-party for any oral or electronic communication. One of the most strictly enforced states.
Rhode Island
One-Party
South Carolina
One-Party
South Dakota
One-Party
Tennessee
One-Party
Texas
One-Party
Utah
One-Party
Vermont
One-Party (Default)
No specific state statute on recording consent. Defaults to federal one-party consent rules. Courts have imposed restrictions on recordings in private homes (State v. Geraw, 2002).
Virginia
One-Party
Washington
All-Party
All-party consent required for private phone calls. Most phone calls are considered private.
West Virginia
One-Party
Wisconsin
One-Party
Wyoming
One-Party
Washington, D.C.
One-Party
Summary Count
One-party consent: 38 states + Washington, D.C. (includes Michigan, Oregon, and Vermont, which effectively function as one-party for phone calls)
All-party consent: 12 states (California, Connecticut, Delaware, Florida, Illinois, Maryland, Massachusetts, Montana, Nevada, New Hampshire, Pennsylvania, Washington)
Important note on Michigan, Oregon, and Vermont: These three states do not fit neatly into either category. Michigan’s statute reads as all-party, but courts have carved out a participant exception. Oregon is one-party for phone calls but all-party for in-person conversations and certain electronic communications like video calls. Vermont has no state statute at all and defaults to federal one-party consent. For standard phone call recording purposes, all three effectively function as one-party consent states, but consult a local attorney if your situation is complex.
What About Cross-State Phone Calls?
When you are in one state and the person you are calling is in another, which law applies? Unfortunately, there is no definitive federal rule that settles this question. Courts have ruled differently depending on the jurisdiction.
The safest approach: follow the stricter law. If you are in a one-party consent state (like New York) but calling someone in an all-party consent state (like California), California law may apply. The person in California could potentially bring charges or a civil claim under California law.
For interstate calls, the FCC also requires either a beep tone or prior verbal notification that the call is being recorded.
Practical advice: If there is any chance the person you are calling is in an all-party consent state, announce the recording before you begin. This one habit eliminates virtually all legal risk.
Business Call Recording Rules
Businesses face additional regulations beyond standard state consent laws.
FCC Rules for Businesses
The FCC requires businesses to inform callers before recording interstate phone calls. Most businesses satisfy this with the familiar automated message: “This call may be recorded for quality assurance and training purposes.”
Under FCC rules (47 C.F.R. Section 64.501), businesses recording interstate calls must either:
Provide prior verbal notice to all parties, or
Use an automatic beep tone throughout the recording
TCPA and Marketing Call Consent
The Telephone Consumer Protection Act (TCPA) governs marketing and telemarketing calls. Businesses must obtain prior express written consent before making marketing calls or sending marketing texts.
Note: The FCC attempted to implement a stricter “one-to-one” consent rule that would have required consent to be given to a specific, identified seller rather than a blanket list of companies. However, the 11th Circuit Court of Appeals vacated this rule, and it never took effect. Businesses should monitor for future regulatory changes but currently operate under the existing TCPA consent framework.
Industry-Specific Requirements
Certain industries have additional recording obligations:
Financial services: Banks and investment firms often must record calls for compliance purposes under SEC and FINRA regulations.
Healthcare: HIPAA rules affect how recorded calls containing patient information must be stored and protected. See our healthcare call recording guide for details.
Call centers: Many states require call centers to disclose recording at the start of every call, regardless of whether the state is one-party or all-party consent.
Employer-Employee Recordings
If you are recording calls in a workplace context, be aware that some states treat employer recordings differently. In Illinois, for example, recording a workplace conversation without all-party consent is explicitly illegal under the eavesdropping statute.
Recording Laws for VoIP and Internet Calls
A common question: do the same rules apply to VoIP calls made through services like Zoom, Google Voice, WhatsApp, or Teams?
Yes, the same consent laws generally apply. The Federal Wiretap Act covers “wire, oral, and electronic communications,” which includes VoIP. State laws similarly apply to electronic communications in most jurisdictions.
However, VoIP occupies a regulatory gray area at the federal level. The FCC has not fully classified all VoIP services. “Interconnected VoIP” services (those that connect to the traditional phone network) are subject to FCC regulations, while purely internet-based services (like app-to-app calls) are less regulated.
Key points for VoIP recordings:
The same one-party or all-party consent rules apply based on the states involved
If the VoIP call connects to a regular phone number, it is treated like any other phone call
Video conferencing platforms (Zoom, Teams, Meet) typically notify participants when recording starts, which can serve as the required disclosure
Oregon specifically expanded its law to include video conferencing communications
Bottom line: Do not assume that because a call happens over the internet, recording rules are different. They are not.
Can Recorded Phone Calls Be Used as Evidence in Court?
Recording a call legally is one thing. Getting it admitted as evidence in court is another. Here is what you need to know.
Legal Recording Is a Prerequisite, Not a Guarantee
A recording obtained in violation of state wiretapping laws is generally inadmissible and could expose you to criminal prosecution. In all-party consent states, a secretly recorded call will almost certainly be excluded from evidence and may result in charges against the person who recorded it.
Authentication Requirements
Even a legally obtained recording must meet evidentiary standards before a court will accept it. Under Federal Rule of Evidence 901(a), you must establish:
Identity: The voices on the recording belong to the people you claim they are
Accuracy: The recording device was capable of producing an accurate recording
Completeness: The recording has not been edited, altered, or tampered with
Chain of custody: You can account for who has had access to the recording
The Hearsay Rule
Recorded statements are generally considered hearsay (out-of-court statements offered for the truth of the matter). However, several important exceptions apply:
Admissions by a party-opponent are not considered hearsay and are freely admissible
Excited utterances and present sense impressions may qualify as exceptions
Business records exceptions may apply to calls recorded in the ordinary course of business
Practical Tips for Admissible Recordings
If you are recording calls with the intention of using them as evidence, use a reliable, purpose-built recording device like the RECAP S2 that produces clear, uncompressed audio. The RECAP S2 works with any phone via a compatible wired headset and adapter and records to a separate device, giving you a clean original file. Keep the original recording file untouched and make copies for review. Document the date, time, and participants of every recorded call.
Brief Note on International Recording Laws
If you make or receive calls from outside the United States, be aware that other countries have their own recording laws, many of which are stricter than U.S. rules.
European Union (GDPR): Recording calls involving EU residents typically requires explicit consent and a stated purpose for the recording. GDPR imposes significant fines for non-compliance.
Canada: Federal law requires one-party consent, similar to U.S. federal law.
United Kingdom: One-party consent for personal use, but businesses must comply with data protection regulations.
Australia: Laws vary by state/territory, with some requiring all-party consent.
If your calls cross international borders, assume you need all-party consent and consult with a legal professional.
Common Misconceptions About Phone Call Recording
“It’s always illegal to record someone without telling them”
False. In 38 states plus D.C., you can legally record a phone call you are participating in without telling the other person. Only all-party consent states require everyone on the call to be informed.
“If a company tells me the call is being recorded, I can record it too”
It depends. In one-party consent states, yes. You are a participant who consents. In all-party consent states, the company’s disclosure does not automatically grant you permission to make your own recording. However, if they have announced recording and you are in a one-party state, you are covered.
“Recording a call is the same as wiretapping”
Not necessarily. Wiretapping typically refers to a third party intercepting a communication they are not part of. Recording your own call as a participant is legally distinct from wiretapping in most jurisdictions, though the same statutes often govern both activities.
“I can always record calls for my own personal notes”
Not in all-party consent states. The purpose of the recording does not change the consent requirement. Even if you are recording “just for yourself,” you still need all-party consent in states that require it.
“Text messages and voicemails have different rules”
Mostly false. Voicemails are generally considered communications you have received and can retain. Text messages are written communications that do not involve “interception” in the traditional sense. However, some states (like Nevada) have extended their phone recording statutes to cover text messages, so check your local law.
FAQ
Is it legal to record a phone call without the other person knowing?
In one-party consent states (38 states plus D.C.), yes. As long as you are a participant in the call and you consent to recording it, you do not need to inform the other party. In all-party consent states (12 states), no. You must inform all parties and obtain their consent before recording.
What happens if I illegally record a phone call?
Penalties vary by state but can be severe. In many all-party consent states, illegal recording is a felony carrying prison time of 1 to 5 years. You may also face civil lawsuits from the person you recorded, with damages that can include actual damages, statutory damages (often $1,000 to $10,000 per violation), punitive damages, and attorney’s fees. In some states, illegally obtained recordings are also inadmissible as evidence.
Do recording laws apply the same way to apps, built-in features, and hardware recorders?
Yes. The law governs the act of recording, not the tool you use. Whether you use a phone’s built-in call recording, a third-party app, or a dedicated hardware recorder like the RECAP S2, the same state and federal consent laws apply to every method equally.
How do I record phone calls on my iPhone or Android?
Neither iOS nor Android offers a universal built-in call recording feature that works across all carriers and regions. For iPhones, a dedicated external recorder is the most reliable option. Check our guide on how to record phone calls on iPhone. For Android users, options vary by manufacturer and carrier. See our Android call recording guide for current solutions. For the most reliable recording across any phone, the RECAP S2 works with both iPhone and Android using a compatible adapter.
Can my employer record my work phone calls?
In most cases, yes, with some limitations. Federal law and most state laws allow employers to monitor business calls, especially when employees are informed through company policy. Many businesses include recording disclosure in employee handbooks or employment agreements. However, in all-party consent states, employers generally must still notify all parties. Personal calls made on work phones may have additional protections depending on the state.
What is the safest way to record phone calls legally?
The safest approach regardless of your state: announce at the beginning of every call that you are recording. Something as simple as “Just so you know, I’m recording this call” satisfies consent requirements everywhere. If the other person objects, you must stop recording (in all-party states) or respect their wishes. Using a reliable recording device ensures you capture clear audio that can serve as evidence if needed.
Do these laws apply to recording for journalism, legal work, or healthcare?
Yes, the same consent laws apply regardless of your profession. However, each profession has additional considerations. Journalists may have shield-law protections in some states. Lawyers must consider bar ethics rules. Healthcare professionals must comply with HIPAA when recordings contain patient information. If you record calls for journalism, legal work, business, or healthcare, see our dedicated guides for profession-specific compliance details.
Does RECAP work with any phone?
The RECAP S2 works with iPhones, Android phones, and landlines. It requires a wired headset (or earbuds) connected to your phone, a compatible adapter for phones without a headphone jack, and a separate recording device (such as a computer, digital voice recorder, or portable recorder). There are no apps to install, no batteries to charge, and no subscription fees. See the RECAP S2 product page for full specifications.
Record Your Calls With Confidence
Understanding your state’s recording laws is the first step. Having the right equipment is the second.
The RECAP S2 is a dedicated phone call recorder that captures both sides of any conversation in crystal-clear audio. It works with iPhones, Android phones, and landlines using a wired headset and compatible adapter. No apps to manage, no batteries to charge, no subscription fees.
At just $99, the RECAP S2 gives you a dependable way to record every important call.
This article is for informational purposes only and does not constitute legal advice. Laws change frequently. Consult an attorney licensed in your state for current guidance.
If you need to record phone calls on your computer for legal documentation, business compliance, journalism, or personal reference, this guide covers every method available — including the complete hardware setup and recording process on both Windows and Mac. By the end, you should have working call recording in a single sitting.
Methods to Record Phone Calls on a Computer
There are several ways to capture phone call audio on a PC or Mac. Each method has different trade-offs in audio quality, reliability, and convenience. Here is an honest overview before we dive into the step-by-step instructions.
The RECAP S2 ($99) is a dedicated audio adapter that connects between your phone and a wired headset, then outputs both sides of the call directly to your computer’s microphone input. Because it captures the electrical audio signal rather than re-recording through the air, you get clean, full-fidelity audio of both voices. No apps, no batteries, no subscriptions — just a hardware connection.
Trade-offs: Requires a wired headset (not Bluetooth), an adapter for phones without a headphone jack, and a separate recording setup on your computer. The rest of this guide walks through the full RECAP S2 setup in detail.
The simplest approach: put your phone on speaker and use your computer’s built-in microphone (or an external USB microphone) to record the room audio.
How: Place your phone near your computer’s microphone, start a call on speaker, and hit record in any audio software (Audacity, OBS, QuickTime, Windows Sound Recorder).
Trade-offs: Audio quality is poor — you pick up room echo, background noise, and your voice will be much louder than the caller’s. Recordings are often unusable for transcription or legal purposes. This method works in a pinch but is not suitable for anything that requires clear, reliable audio.
Method 3: Google Voice Recording to Computer
If you make calls through Google Voice on your computer’s web browser, you can record incoming calls directly. Google Voice has a built-in recording feature (press 4 during a call to start recording), but it only works on incoming calls and announces the recording to all parties.
Trade-offs: Only works for incoming calls made through Google Voice. The recording announcement cannot be disabled. Call quality depends on your internet connection. You cannot record outgoing calls. Not suitable if you need discreet or flexible recording.
Method 4: Third-Party VoIP Apps with Built-In Recording
Some VoIP (Voice over IP) applications — such as Skype (discontinued May 2025, now redirects to Microsoft Teams), Zoom, Microsoft Teams, and other conferencing tools — offer built-in call recording when you make phone calls through them.
Trade-offs: Requires making your calls through the app rather than your phone’s native dialer. Many VoIP apps notify all participants that recording is active. Recording quality depends on your internet connection. Monthly subscriptions may apply for phone number access. Not practical if you need to record standard cell phone calls from your phone’s regular number.
Why RECAP S2 Is the Best Option for Most Users
Unlike speakerphone recording, RECAP S2 captures a clean analog signal — no room noise, no echo, balanced volume on both sides. Unlike Google Voice or VoIP apps, it works with any phone call from any carrier, on any phone, using your regular phone number. There is no recording announcement, no subscription, and no dependency on internet quality. For anyone who needs reliable, high-quality phone call recordings on their computer, RECAP S2 is the most straightforward solution.
Recording phone calls to a computer with RECAP S2 requires a hardware adapter to route the call audio from your phone to your PC. Here is the complete list:
RECAP S2 audio adapter ($99) — connects between your phone and headset, and outputs both sides of the call to a recording device
A wired headset with a 3.5mm TRRS plug (most earbuds with a built-in microphone work)
A USB-C or Lightning to 3.5mm adapter — if your phone does not have a headphone jack (most modern phones). See our adapter compatibility guide for tested recommendations.
Recording software on your PC — Audacity (free), OBS Studio (free), Windows Sound Recorder, QuickTime, or another audio recorder
You may also need one of the following depending on your computer’s audio ports:
A USB audio adapter — if your PC has no 3.5mm microphone input at all. See our adapter guide for recommendations.
A TRRS splitter — if your laptop has a single combo headset jack instead of separate mic and headphone jacks
Check Your Computer First (30 Seconds)
Before setting up, run our free Audio Device Scanner to check whether your computer has a stereo microphone input. The scanner runs in your browser in 30 seconds and tells you exactly what audio inputs your computer supports. If your computer does not have a stereo input (common on modern Macs and thin laptops), the scanner will tell you — and a USB audio adapter will solve it.
Hardware Setup: Step by Step
The signal chain is straightforward. Audio flows from your phone call, through RECAP S2, and into your computer’s microphone input.
Step 1: Connect Your Phone to RECAP S2
If your phone has a 3.5mm headset jack, plug RECAP S2 directly into it.
If your phone uses USB-C (Samsung Galaxy S20+, Google Pixel 6+, most modern Android phones): connect a USB-C to 3.5mm adapter to your phone first, then plug RECAP S2 into the adapter. Use an active adapter with a built-in DAC — cheap passive adapters will not work with Samsung or Pixel phones.
If your iPhone uses Lightning: connect Apple’s Lightning to 3.5mm adapter to your phone first, then plug RECAP S2 into the adapter.
If your iPhone uses USB-C: use a USB-C to 3.5mm adapter.
See our compatible adapters guide for tested options, pricing, and where to buy for your specific phone.
Step 2: Connect Your Headset
Plug your wired headset into the headset port on RECAP S2. You will talk and listen through this headset during your calls, just as you normally would. RECAP S2 passes audio through transparently — there is no change to call quality or experience for you or the other party.
Step 3: Connect RECAP S2 to Your Computer
RECAP S2 has a separate output cable that carries both sides of the call audio. This cable connects to your computer’s microphone input (not the headphone jack).
Identify your computer’s audio ports:
Desktop PC with separate jacks: Look for the pink 3.5mm jack on the back or front panel — that is the microphone input. Plug RECAP S2’s output cable directly into it.
Laptop with separate mic and headphone jacks: Plug RECAP S2’s output cable into the microphone jack (usually marked with a microphone icon or colored pink).
Laptop with a single combo headset jack (most modern laptops): You need a TRRS splitter that separates the combo jack into individual microphone and headphone connections. Plug RECAP S2’s output cable into the microphone side of the splitter. TRRS splitters are widely available on Amazon.
Computer with no 3.5mm jacks (USB-C only or no audio ports): You need a USB audio adapter that adds a 3.5mm microphone input via USB. See our compatible adapters guide for recommended USB audio adapters. Plug RECAP S2’s output cable into the adapter’s mic input, and plug the adapter into a USB port on your computer.
Once everything is connected, make a test call before recording anything important. Call a friend or your voicemail, and confirm that you can hear the caller through your headset and that they can hear you.
Recording on Windows
Selecting the Right Input Device
Before recording, you need to tell Windows to use the correct microphone input — the one RECAP S2 is connected to.
Right-click the speaker icon in the system tray (bottom-right of your screen).
Click Sound settings (Windows 11) or Open Sound settings (Windows 10).
Scroll down to the Input section.
Under “Choose a device for speaking or recording,” select the input that RECAP S2 is connected to. This will be your computer’s built-in microphone jack (labeled something like “Microphone – Realtek Audio”) or your USB audio adapter (labeled something like “Microphone – USB Audio Device”).
Speak into your headset while watching the input level meter. You should see it move. If it does not, you have the wrong device selected — try the other options in the dropdown.
Adjusting Microphone Volume
The input volume needs to be set correctly or your recording will be too quiet or distorted.
In the same Sound settings window, click on the input device you selected.
Adjust the Input volume slider. Start at 80% and test.
Make a test call and watch the level meter. The meter should bounce actively during conversation without hitting the maximum constantly.
If the audio is too quiet even at 100%, you may need to enable Microphone Boost in the advanced audio settings. See our detailed guide: How to adjust microphone volume on PC.
In the top toolbar, click the Audio Setup button (or go to Edit > Preferences > Audio Settings).
Set the Recording Device to your microphone input (the same one you selected in Windows Sound settings).
Set Recording Channels to Mono. Phone calls are mono audio — recording in stereo doubles the file size for no benefit.
Click OK.
Recording a call:
Open Audacity and confirm the correct input device is selected in the toolbar.
Start your phone call.
Click the red Record button in Audacity. You should see a waveform appear as audio comes through.
When the call ends, click Stop.
Go to File > Export Audio and save as MP3 (128kbps is sufficient for voice) or WAV.
Voice-activated recording (hands-free):
If you want Audacity to start recording automatically when a call begins:
Go to Transport > Transport Options > Sound Activated Recording and enable it.
Go to Transport > Transport Options > Sound Activation Level and set the threshold. Start at -30dB and adjust — the threshold should be above your room’s background noise level but below normal conversation volume.
Click Record. Audacity will wait silently until it detects audio above the threshold, then begin capturing.
OBS Studio is a free, open-source tool primarily known for streaming and screen recording, but it also works well as a dedicated audio recorder. OBS is a strong choice if you already use it for other tasks or want to record audio alongside screen activity.
Under Global Audio Devices, set Mic/Auxiliary Audio to the input RECAP S2 is connected to.
Click OK.
In the Audio Mixer panel at the bottom, you should see the mic channel. Speak into your headset and confirm the level meter moves.
To record audio only (no video), go to Settings > Output, set Recording Format to MKV or MP4, and under Audio Encoder, choose AAC or MP3.
Click Start Recording when your call begins, and Stop Recording when it ends.
OBS is more complex than Audacity for simple call recording, but it offers flexible multi-source mixing if you need it. For a full comparison of OBS, Audacity, and other recording software, see our software guide.
Option C: Recording with Windows Sound Recorder
If you do not want to install any software, Windows has a built-in option.
Open the Start menu and search for Sound Recorder (Windows 11) or Voice Recorder (Windows 10).
If prompted, select the correct input device.
Click the large Record button to start.
Click Stop when your call ends.
The recording saves automatically in M4A format.
Sound Recorder is simpler than Audacity or OBS but lacks level monitoring, voice activation, and editing tools. It works well for quick, occasional recordings.
Recording on Mac
Selecting the Input Device
Important — Mac users, check your audio inputs first: Run our Audio Device Scanner to see what inputs your Mac supports. Most modern MacBooks (2021 and newer, with Apple Silicon chips) have a single combo 3.5mm jack that is designed for headsets, not line-level input. This combo jack will not detect RECAP S2’s output cable as a microphone input — even though it works fine with Apple earbuds. If the scanner shows no stereo microphone input, you need a USB audio adapter with a stereo microphone input — see our compatible adapters. Older Macs (pre-2021) with a separate “Line In” port work directly.
Open System Settings (click the Apple menu > System Settings).
Go to Sound in the sidebar.
Scroll down to the Input section.
Select the input that RECAP S2 is connected to. On older Macs this will be “Line In.” On newer Macs with a USB audio adapter, select the adapter’s name (e.g., “USB Audio Device” or “Andrea USB-MA”).
Speak into your headset and watch the Input level meter. It should respond. If it does not, try selecting a different input device.
Adjust the Input volume slider. Start at 80% and test during a call.
Option A: Recording with QuickTime (Built-In)
QuickTime Player is already installed on every Mac and works well for simple call recording.
Open QuickTime Player (find it in Applications or use Spotlight search).
Go to File > New Audio Recording.
Click the small dropdown arrow next to the record button. Select the input device that RECAP S2 is connected to.
Adjust the volume slider to set recording level. Watch the level meter as you speak.
Click the red Record button when your call starts.
Click Stop when the call ends.
Go to File > Save or File > Export As to save the recording. QuickTime saves in M4A format by default.
QuickTime is simple and reliable but does not offer voice activation or waveform display during recording.
Option B: Recording with Audacity on Mac
Audacity works identically on Mac as it does on Windows. Follow the same steps from the Windows Audacity section above:
Whatever software you use on either platform, these settings produce the best results for phone call audio:
Setting
Recommended Value
Why
Sample rate
44,100 Hz
Standard quality, more than sufficient for voice
Bit depth
16-bit
Adequate for phone audio dynamic range
Channels
Mono
Phone calls are mono — stereo doubles file size with no benefit
Export format
MP3 (128kbps) or WAV
MP3 for smaller files, WAV for maximum quality
Input volume
Peaks at -6dB to -3dB
Strong signal without clipping
Troubleshooting Common Issues
No Audio Detected
Symptom: Your recording software shows no input, the level meter does not move.
Fix: 1. Check that you selected the correct input device in your OS sound settings AND in your recording software. These are separate settings — both must point to the right input. 2. Make sure RECAP S2’s output cable is plugged into your PC’s microphone input, not the headphone output. 3. Try a different USB port if using a USB audio adapter. 4. On Windows, make sure the microphone is not muted or disabled in Sound settings > Input device properties. 5. On Mac (2021 and newer with Apple Silicon): The combo 3.5mm jack on modern MacBooks does not accept line-level input from RECAP S2’s output cable. Run our Audio Device Scanner to confirm — if no stereo microphone input appears, you need a USB audio adapter with a stereo microphone input — see our compatible adapters.
Audio Too Quiet
Symptom: The recording is barely audible even at full playback volume.
Fix: 1. Increase the microphone input volume in your OS sound settings (see instructions above). 2. On Windows, enable Microphone Boost in the advanced input device properties. 3. In Audacity, use Effect > Amplify after recording to boost the volume. 4. See our detailed guide: How to adjust microphone volume.
Audio Distorted or Clipping
Symptom: The recording sounds crunchy, harsh, or distorted. The waveform in Audacity looks like it is hitting the top and bottom edges (flat-topped).
Fix: 1. Lower the microphone input volume in your OS sound settings. Try 50-60%. 2. Lower the phone’s call volume during the call. 3. In Audacity, if the waveform is clipped, use Effect > Clip Fix to attempt repair (results vary). 4. See our detailed guide: How to fix clipping sound in recordings.
Only Hearing One Side of the Call
Symptom: The recording captures your voice but not the caller’s, or vice versa.
Fix: 1. Make sure your phone adapter is an active adapter with a built-in DAC (not a passive adapter). This is the most common cause on Samsung and Pixel phones. See our adapter compatibility guide. 2. Check that RECAP S2 is fully seated in the adapter and the headset is fully plugged into RECAP S2. 3. Try unplugging and reconnecting each connection in the chain. 4. If using a USB-C adapter on Android, try a different adapter — see our compatible adapters guide for tested options that work reliably on all phones.
Recording Starts but Audio Cuts In and Out
Symptom: Audio drops intermittently during the recording.
Fix: 1. Check all physical connections — a loose cable is the most common cause. 2. If using voice-activated recording in Audacity, the activation threshold may be set too high. Lower it (e.g., from -20dB to -35dB) so the software does not cut out during quieter speech. 3. Try a different cable or adapter to rule out a hardware defect.
Advanced: Automatic Recording
If you record calls regularly and want a hands-free workflow where every call is captured without pressing buttons, you have two options:
Audacity’s Sound Activated Recording — Audacity listens for audio above a threshold and records automatically. Leave it running in the background, and it captures every call. See the setup steps in the Windows and Mac sections above.
A dedicated voice-activated recorder — Digital voice recorders from Sony, Olympus, and Zoom have VOR (Voice Operated Recording) modes that start and stop based on audio detection. Connect RECAP S2’s output to the recorder instead of your PC.
Can I record phone calls on my computer without any hardware?
Not with high quality. Your phone and computer are separate devices, so there is no software that can route live phone call audio from your cell phone to your PC with full fidelity. You can use the speakerphone method (put the call on speaker and record with your computer’s microphone), but the audio quality will be poor due to room noise and echo. For clean recordings of both sides of the call, you need a hardware connection like RECAP S2.
Do I need a specific type of headset?
Any wired headset or earbuds with a 3.5mm TRRS plug (the kind with a built-in microphone) will work. Bluetooth headsets and AirPods will not work — RECAP S2 requires a wired connection because it captures the audio signal from the physical cable.
Can I use RECAP S2 with any phone?
Yes. RECAP S2 works with every phone that supports a wired headset — iPhones (all models, using the appropriate adapter), Android phones (all manufacturers and OS versions), and even landline desk phones with a headset jack. See our adapter guide for the right adapter for your specific phone.
What if my computer only has USB-C ports and no audio jacks?
Use a USB audio adapter that adds a 3.5mm microphone input via USB. See our compatible adapters guide for recommended USB audio adapters. Plug RECAP S2’s output into the adapter, and plug the adapter into your computer’s USB port.
Will the other person know I am recording?
RECAP S2 is a hardware device that does not interact with your phone’s software in any way. It does not trigger any recording notification, beep, or announcement. The other party will not know unless you tell them. Whether you are required to tell them depends on your local recording laws.
What audio quality can I expect?
RECAP S2 delivers a clean analog audio signal directly from the call. Recording quality depends on your software settings, but with the recommended settings (44,100 Hz, 16-bit, MP3 128kbps), you will get clear, professional-quality audio suitable for transcription, legal documentation, or archiving.
Can I use OBS Studio instead of Audacity to record calls?
Yes. OBS Studio works as an audio recorder by setting your microphone input to the RECAP S2 source and starting a recording. OBS is a good choice if you already use it for streaming or screen recording. However, Audacity is generally easier for audio-only call recording because it offers voice-activated recording, a waveform display, and built-in editing tools. See our software comparison guide for a full breakdown.
Comparing different recording devices? See our guide:
Is there a way to record phone calls on my computer for free?
The recording software itself is free — Audacity, OBS Studio, QuickTime, and Windows Sound Recorder all cost nothing. The hardware is the only cost: the RECAP S2 adapter is $99 (one-time purchase, no subscription), and you may need a phone adapter if your phone lacks a headphone jack (see our adapter guide for options and pricing).
Ready to start recording phone calls on your computer?
Already have recordings? Try Recap — upload any audio file and get AI transcription with speaker labels, summaries, and full-text search. Free during early access.
“.get_post(2271)->post_content.”@@E@@”;’ –skip-themes –skip-plugins
==================================================
⚠️ SSH_AUTH_SOCK is set but the agent is unreachable — falling back to an on-disk key
🔌 Connecting to u765740122@217.196.55.96:65002
🔑 Using SSH key: /Users/igor/.ssh/id_rsa_mc
✅ Connected to Hostinger Business Hosting as u765740122
@@B@@
This guide covers every method to record phone calls on iPhone — from Apple’s built-in call recording feature to third-party apps, Google Voice, and dedicated hardware. You will learn what works, what does not, and which option fits your situation.
Method 1: iPhone Built-In Call Recording
Apple introduced native call recording to the iPhone with a recent iOS update. It was the first time iPhone users had an official recording tool built into the operating system.
How to Use It
Make or receive a phone call (or FaceTime audio call).
During the call, tap the waveform icon in the top-left corner of the call screen.
An automated voice announces to both parties that the call is being recorded. This announcement cannot be skipped or disabled.
Tap the icon again to stop recording.
The recording is automatically saved to the Notes app, along with a transcription (on supported models — see below).
Supported iPhones and Feature Tiers
The call recording feature works on a wide range of iPhones, but capabilities differ by model:
Recording + Transcription (iPhone 12 and later — A14 chip or newer):
iPhone 12 / 12 mini / 12 Pro / 12 Pro Max
iPhone 13 / 13 mini / 13 Pro / 13 Pro Max
iPhone 14 / 14 Plus / 14 Pro / 14 Pro Max
iPhone 15 / 15 Plus / 15 Pro / 15 Pro Max
iPhone 16 / 16 Plus / 16 Pro / 16 Pro Max (and newer)
iPhone SE (3rd generation)
These models get both the audio recording and an on-device transcription powered by Apple’s speech recognition engine.
Recording Only — No Transcription (iPhone XR, XS, 11, SE 2nd gen):
iPhone XR
iPhone XS / XS Max
iPhone 11 / 11 Pro / 11 Pro Max
iPhone SE (2nd generation)
These older models can record calls and save the audio, but they do not generate a transcription. The on-device transcription feature requires an A14 Bionic chip or later, which these models lack.
AI-powered call summaries (part of Apple Intelligence) require an iPhone 15 Pro or later. Older models that support transcription get the transcript but not the AI summary.
Transcription Languages
iPhone call transcriptions currently support: English (US, UK, Australia, New Zealand), Spanish (US, Mexico, Spain), French (France), German (Germany), Italian (Italy), Portuguese (Brazil), Japanese, Korean, Mandarin Chinese (China mainland, Taiwan), and Cantonese (Hong Kong). Apple has been expanding this list with each update, so additional languages may be available by the time you read this.
Limitations
Mandatory announcement. Every recording starts with an audible notification that tells the other party the call is being recorded. There is no way to turn this off. For journalists, attorneys, private investigators, and many business users, this eliminates the utility of the feature entirely.
Not available in many countries. Apple blocks the recording feature in the European Union and many other countries. If your iPhone’s region setting is set to one of these locations, the record button simply won’t appear. Apple made this decision to comply with GDPR and regional privacy regulations. Check Apple’s support page for the current list of supported regions.
No auto-recording. You must manually tap the record button on every single call. If you forget, you miss the recording. There is no setting to record all calls automatically.
Phone app and FaceTime only. The recording feature does not work with third-party calling apps. Calls made through WhatsApp, Signal, Zoom, Microsoft Teams, or any other app are not supported.
If these limitations rule out the built-in method, a phone recording device like RECAP S2 removes all of them — no announcements, works in every country, supports all calling apps, and captures both sides.
No transcription on older models. As noted above, iPhone XR, XS, 11, and SE (2nd generation) get the audio recording but no transcript. If you need searchable text from your calls on those devices, you will need to transcribe manually or use external software.
When This Method Works
iPhone built-in recording is fine for casual use if you are in a supported country, you are making a standard phone or FaceTime call, and you do not mind the other party hearing a recording announcement. It is a welcome addition, but it is designed for transparency-first personal use, not professional recording needs.
Historically, recording calls on iPhone through a third-party app has been close to impossible. Unlike Android, iOS has never allowed apps to access the call audio stream. No app on the App Store can simply “tap into” a live phone call.
How These Apps Work
Apps like TapeACall use a workaround: three-way (conference) calling. Here is the process:
You are on a phone call.
You open the recording app, which dials a recording server.
You tap Merge Calls on your iPhone to create a three-way call between you, the other party, and the recording service.
The recording service captures the audio from its end of the conference call.
In theory, this gives you a recording of both sides. In practice, it is cumbersome and unreliable.
Note: Rev Call Recorder, which was once a popular free option in this category, has been discontinued. The app is no longer available for download and the recording service has been shut down. If you previously relied on Rev Call Recorder, you will need to switch to another method.
Limitations
Complicated workflow. Despite marketing claims of a “one-tap” experience, the actual process involves multiple steps across multiple apps. You need to put your call on hold, dial the service, wait for it to answer, then merge. Users report the real process takes seven or more taps across three different screens.
Carrier support required. Three-way calling must be enabled by your mobile carrier. Some carriers and prepaid plans (SimpleTalk, H2O Wireless, and many international carriers) do not support conference calling, which makes these apps completely non-functional.
Your audio goes through third-party servers. The recording happens on the app company’s servers, not on your phone. Your private conversations are transmitted to and stored on servers you do not control. For anyone handling sensitive calls — legal, medical, financial, or journalistic — this is a serious privacy and compliance concern.
Subscription fees. TapeACall requires a paid subscription (check the App Store listing for current pricing). These subscription costs add up over time compared to one-time purchase alternatives.
Conference call notification. When you merge calls, the other party may hear a tone or brief interruption, potentially alerting them to the recording.
Geographic restrictions. TapeACall has broad support but still requires a carrier that supports three-way calling, and coverage varies by region.
Truecaller discontinued iPhone recording. Truecaller shut down its call recording feature on iPhone entirely, citing Apple’s native recording feature.
When This Method Works
Three-way calling apps can work if you have a carrier that supports conference calling and you are willing to pay a subscription. But the workflow is clunky, your audio passes through external servers, and the reliability is inconsistent. For most users, there are better options.
Method 3: Google Voice (Press 4 to Record)
If you use Google Voice as your phone number, it has a simple built-in recording feature:
In the Google Voice app, go to Settings > Calls and enable Incoming call options.
When you receive a call to your Google Voice number, press 4 on the dialpad to start recording.
An automated announcement plays, informing both parties that the call is being recorded.
Press 4 again to stop recording. The audio saves to your Google Voice voicemail inbox.
Limitations
Incoming calls only. Google Voice recording does not work on outgoing calls — only calls that someone else makes to your Google Voice number. This is a severe limitation for anyone who initiates most of their calls.
Mandatory announcement. Both parties hear a notification when recording starts and stops. There is no way to disable this, even if the call is muted on your end.
Manual activation. You must remember to press 4 during the call. There is no auto-record option on the free plan.
Google Voice number required. You need a Google Voice account and must route calls through it. Not everyone wants to give out a Google Voice number for professional use.
Limited availability. Google Voice is only available in the US (and select other countries). It is not an option for international users.
No VoIP app calls. This only works for phone calls routed through Google Voice — not WhatsApp, Signal, or other apps.
When This Method Works
Google Voice recording is useful if you already use Google Voice as your primary number, you mainly receive calls rather than making them, and you are comfortable with both parties hearing the recording announcement. It is free and simple, but too limited for most professional use cases.
Method 4: Voicemail Forwarding Trick
Some guides online suggest a workaround where you merge your active call with your own voicemail to create a recording:
During a call, tap Add Call and dial your own number.
When it goes to voicemail, tap Merge Calls.
The voicemail system records the merged audio.
Why This Is Unreliable
Carrier-dependent. This trick depends on your carrier allowing you to merge with your own voicemail, and many carriers block or do not support this.
Voicemail time limits. Most voicemail systems cut off after 1-3 minutes, making it useless for anything longer than a brief exchange.
Terrible audio quality. Voicemail systems are compressed for voice messages, not high-quality recording. The result is usually muffled and clipped.
May drop the call. Merging with voicemail can cause the original call to disconnect on some carriers.
No way to organize or export. Recordings are buried in your voicemail inbox with no easy way to file, search, or share them.
This method is a hack at best. We do not recommend relying on it for any purpose.
Method 5: Speakerphone + External Recorder
The lowest-tech option: put the call on speakerphone and record the room audio with another device.
Make or receive your call and tap Speaker.
Use a second phone, digital voice recorder, laptop, or tablet to record the audio playing from your iPhone’s speaker.
Limitations
Poor audio quality. You are recording room audio, which means echo, background noise, uneven volume between your voice and the caller’s voice, and distortion from the speaker. Call recordings made this way are often difficult to understand or transcribe.
No privacy. Everyone in the room hears the entire conversation. This is a non-starter for confidential calls — legal consultations, medical discussions, business negotiations, or any sensitive topic.
Unprofessional. If you are on a business call and the other party hears room echo, it is obvious you are on speakerphone. This can undermine trust.
Difficult to transcribe. Automatic transcription services perform poorly on speakerphone recordings because both voices are picked up unevenly by the external microphone, often overlapping with room noise.
When This Method Works
In a pinch, when you have no other option and the call is not confidential. That is about it.
Method 6: Hardware Audio Adapter (RECAP S2)
Every method above has significant trade-offs: mandatory announcements, regional blocks, three-way calling hassles, incoming-only restrictions, or unusable audio quality. A hardware adapter avoids all of these because it captures the audio at the electrical signal level, completely outside the reach of iOS software restrictions.
Looking for a phone call recording device? See our complete guide to phone call recording devices — why hardware beats apps, how it works, and which phones are compatible.
RECAP S2 is an audio adapter that connects between your iPhone and a wired headset. It taps both sides of the call audio (your voice and the caller’s) and routes a copy to any recording device – a computer, digital voice recorder, tablet, or second phone. No apps, no batteries, no subscriptions.
How It Works — and What You Should Know Up Front
RECAP S2 is a passive analog device, which means it has real strengths and honest trade-offs:
Requirements: – A wired headset with a 3.5mm TRRS plug (most standard earbuds with a built-in microphone work). Bluetooth headsets will not work — the audio must travel through the wire. – If your iPhone lacks a 3.5mm headphone jack (iPhone 7 and later), you need a Lightning to 3.5mm adapter or USB-C to 3.5mm adapter. See our compatible adapters guide for tested options. – A separate recording device (PC, Mac, digital voice recorder, tablet, or a second phone). RECAP routes audio to this device — it does not record internally.
These requirements mean RECAP is not a pocket-and-go solution like pressing a button in Apple’s built-in recorder. It is a desk setup or a prepared-in-advance kit. For professionals who need reliable, private, high-quality recordings, that trade-off is well worth it.
How to Record Phone Calls on iPhone with RECAP S2
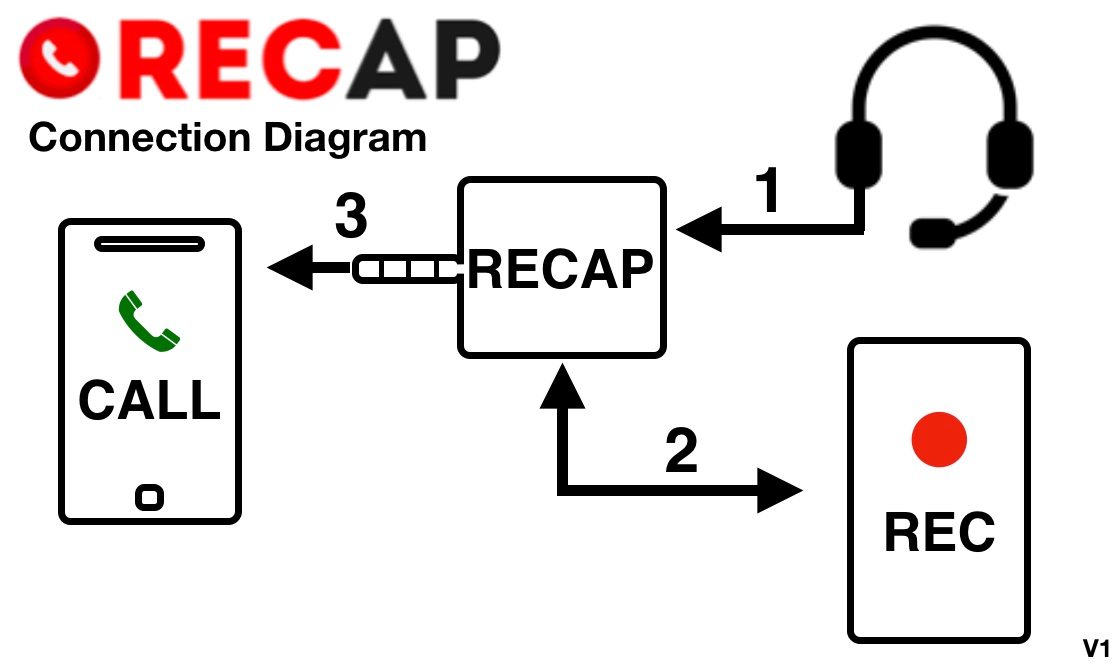
Follow the Connection Diagram above — the numbers match these steps:
① Plug your headset into RECAP.
② Connect RECAP’s output to your REC device — a separate computer, digital voice recorder, or second phone. This is what records — not the CALL phone you’re talking on.
③ Plug RECAP into your CALL phone last (use an Apple USB‑C or Lightning → 3.5mm adapter if it has no headphone jack).
Start the call and hit record on your REC device. Both sides are captured in clear, full‑quality audio.
Record in stereo — and check your input. RECAP puts your voice and the caller’s voice on two separate channels, so your REC device needs a stereo microphone input. A mono input — common on laptops, and on phone “headphone” dongles — collapses both sides into one and drops your voice. Not sure what yours captures? Run our free Audio Device Scanner, and see the compatibility guide for tested stereo adapters.
Because RECAP is a hardware device operating at the analog audio level, iOS restrictions do not apply. There is no recording announcement, no region block, and no dependency on any specific software version or app.
iPhone Adapter Guide
iPhones have used three different audio connector types over the years. Here is what you need for each:
iPhone 6s and older / iPhone SE (1st gen): No adapter needed These models have a built-in 3.5mm headphone jack. Plug RECAP S2 directly into the phone.
iPhone 7 through iPhone 14 / iPhone SE (2nd and 3rd gen): Lightning to 3.5mm adapter These models use Lightning and have no headphone jack. You need Apple’s Lightning to 3.5mm Headphone Jack Adapter. Important: use the genuine Apple adapter. Third-party Lightning to 3.5mm adapters frequently do not pass microphone audio correctly, which means your voice will not be captured. The Apple adapter is specifically designed to carry both headphone and microphone signals through Lightning. This is the number-one compatibility issue we see with iPhone setups. See our compatible adapters guide for tested adapters, pricing, and where to buy.
iPhone 15, iPhone 16 (and future models): USB-C to 3.5mm adapter These models use USB-C. You need a USB-C to 3.5mm Headphone Jack Adapter. The Apple USB-C adapter works reliably for both headphone audio and microphone input. Third-party USB-C adapters with a built-in DAC also work well with these models — the compatibility issues that plague Lightning adapters are less common with USB-C. See our compatible adapters guide for tested options, pricing, and where to buy.
What RECAP S2 Works With (Beyond Phone Calls)
Because RECAP captures audio from the headset jack, it works with any app that routes audio through headphones:
Standard phone calls (carrier calls)
FaceTime (audio and video)
WhatsApp calls
Signal calls
Zoom meetings
Microsoft Teams calls
Skype calls
Any other VoIP or calling app
This is a major advantage over Apple’s built-in recording, which only works with the Phone app and FaceTime.
What You Need
RECAP S2 audio adapter ($99 — one-time purchase, no subscriptions)
A recording device: PC, Mac, digital voice recorder, tablet, or a second phone running any voice recording app
A wired headset with a 3.5mm TRRS plug (most standard earbuds with a built-in microphone work)
If your iPhone lacks a 3.5mm jack: a compatible adapter (Lightning to 3.5mm or USB-C to 3.5mm — see our adapter guide)
Compatible iPhones
RECAP S2 works with every iPhone that supports a wired headset:
3.5mm jack (no adapter needed): iPhone 4, 4s, 5, 5c, 5s, 6, 6 Plus, 6s, 6s Plus, SE (1st gen)
Lightning (Apple Lightning adapter required): iPhone 7, 7 Plus, 8, 8 Plus, X, XR, XS, XS Max, 11, 11 Pro, 11 Pro Max, 12 mini, 12, 12 Pro, 12 Pro Max, 13 mini, 13, 13 Pro, 13 Pro Max, 14, 14 Plus, 14 Pro, 14 Pro Max, SE (2nd gen), SE (3rd gen)
USB-C (Apple USB-C adapter required): iPhone 15, 15 Plus, 15 Pro, 15 Pro Max, 16, 16 Plus, 16 Pro, 16 Pro Max (and future USB-C models)
Since RECAP is hardware, it works on every iOS version — past, present, and future. No software updates can break it.
Comparison: All Methods to Record Phone Calls on iPhone
Use iPhone built-in recording if: You are in a supported country, you are making standard phone or FaceTime calls, and you are fine with the other party hearing a recording announcement. Good for casual, transparent recording.
Use Google Voice if: You already use Google Voice, you mainly receive calls, and you only need occasional recordings. Free but severely limited.
Use RECAP S2 if: You need reliable, high-quality recording of both sides on any iPhone, with any calling app, in any country, without announcing the recording to the other party. RECAP is the choice for professionals — journalists, lawyers, researchers, compliance officers, business owners — who need recordings they can count on. It is a one-time purchase that does not depend on iOS versions, carrier support, or regional availability.
Avoid three-way calling apps unless you have exhausted other options. The workflow is frustrating, your audio passes through external servers, and carrier compatibility is a gamble. Note that Rev Call Recorder has been discontinued entirely, further shrinking this category.
Avoid the speakerphone/voicemail methods entirely for anything you need to actually use afterward.
Frequently Asked Questions
Can I record phone calls on iPhone without the other person knowing?
With Apple’s built-in recording, no. Apple’s feature plays a mandatory announcement that cannot be disabled. Third-party apps like TapeACall also produce audible artifacts (conference call merge tones). RECAP S2 is a hardware device that operates silently at the audio signal level — no announcements, no tones, no notifications are sent to the other party.
Important legal note: Recording laws vary by jurisdiction. In the US, federal law allows one-party consent (you can record if you are a participant), but 12 states require all-party consent: California, Connecticut, Delaware, Florida, Illinois, Maryland, Massachusetts, Michigan, Montana, New Hampshire, Oregon, and Washington. Pennsylvania’s wiretapping statute is also frequently interpreted as requiring all-party consent. Always verify your local regulations before recording any call.
Does iPhone call recording work in the EU?
No. As of this writing, Apple has blocked the call recording feature in all European Union countries, citing GDPR compliance. The feature remains unavailable in the EU. Users in the EU who need to record phone calls on iPhone must use alternative methods like RECAP S2.
Why do I need to use an Apple-brand Lightning adapter with RECAP?
Apple’s Lightning connector is a proprietary standard. Third-party Lightning to 3.5mm adapters often cut corners on microphone passthrough — they will play audio to your headphones, but they will not carry your microphone signal back to the phone correctly. This means RECAP would capture the other party’s voice but not yours. The genuine Apple Lightning to 3.5mm adapter is specifically engineered to support full bidirectional audio (headphone + microphone), and it resolves this issue completely. USB-C adapters do not have this problem as frequently, but we still recommend Apple’s USB-C to 3.5mm adapter for guaranteed compatibility. See our compatible adapters guide for the full tested list.
Can RECAP S2 record WhatsApp, Signal, and Zoom calls on iPhone?
Yes. Because RECAP captures audio from the headset connection, it works with any app that routes sound through wired headphones. This includes WhatsApp, Signal, Telegram, Zoom, Microsoft Teams, Skype, FaceTime, Google Meet, and standard carrier phone calls. Apple’s built-in recording, by contrast, only works with the Phone app and FaceTime — no third-party apps.
Can I automatically record every phone call on iPhone?
Not with any software-based method. Apple’s built-in recording requires a manual tap on every call. Third-party apps require a multi-step merge process each time. Google Voice requires pressing 4 during each call.
With RECAP S2, automatic recording is possible on the recording device side. RECAP continuously passes audio through whenever your headset is connected. If your recording device (a digital voice recorder, PC, or tablet) is set to record continuously or activated by voice detection, every call is captured without any manual action on your iPhone. See our full guide on how to automatically record every phone call for detailed setup instructions.
Can I record the call on the same iPhone I’m talking on?
No — your REC device has to be separate from your CALL phone. A single phone port can’t run RECAP’s headset path and a recording input at the same time, and phone “headphone” dongles capture mono, so you’d lose one side. Record on a separate computer, digital voice recorder, or a second phone with a stereo microphone input.
What recording software should I use with RECAP S2?
RECAP routes audio to any device with a microphone input. Popular options include:
On a second phone or tablet: Any voice recorder app — Voice Memos (iPhone), Easy Voice Recorder (Android), or similar.
Dedicated voice recorder: Sony, Olympus, and Zoom digital recorders all work. Many support voice-activated recording for hands-free operation.
Is it legal to record phone calls on iPhone?
Laws vary significantly by jurisdiction. In the United States, federal law permits one-party consent (you can record a call you are participating in without telling the other party). However, 12 states require all-party consent, meaning everyone on the call must know about and agree to the recording. These states are: California, Connecticut, Delaware, Florida, Illinois, Maryland, Massachusetts, Michigan, Montana, New Hampshire, Oregon, and Washington. Pennsylvania is also frequently classified as an all-party consent state. Outside the US, laws vary widely by country.
This is true regardless of which recording method you use. The recording tool does not change the law — your legal obligation is the same whether you use Apple’s built-in feature, an app, or RECAP.
How does RECAP S2 audio quality compare to iPhone built-in recording?
iPhone built-in recording produces good-quality audio saved in the Notes app. RECAP S2 captures a raw analog audio signal directly from the headset connection and sends it to your recording device. Because it captures the electrical signal rather than processing it through software layers, the output is typically cleaner and more consistent — especially for the caller’s voice. The final quality depends on your recording device and settings (sample rate, bit depth, format), giving you full control. For professional transcription, archiving, or evidence purposes, RECAP recordings tend to be superior.
Need reliable call recording on any iPhone, with any calling app, in any country?
Already have recordings? Try Recap — upload any audio file and get AI transcription with speaker labels, summaries, and full-text search. Free during early access.
How to Record Phone Calls to a Digital Voice Recorder in 2026
Most call recording guides assume you want an app or a computer. But a digital voice recorder paired with the right adapter is simpler, more portable, and more reliable for people who record phone calls regularly.
This guide covers every way to record phone calls to a voice recorder, which recorders work best, and how to set up voice-activated recording so you never miss a call.
All the Ways to Record Phone Calls
Before diving into voice recorders specifically, here is a quick overview of every method for recording phone calls — because the right approach depends on your situation.
Built-In Phone Recording
Some phones have native call recording. Google Pixel phones (Pixel 6 and later) support call recording directly in the Phone app. Samsung Galaxy phones with recent One UI versions offer it in some regions. On iPhone, Apple introduced call recording natively.
Pros: No extra hardware. Free. Cons: Limited availability by device and region. Recordings stored on the phone. Some implementations notify the other party automatically, which may not be desirable for all use cases.
Recording Apps
Third-party apps like Rev Call Recorder, TapeACall, or Cube ACR can record calls on both Android and iPhone.
Pros: Easy to install. Some offer transcription. Cons: Many require a monthly subscription. Call quality varies. Some route calls through a third-party server, raising privacy concerns. App-based recording has become increasingly restricted on both Android and iOS in recent years.
Recording to a Computer
You can record phone calls to a PC or Mac using the RECAP S2 adapter connected to software like Audacity or OBS. This gives you studio-level control over recording quality and format.
Pros: Full control over audio settings. Large storage capacity. Easy file management. Cons: Requires a computer and desk setup. Not portable.
Recording to a Digital Voice Recorder
This is the focus of this guide. A dedicated voice recorder paired with the RECAP S2 adapter gives you a portable, self-contained recording setup — no computer, no apps, no subscriptions. You plug in, make your call, and the recorder captures both sides of the conversation.
Pros: Extremely portable. Dedicated device — no crashes, no notifications. Battery lasts 20-100+ hours. Voice-activated recording means hands-free operation. Cons: Requires the RECAP S2 adapter ($99) and a wired headset. Modern phones without a 3.5mm jack need an adapter (see compatible adapters).
Why a voice recorder wins for many use cases: If you record calls away from a desk — in the car, in the field, at client sites — a voice recorder is the most reliable and portable option. The rest of this guide shows you exactly how to set it up.
Why Use a Voice Recorder Instead of a Computer?
Recording phone calls to a computer works when you are at a desk. But plenty of situations call for something more portable. Here is why a dedicated voice recorder makes sense:
Portability
A voice recorder fits in a shirt pocket. Combined with the RECAP S2 and a pair of earbuds, you have a complete call recording setup you can carry anywhere — in the car, out in the field, at a client site, or on the road between meetings. No laptop bag required.
Instant On
Voice recorders power up in seconds. There is no operating system to boot, no software to launch, no driver updates interrupting you mid-call. Slide a switch or press a button and you are recording.
Battery Life That Lasts
Modern voice recorders run for 20 to 100+ hours on a single charge or a pair of AAA batteries. Compare that to a laptop that might give you 6 to 8 hours on a good day. For people who record calls throughout a full workday or across multi-day trips, that battery life is a genuine advantage.
Dedicated Device
When you record on a computer, your recording software competes with everything else running on the machine — notifications, video calls, system updates. A voice recorder does one thing and does it well. It will not crash because your browser ran out of memory.
Voice-Activated Recording
Many voice recorders have a voice-activated recording mode (often called VOR or VAR). This means the recorder starts automatically when it detects audio and pauses when the line goes silent. Set it up once, and you get automatic recording of every call without pressing a single button. More on this below.
What You Need
The setup requires just a few pieces. No apps, no batteries to worry about (the recorder handles its own power), and no subscriptions:
Your phone (any cell phone or desk phone with a headset jack or adapter)
The RECAP S2 ($99) — connects between your phone and headset, outputs call audio to a recording device
A digital voice recorder with a 3.5mm stereo mic input (RECAP outputs your voice on one channel and the caller on the other, so a mono input collapses both into one)
Earbuds or a headset with a 3.5mm plug
That is the entire kit. The RECAP S2 requires no batteries or charging — it is powered passively by the audio signal. Everything except the phone fits in a pocket.
Important to know: The RECAP S2 requires a wired headset connection. If your phone does not have a 3.5mm headphone jack (most modern phones), you will need a compatible adapter. Our adapters guide covers which adapters work with which phones, including the difference between passive and active DAC adapters.
The RECAP S2 sits between your phone and your headset. It passes audio through to your earbuds so you hear the call normally, and simultaneously outputs that same audio through a separate cable that plugs into your recorder.
Step 2: Connect the Recorder
Take the RECAP S2 output cable (3.5mm) and plug it into the mic input on your voice recorder. Use the mic input, not the line input — RECAP is passive and draws its power from the recorder’s mic jack (sometimes called “plug-in power” in the recorder’s spec sheet).
Step 3: Configure the Recorder’s Input
This step is important. You need to tell the recorder to capture audio from its external input rather than its built-in microphone:
Navigate to the recorder’s input source or recording source setting
Select “External Mic”, “Mic In”, or “Line In” (the label varies by model)
If your recorder offers both mic and line input modes, start with mic mode — the RECAP S2 output level works well with mic-level inputs
If the recording sounds distorted or too loud, reduce the input level. If it sounds too quiet, increase the input level.
Step 4: Set Recording Quality
For phone call recordings, you do not need studio-quality settings. A good balance of audio clarity and file size:
Format: MP3
Bitrate: 128 kbps
Sample rate: 44.1 kHz
At 128 kbps MP3, a 4GB recorder holds roughly 60 hours of recordings. That is a lot of calls before you need to transfer files.
If you need higher fidelity for legal or compliance purposes, record in WAV format at 44.1 kHz / 16-bit. Files will be larger (about 10 MB per minute of stereo audio), but the quality will be lossless.
Step 5: Test Before Your First Real Call
Call a friend or your own voicemail. Verify that:
You can hear the call through your earbuds
The recorder captures both your voice and the other party
The volume levels are reasonable on playback
There is no distortion or clipping
Adjust input levels as needed, then you are ready to go.
Recommended Voice Recorders for Phone Call Recording
The critical spec to look for: a 3.5mm stereo mic input with plug-in power. Beyond that, choose based on battery life, storage, and whether you want voice-activated recording. Two reliable product lines that consistently meet these requirements:
Pocket-friendly form factor, long battery life, built-in USB on many models for direct file transfer. Sony refreshes the lineup periodically — any current ICD-series model with a 3.5mm stereo mic input works.
More feature-rich — higher bit-depth recording, doubles as a USB audio interface on several models, strong auto-level controls to prevent clipping. Good fit if you want flexibility beyond just phone calls.
A Few Notes on Choosing
If you want compact and simple, pick a current Sony ICD-series recorder. These are designed for portability — they slip into a shirt pocket, have long battery life, and many include a built-in USB plug so you can transfer files without a separate cable.
If you want more flexibility, pick a current Tascam DR-series recorder. These are slightly larger but offer richer features — higher bit-depth recording, USB-audio-interface modes, auto-level controls that help prevent clipping. Useful if you also want to record interviews, meetings, or audio beyond just phone calls.
Before buying, double-check the product’s spec sheet for a 3.5mm stereo mic input with plug-in power. Both are required for RECAP. Most current Sony ICD and Tascam DR models include both, but the specific feature set varies by SKU, so confirm before ordering.
Voice-Activated Recording: Record Every Call Automatically
Voice-activated recording is the feature that makes this setup truly hands-free. Here is how to configure it.
Many recorders label this feature VOR (Voice-Operated Recording) or VAR (Voice-Activated Recording). Find it in your recorder’s settings menu and turn it on.
Note: Not all recorders include VOR. Most current Sony ICD and Tascam DR models support it, but the specific feature set varies by SKU — check the spec sheet before buying if VOR is essential to your workflow.
Set the Sensitivity
The recorder’s sensitivity threshold determines how loud the audio needs to be before recording starts. You want it sensitive enough to trigger on call audio coming through the RECAP S2, but not so sensitive that room noise starts and stops the recording constantly.
Start with a medium sensitivity setting
Make a test call and check if the recorder starts and stops reliably
If it misses the beginning of sentences, increase sensitivity
If it triggers on background noise when no one is talking, decrease sensitivity
How It Works in Practice
With voice-activated recording configured:
You plug in the RECAP S2 and put your earbuds in
The recorder sits in your pocket or on the desk, powered on and in VOR mode
When a call comes in and audio flows, the recorder starts capturing automatically
When the call ends and audio stops, the recorder pauses
The next call triggers a new recording (or continues the same file, depending on your recorder’s settings)
No buttons to press. No “I forgot to hit record.” Every call gets captured.
Transferring and Organizing Recordings
After a day of recording calls, you will want to get those files off the recorder and organized.
Transfer via USB
Most voice recorders connect to a PC or Mac via USB (micro-USB, USB-C, or a built-in USB connector). The recorder appears as a removable drive, and you can copy files directly.
File Naming
Recorders typically name files sequentially (e.g., VOICE001.mp3, VOICE002.mp3). After transferring, rename files with useful information:
2026-01-15_john-smith_contract-review.mp3
2026-01-15_client-call_support-issue-4821.mp3
A consistent naming convention saves time when you need to find a specific call later.
Backup Strategy
Do not rely on the recorder as your only copy. After transferring files:
Keep a local folder on your computer organized by date or client
Back up to cloud storage (Google Drive, Dropbox, OneDrive) for redundancy
Delete files from the recorder once confirmed on your computer to free up space
Transcription
Once your recordings are on your computer as MP3 or WAV files, you can run them through any transcription service — Google Docs voice typing, Otter.ai, or desktop transcription software. Having both the audio file and a text transcript is useful for reference, searchability, and compliance.
The Portable Field Setup
One of the biggest advantages of recording to a voice recorder is how portable the entire setup becomes. Here is what the pocket-sized field kit looks like:
Phone — in your hand or pocket as usual
RECAP S2 — clips to a pocket or sits in a bag
Voice recorder — in a pocket, set to voice-activated mode
Earbuds — in your ears
That is it. No laptop, no power outlet, no desk. Everything travels with you. No apps to install, no batteries to charge for the RECAP S2 (it draws power from the audio signal), and no subscriptions eating into your budget month after month.
This setup is particularly valuable for:
Journalists conducting phone interviews in the field
Investigators who need reliable call documentation away from the office
Sales reps recording client calls from the car between appointments
Insurance adjusters documenting claims calls on location
Legal professionals capturing witness or client conversations on the go
The entire kit weighs a few ounces and records for hours on a single charge.
Legal Considerations
Before you start recording, know the laws in your jurisdiction. Recording laws vary by state and country:
Some jurisdictions require one-party consent (only you need to know about the recording)
Others require all-party consent (everyone on the call must be informed)
Always check your local laws before recording phone calls.
Frequently Asked Questions
Can I use any voice recorder with the RECAP S2?
It needs a 3.5mm stereo mic input with plug-in power. The stereo part matters because RECAP outputs your voice on one channel and the caller on the other; a mono input collapses both into one. Plug-in power matters because RECAP is passive and draws its power from the recorder’s mic jack. Most current consumer voice recorders include both, but check the spec sheet before buying.
Will the other person hear any difference on the call?
No. The RECAP S2 passes audio through to your earbuds without affecting call quality. The other party will not know a recorder is connected.
What if my voice recorder does not have voice-activated recording?
You can still use it — you will just need to manually press record when a call starts and stop when it ends. If automatic recording is important to you, look for a recorder that lists VOR or VAR mode in its spec sheet.
How much recording time do I get?
It depends on the recorder’s storage and your quality settings. At 128 kbps MP3, expect roughly 15 hours of recording per gigabyte. A recorder with 4GB of internal storage holds about 60 hours. With a 32GB microSD card, you are looking at 480+ hours — more than most people will ever need between transfers.
Do I need a computer at all?
Not for recording. The RECAP S2 and a voice recorder handle everything independently. You will only need a computer when you want to transfer files off the recorder, back them up, or run transcription software. The recording itself is completely computer-free.
Get Started
The RECAP S2 adapter is $99 and works with any phone and any recording device with a 3.5mm input. Pair it with a voice recorder and you have a simple, portable call recording setup that works anywhere — no computer, no software, no subscriptions.




 “.get_post(2271)->post_content.”@@E@@”;’ –skip-themes –skip-plugins
==================================================
⚠️ SSH_AUTH_SOCK is set but the agent is unreachable — falling back to an on-disk key
🔌 Connecting to u765740122@217.196.55.96:65002
🔑 Using SSH key: /Users/igor/.ssh/id_rsa_mc
✅ Connected to Hostinger Business Hosting as u765740122
@@B@@
“.get_post(2271)->post_content.”@@E@@”;’ –skip-themes –skip-plugins
==================================================
⚠️ SSH_AUTH_SOCK is set but the agent is unreachable — falling back to an on-disk key
🔌 Connecting to u765740122@217.196.55.96:65002
🔑 Using SSH key: /Users/igor/.ssh/id_rsa_mc
✅ Connected to Hostinger Business Hosting as u765740122
@@B@@